
PROVOZNÍ NÁVOD
1. POPIS
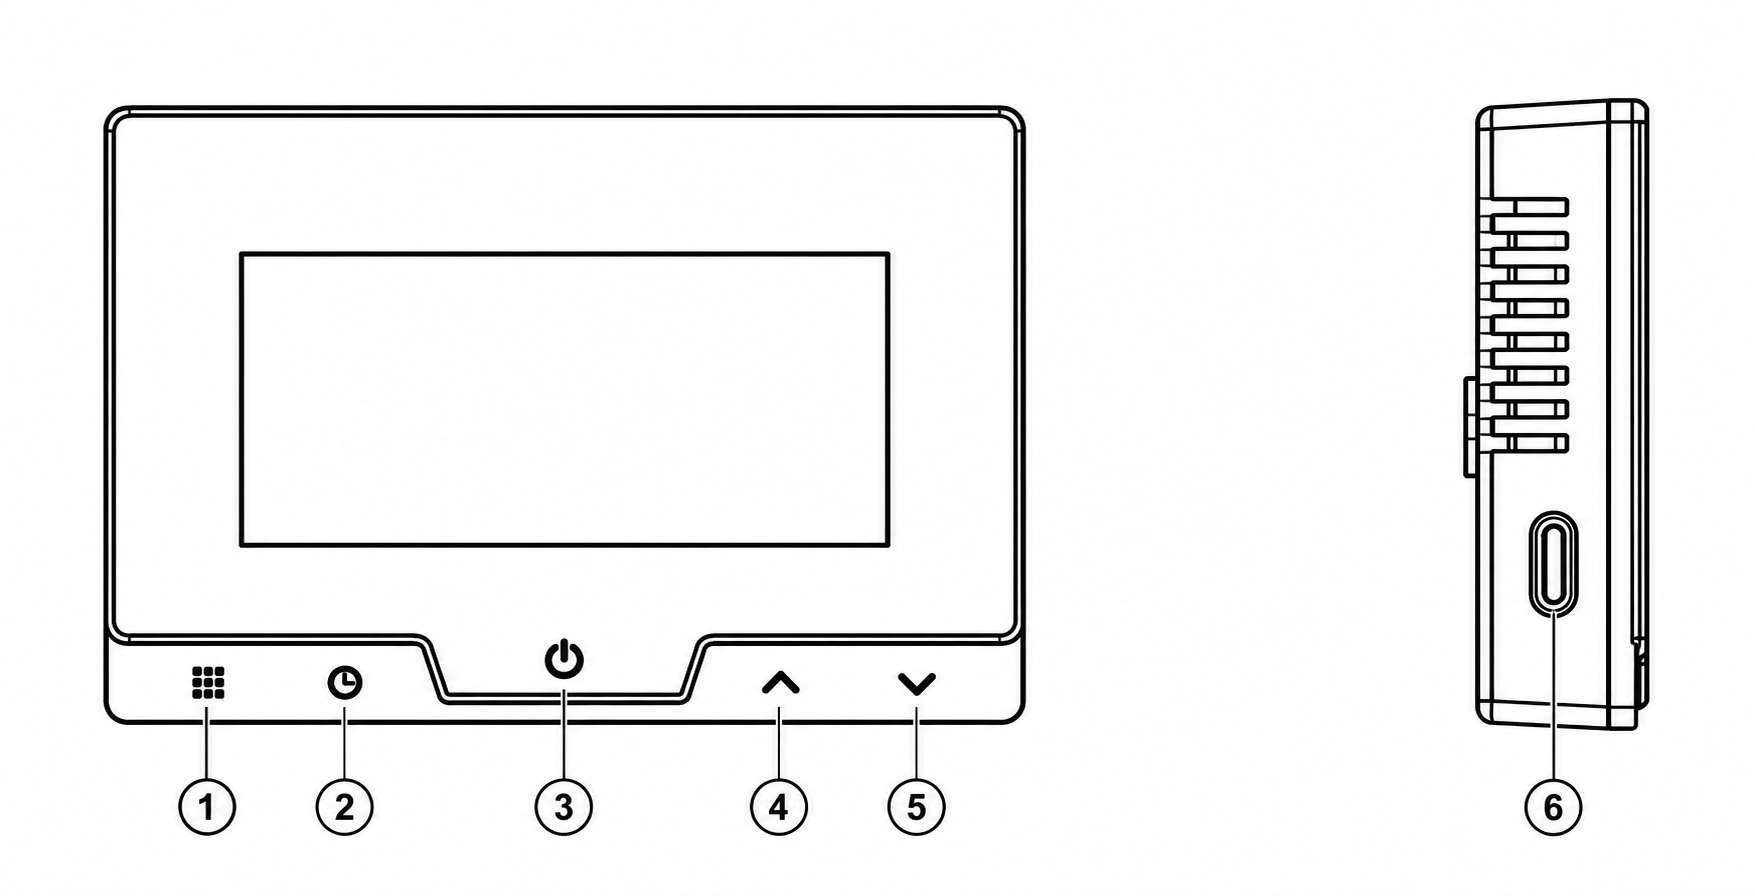 |
| Žádný. | Jméno | Popis |
| 1 | Menu | Přepíná mezi programovaným provozem a manuálním/dočasným režimem pozastavení. Stiskněte a podržte déle než 3 sekundy pro vstup do nastavení topného programu. |
| 2 | Čas | Zobrazuje a upravuje nastavení data a času. Stisknutím a podržením po dobu přibližně 3 sekund přejdete do režimu nastavení času. |
| 3 | Napájení / Potvrzení | Zapíná/vypíná termostat a potvrzuje nastavení. Používá se také k ukončení nabídek nastavení. |
| 4 | Nahoru ▲ | Zvyšuje nastavenou teplotu nebo hodnotu vybraného parametru. |
| 5 | Dolů ▼ | Snižuje nastavenou teplotu nebo hodnotu vybraného parametru. |
| 6 | Probuzení | Aktivuje displej/podsvícení, když je termostat v úsporném režimu nebo v pohotovostním režimu. |
| Jméno | Popis |
1. Nabídka |
Krátké stisknutí: přepíná termostat mezi programovaným provozem a manuální/dočasnou regulací teploty. Stisknutí a podržení po dobu delší než 3 sekundy: vstup do nastavení topného programu. Hodnoty v rámci nastavení se upravují pomocí tlačítek 4 ▲ a 5 ▼ . |
2. Nastavení času |
Krátké stisknutí: přepíná zobrazení mezi údaji o čase/teplotě. Press and hold for about 3 seconds: enters the date and time settings. Use 4 ▲ and 5 ▼ to change values and 3 to confirm. |
3. Power / Confirm |
Used as the main power and confirmation button. In setting modes, a short press means Confirm / Exit. In normal operation, the button is used to turn the thermostat on and off. It can also be used to wake the thermostat from power-saving mode. |
4. Up ▲ |
Increases the set temperature or the selected parameter value. It is also used when setting the time, heating schedule, and system parameters. |
5. Down ▼ |
Decreases the set temperature or the selected parameter value. |
6. Wake-up |
The side button is used to activate the display after the thermostat enters power-saving mode. In the manual, it is specifically identified as the Wake-up button. |
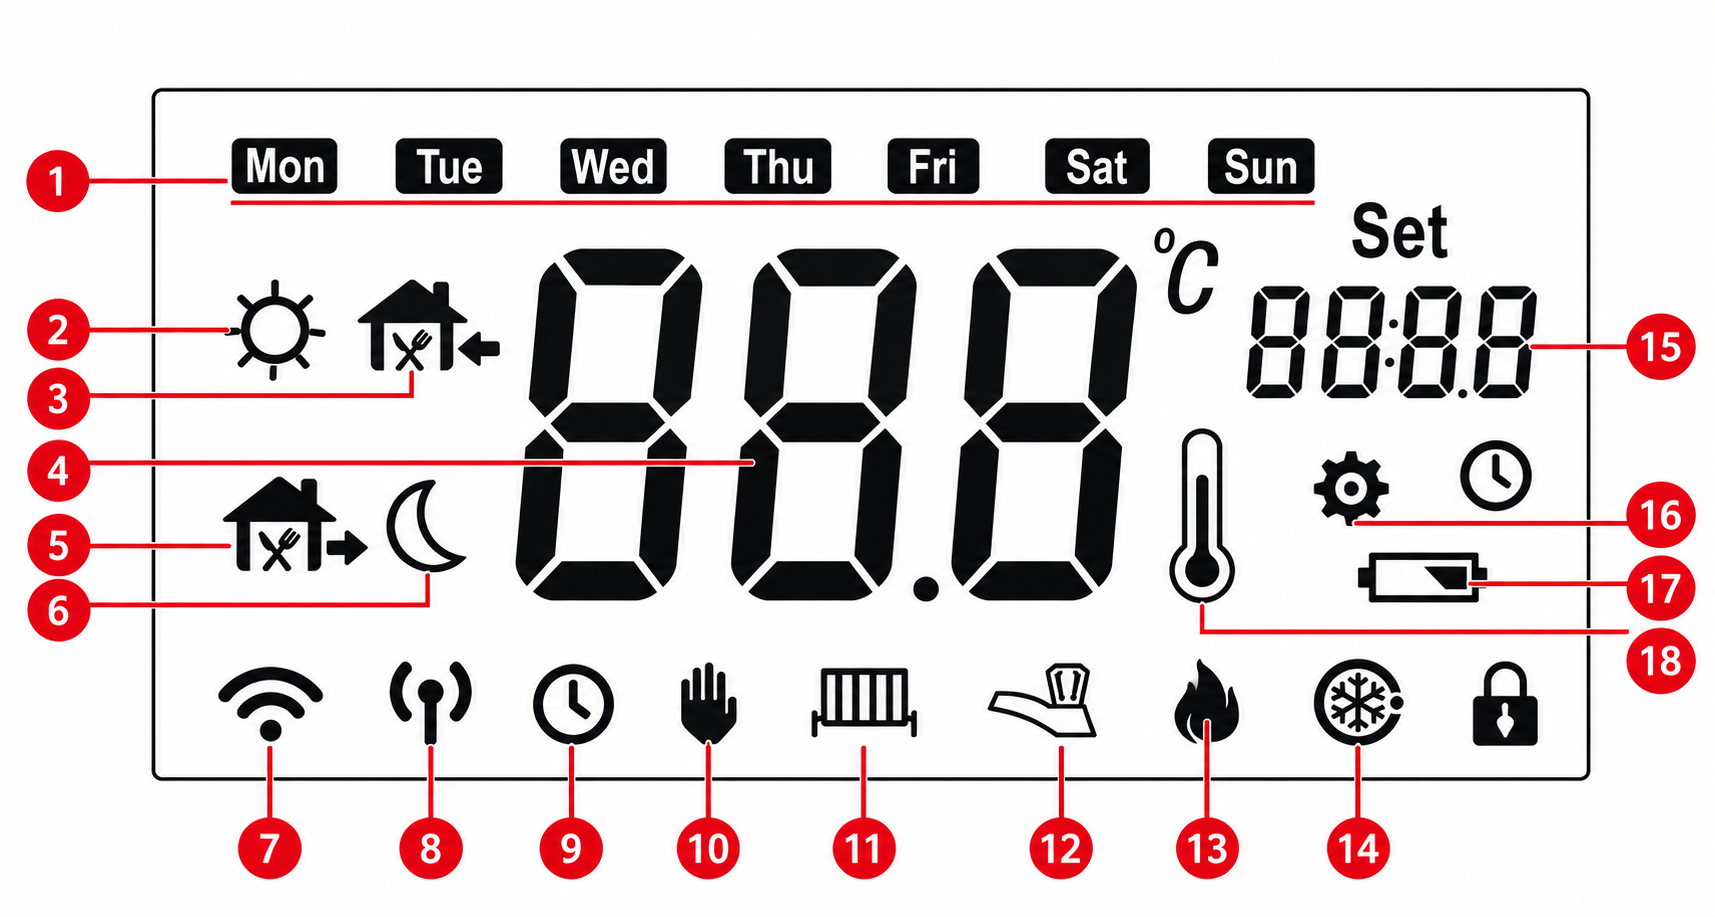 |
1. Week shows |
| 2. Time Bucket flag-Wake up | |
| 3. Time Bucket flag-Back home | |
| 4. OFF\ Temperature shows | |
| 5. Time Bucket flag-Out home | |
| 6. Time Bucket flag-Sleep | |
| 7. Communication show (blinking indicates communication error alarm) | |
| 8. Alternate button | |
| 9. Time shows, Running mode shows | |
| 10. Forever keeping mode shows | |
| 11. Alternate button | |
| 12. Alternate button | |
| 13. Output shows | |
| 14. Anti-freezing mode shows | |
| 15. Setting Time\ Temperature shows | |
| 16. Setting shows (Parameters, programming, time) | |
| 17. Low battery indicator shows | |
| 18. Meterage shows |
Brief Operating Instructions
Power On
If the thermostat is switched off, press 3 – Power.
After switching on, the display shows the current room temperature, set temperature, time, operating mode, and additional indicators. The manual provides indicators for programming, heating output, communication, anti-freeze protection, and low battery status.
Temperature Setting
Use:
4 ▲ – increase the temperature;
5 ▼ – decrease the temperature.
The thermostat temperature setting range is 5–35°C, with a setting accuracy of 0.5°C.
Manual and Programmed Mode
Short press 1 – Menu to switch between manual control and programmed operation. In programmed mode, the thermostat automatically changes the set temperature during the day. The factory program includes six periods:
|
Period |
Time |
Temperature |
|
Wake up |
06:00 |
20°C |
|
Out |
08:00 |
16°C |
|
Back home |
11:00 |
20°C |
|
Out |
14:00 |
16°C |
|
Back home |
18:00 |
20°C |
|
Sleep |
22:00 |
16°C |
Editing the Heating Schedule
Press and hold 1 – Menu for more than 3 seconds.
Then use:
4 ▲ / 5 ▼ – select and change time/temperature;
1 Menu – move to the next parameter/period;
3 Power/Confirm – save settings and exit.
The thermostat allows common or separate programming for different days of the week. The settings allow you to select 4 or 6 temperature periods per day.
Date and Time Setting
Press and hold 2 – Time for approximately 3 seconds.
Use 4 ▲ / 5 ▼ to change the date and time. Button 2 is used to move between parameters, and 3 – Power/Confirm is used to confirm and exit.
Advanced Settings
In standby mode, press and hold 1 – Menu for more than 3 seconds to open the configuration menu. Values are changed using ▲/▼. Press Menu again to move to the next item, and press Power to confirm the settings. If no button is pressed for approximately 10 seconds, the thermostat automatically exits the menu.
|
Parameter |
Function |
Range / Options |
|
CL |
Temperature display calibration |
-4…+4°C |
|
AH |
Maximum allowed temperature |
20-35°C |
|
AL |
Minimum allowed temperature |
5-20°C |
|
bL |
Display-on time |
5 / 10 / 15 sec / --- |
|
db |
Heating differential |
0.5-3°C |
|
Pro |
Weekly program |
ON / OFF |
|
Seg |
Number of periods |
4 / 6 |
|
ES |
Intelligent function |
ON / OFF |
|
PP |
Anti-freeze function |
ON / OFF |
Open Window Detection
The thermostat monitors rapid temperature drops. If the room temperature drops by approximately 1.5°C within 3 minutes, the thermostat detects this as an open window and temporarily stops heating. Normal operation is restored when any button is pressed, when the temperature rises by approximately 1.5°C, or automatically after 30 minutes.
Anti-freeze Protection
Even when the thermostat is switched off, it can still protect the room against freezing: if the temperature falls below 5°C, heating starts, and when the temperature rises above 8°C, heating stops.
Low Battery Indication
When the battery voltage drops below approximately 2.3 V, the low-battery indicator starts flashing on the display.
2. TECHNICAL CHARACTERISTICS
WiFi Frequency: 2.4 GHz
Network Protocol: IEEE802.11 b/g/n
Frequency range: 2.412- 2.484 GHz
Output: 1 channel passive linkage output (10A)
Frequency: 868 MHz (Bidirectional FSK)
Working Range: 100 m
Communicaon protocol: TCP/IP, MQTT
Temperature setting range: 5℃~35℃
Temperature setting accuracy: 0.5℃
Working Temperature: 0°C~50°C
Water resistance: IP21
Power Input: 100-240 V (AC), 50/60 Hz
Power Input (thermostat): 4 AAA batteries / USB-A (5V, 1A)
GATEWAY & RECEIVER:
WiFi Frequency: 2.4 GHz
Network Protocol: IEEE802.11 b/g/n
Frequency range: 2.412GHz- 2.484GHz
Output: 1 channel passive linkage output (10A)
Frequency: 868MHz(Bidirectional FSK)
Working Range: 100m
Communicaon protocol: TCP/IP, MQTT
Working Temperature: 0°C~50°C
Water resistance: IP21
Power Input: 100-240VAC 50/60Hz
Thermostat:
Output: 1 channel passive linkage output (8A)
Frequency: 868MHz (Bidirectional FSK)
Working Range: 100m
Working Temperature: 0°C~50°C
Water resistance: IP21
Power Input: 4 AAA batteries / USB power supply (5V, 1A)
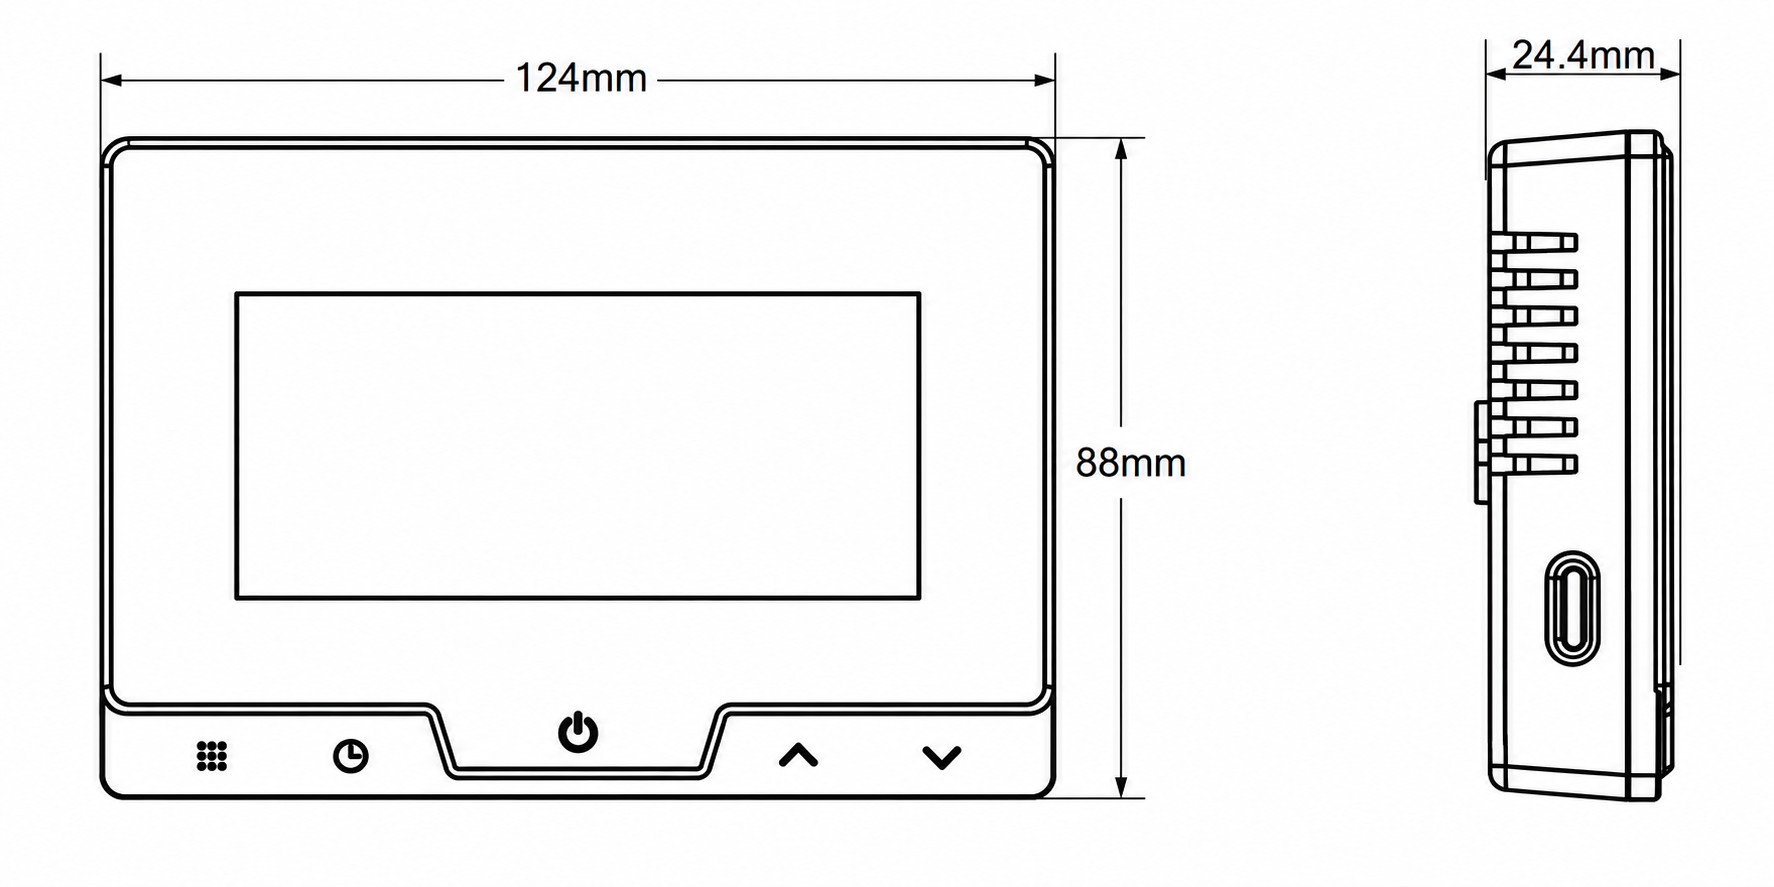 |
3. SAFETY AND PRECAUTIONARY MEASURES
- Please read this manual carefully.
- Use the product within the temperature and humidity limits specified in the technical data sheet.
- Neinstalujte výrobek v blízkosti zdrojů tepla, jako jsou radiátory atd.
- Nedovolte, aby zařízení spadlo nebo bylo vystaveno mechanickému namáhání.
- K čištění výrobku nepoužívejte chemicky aktivní ani abrazivní čisticí prostředky. Použijte místo toho vlhký flanelový hadřík.
- Nepřekračujte specifikovaný jmenovitý výkon. Může dojít ke zkratu a úrazu elektrickým proudem.
- Nerozebírejte výrobek sami - diagnostiku a opravy zařízení by měly provádět pouze certifikované servisní středisko.
4. PŘIPOJENÍ
Pro připojení zařízení Nous potřebujete chytrý telefon s operačním systémem Android nebo iOS s nainstalovanou aplikací Nous Smart Home. Tato mobilní aplikace je zdarma a je k dispozici ke stažení z Play Marketu a App Storu. QR kód aplikace je uveden níže:
 |
Naskenujte QR kód
Důležité: Ujistěte se, že je síť Wi-Fi stabilní a má dostatečný signál ve zvoleném místě instalace. Síla signálu bude přímo ovlivňovat provoz termostatu, proto se prosím ujistěte, že je místo instalace termostatu pokryto sítí Wi-Fi a má dobrý signál.
5. INSTALACE
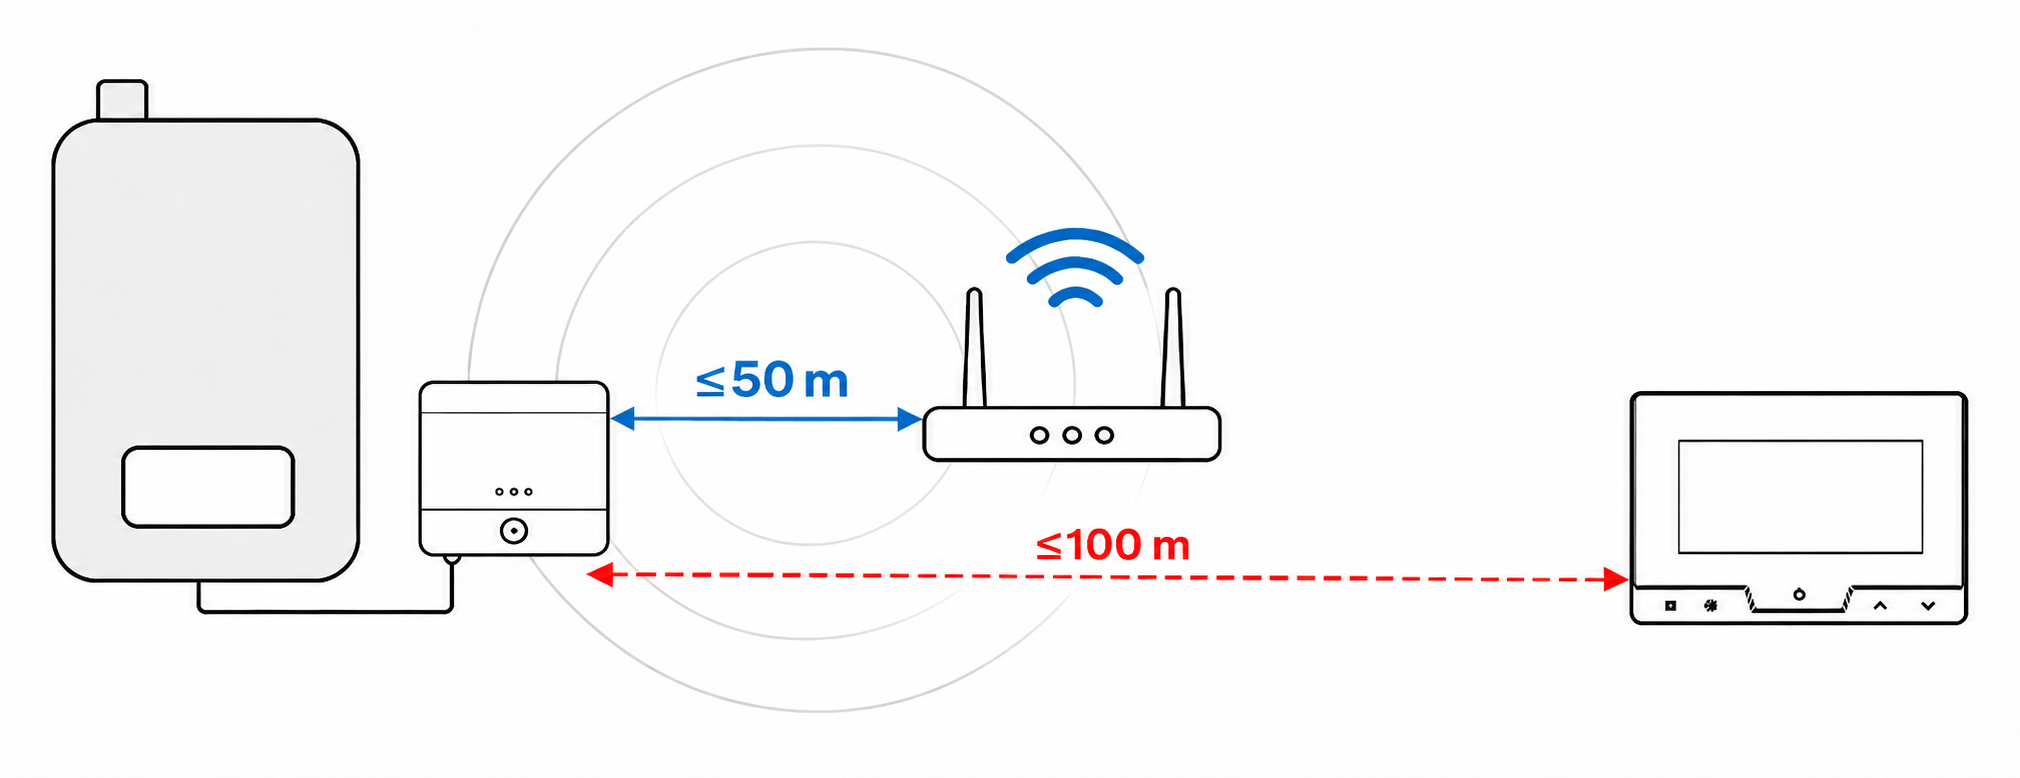
PLÁN A
Pokud je Wi-Fi pokryta signálem kotle, je nutné přijímač nainstalovat v oblasti signálu kotle, vysílač lze umístit
kamkoli chcete.
 |
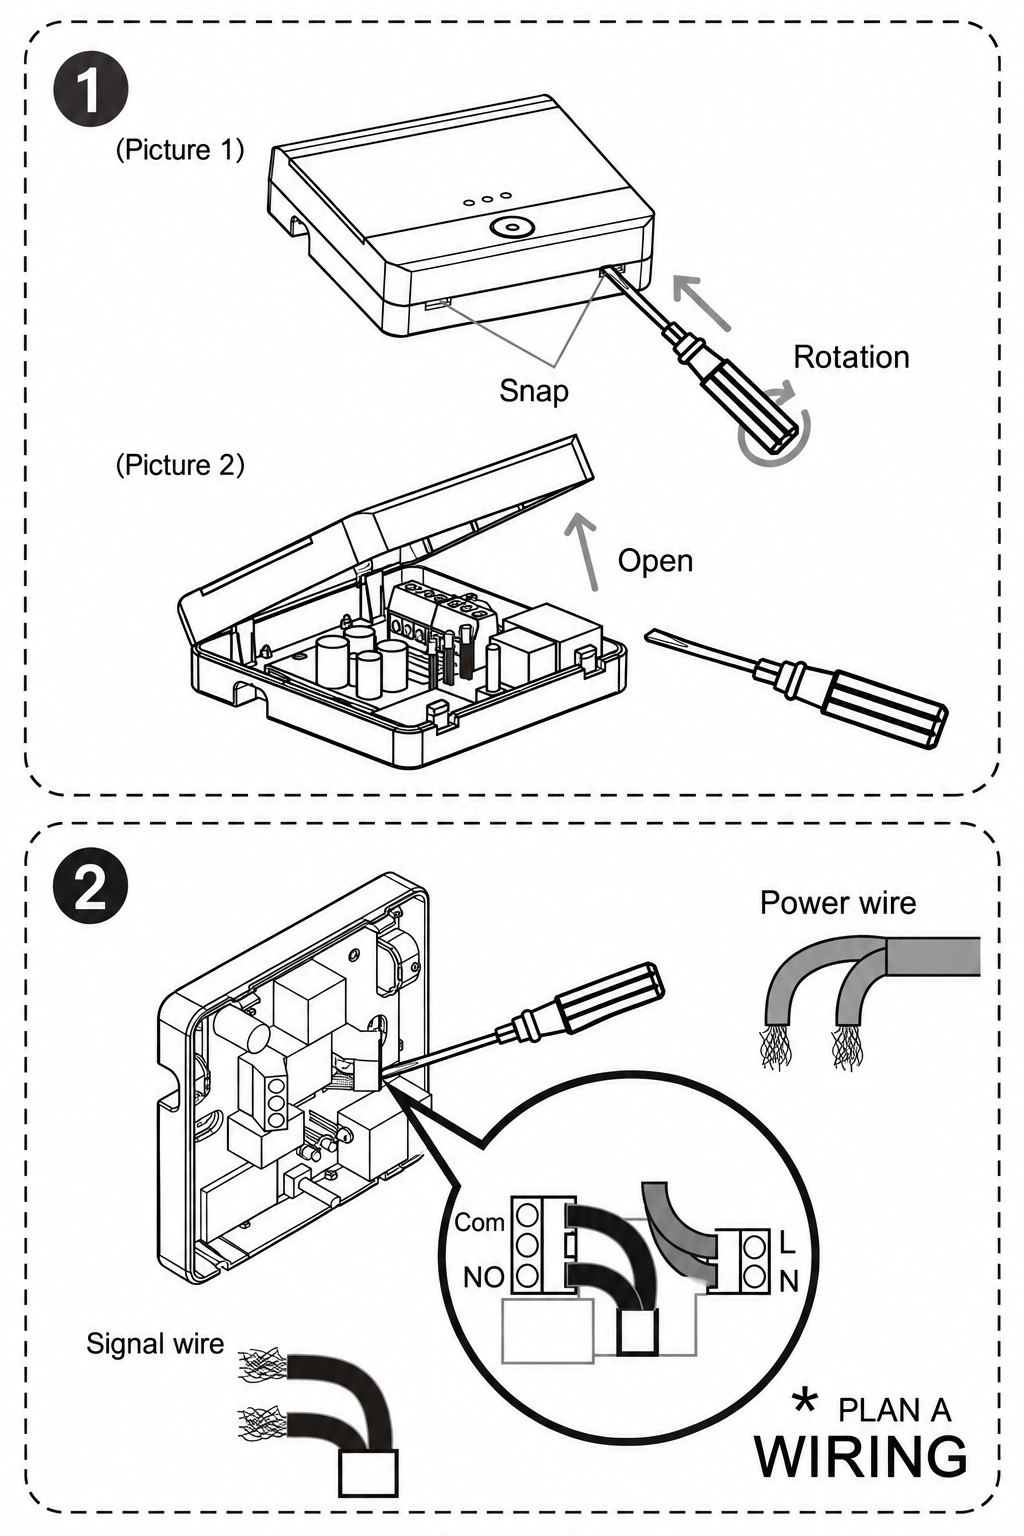 |
|
|
2. Zapojení: Vložte vodič do svorky a poté |
PLÁN B
Pokud Wi-Fi není pokryta signálem kotle,
musí být vysílač instalován v oblasti signálu kotle a přijímač v oblasti pokrytí Wi-Fi.
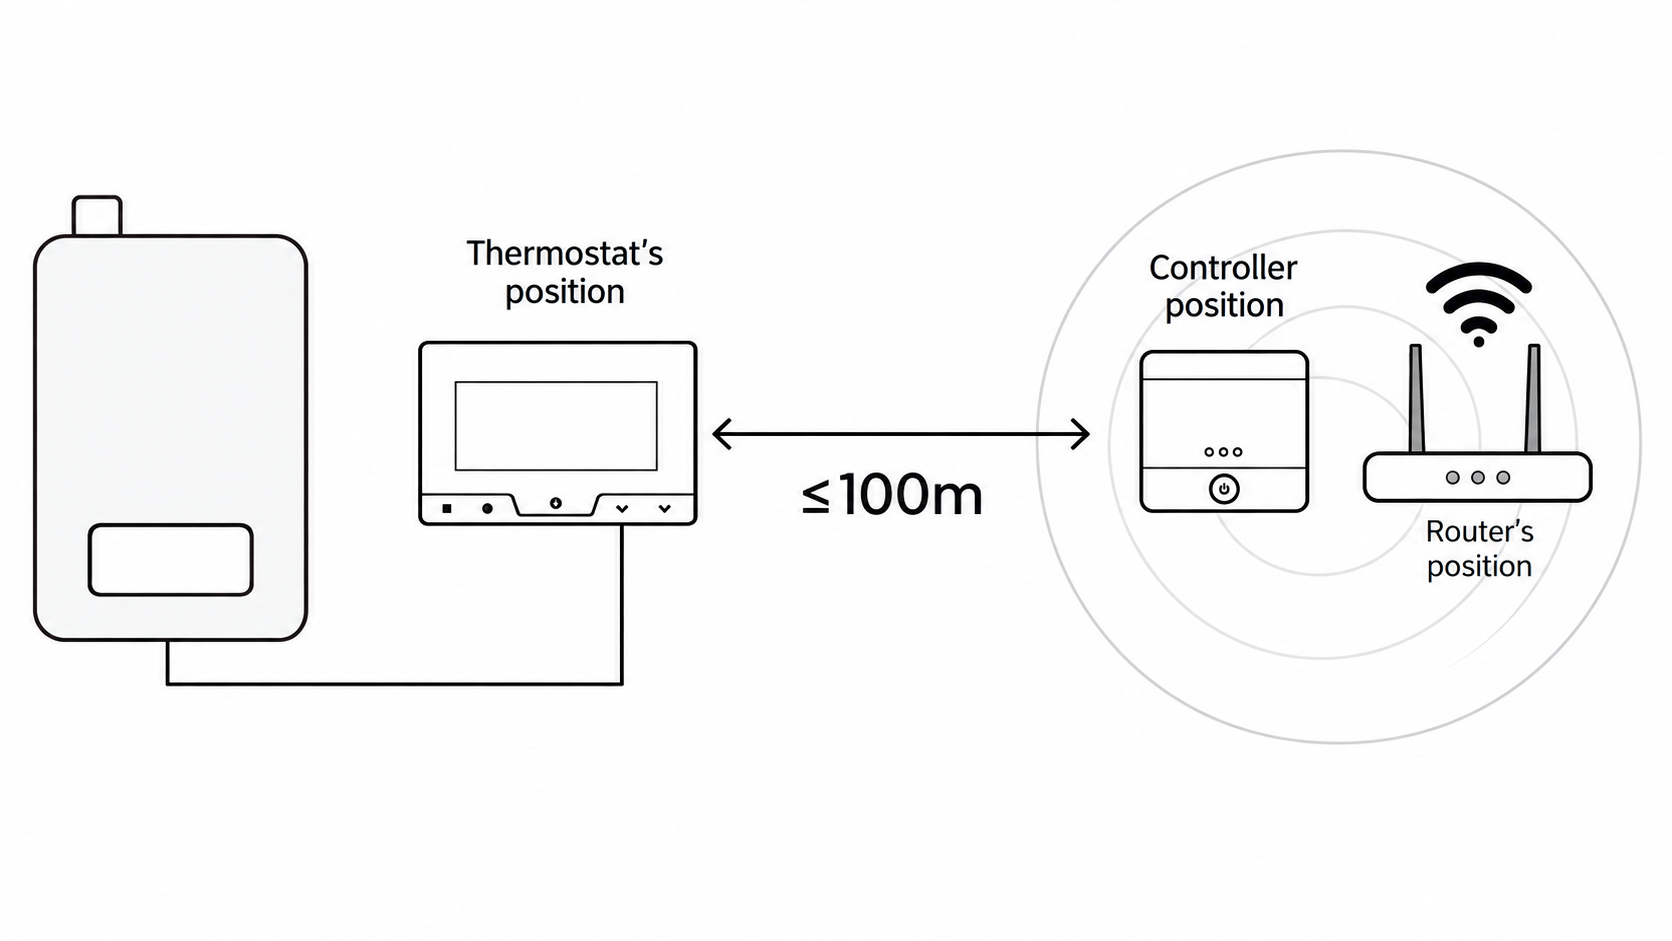 |
|
|
1. Sejměte bezpečnostní kryt |
| 2. Zapojení kabeláže | |
| 3. Nainstalujte bezpečnostní kryt a proveďte ochranu |
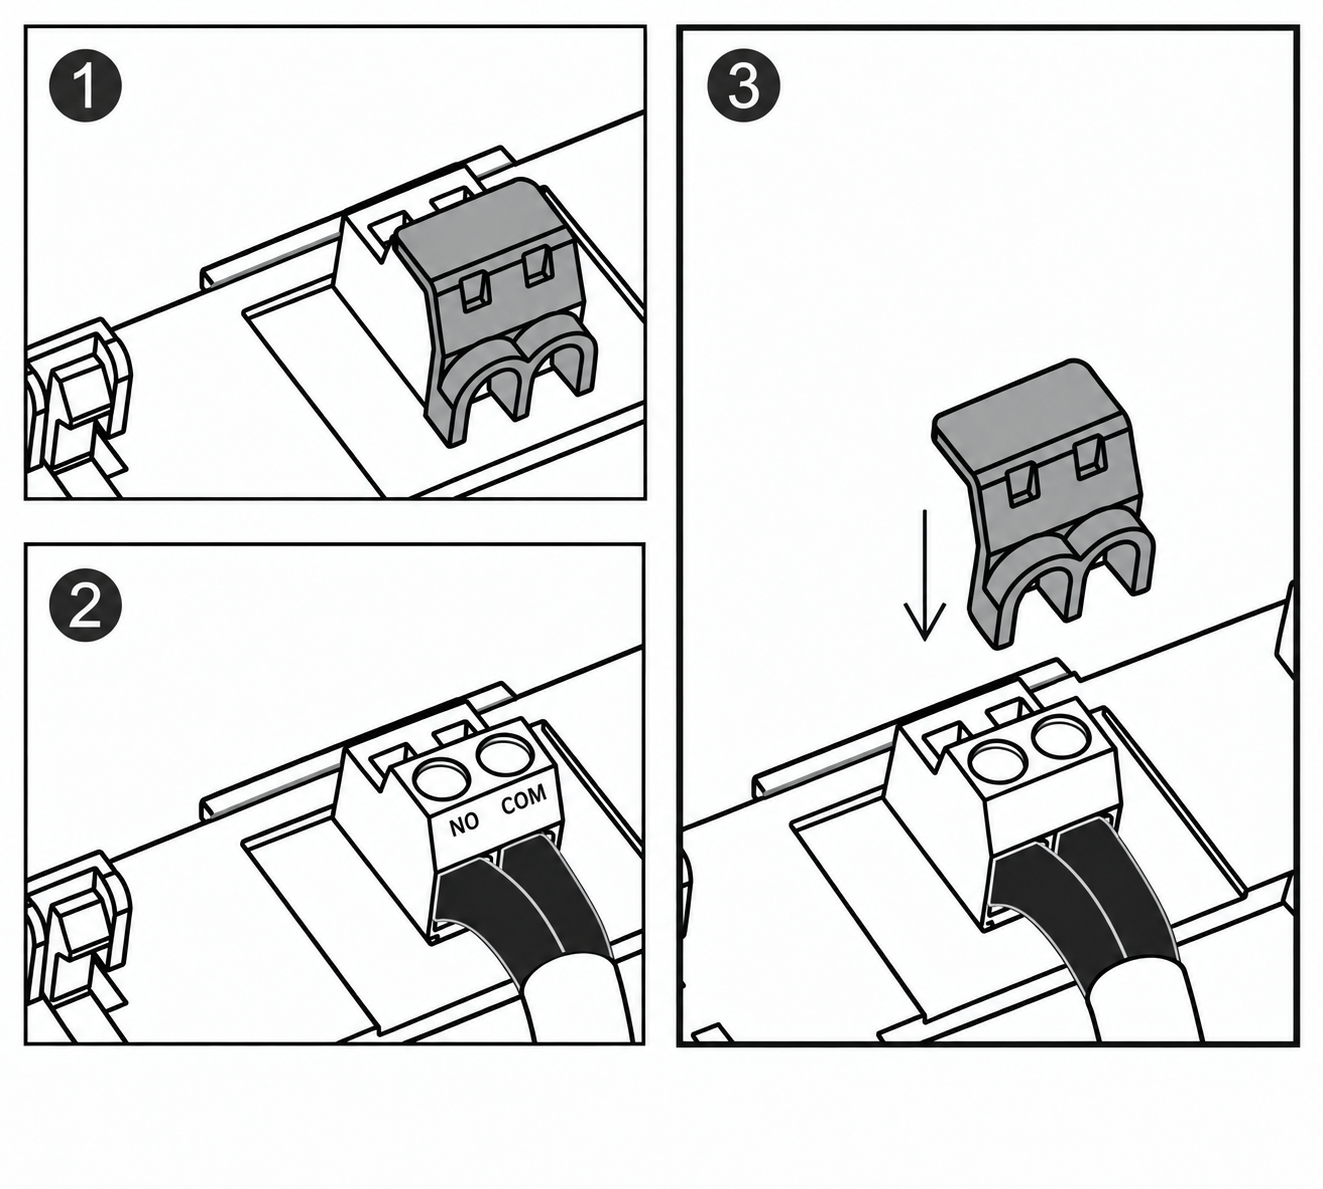
SCHÉMA ZAPOJENÍ (A/B - PLÁN)
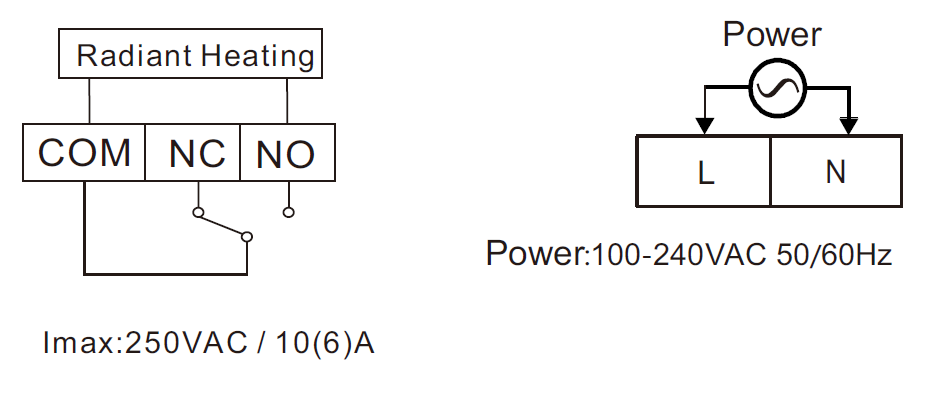 |
Instalace termostatu
Na zdi
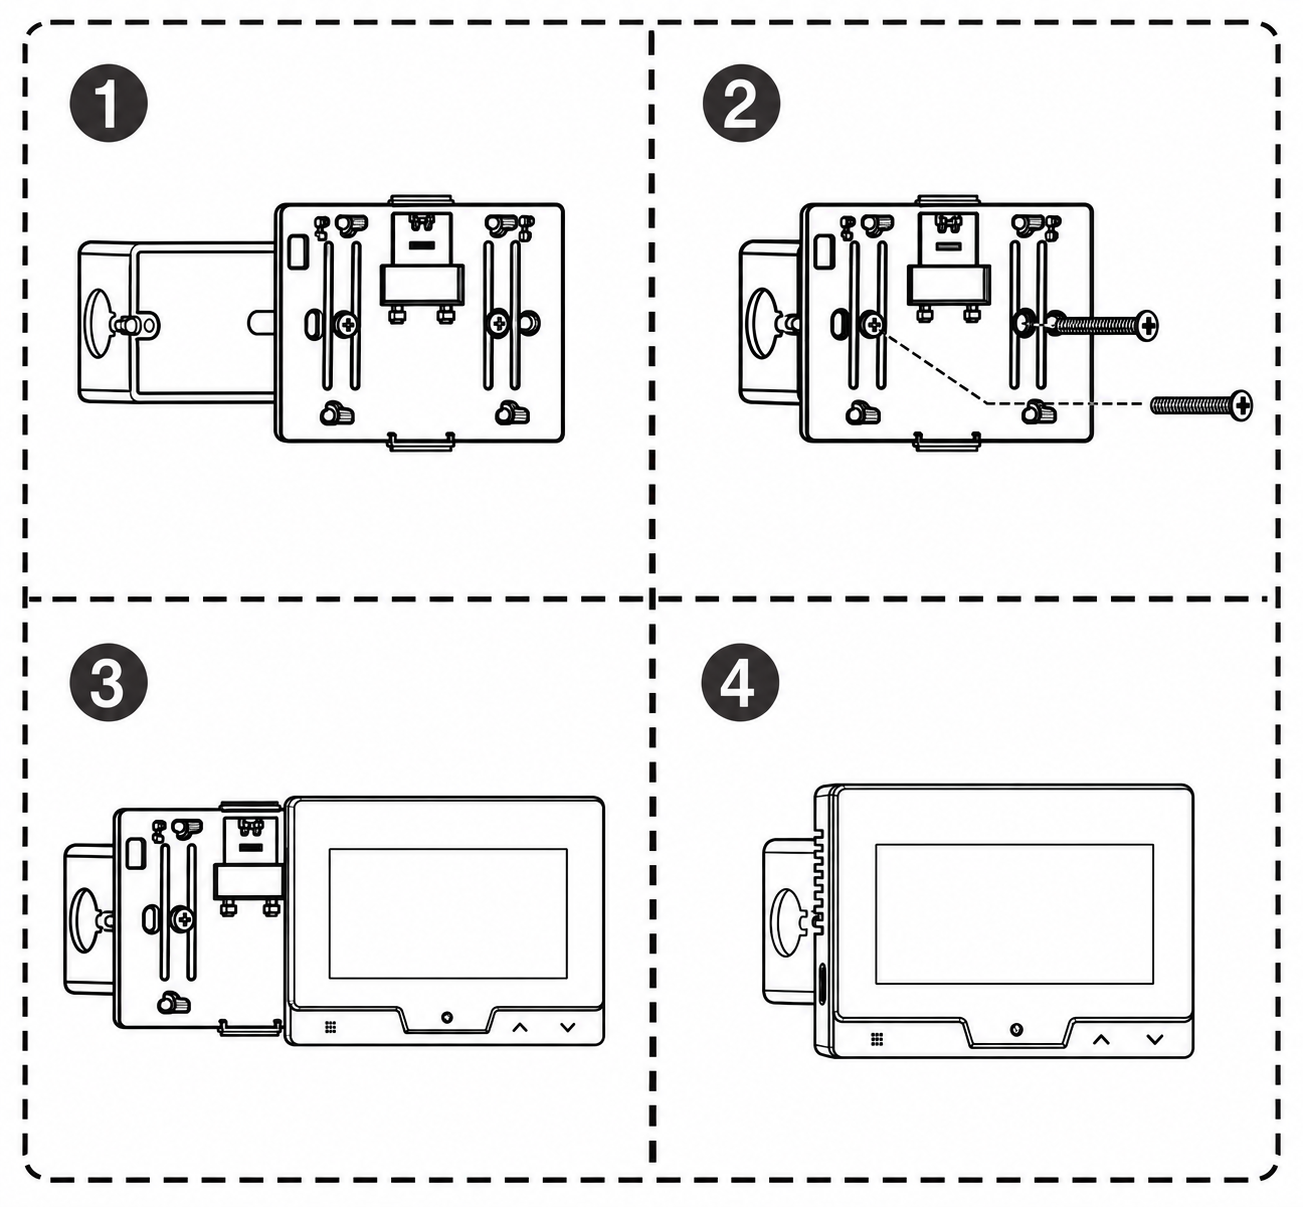 |
1. Nasaďte zadní desku na instalační krabici |
|
2. Vložte šroub do otvoru a zašroubujte jej |
|
|
3. Zakryjte panel |
|
|
4. Dokončení instalace |
Na stole
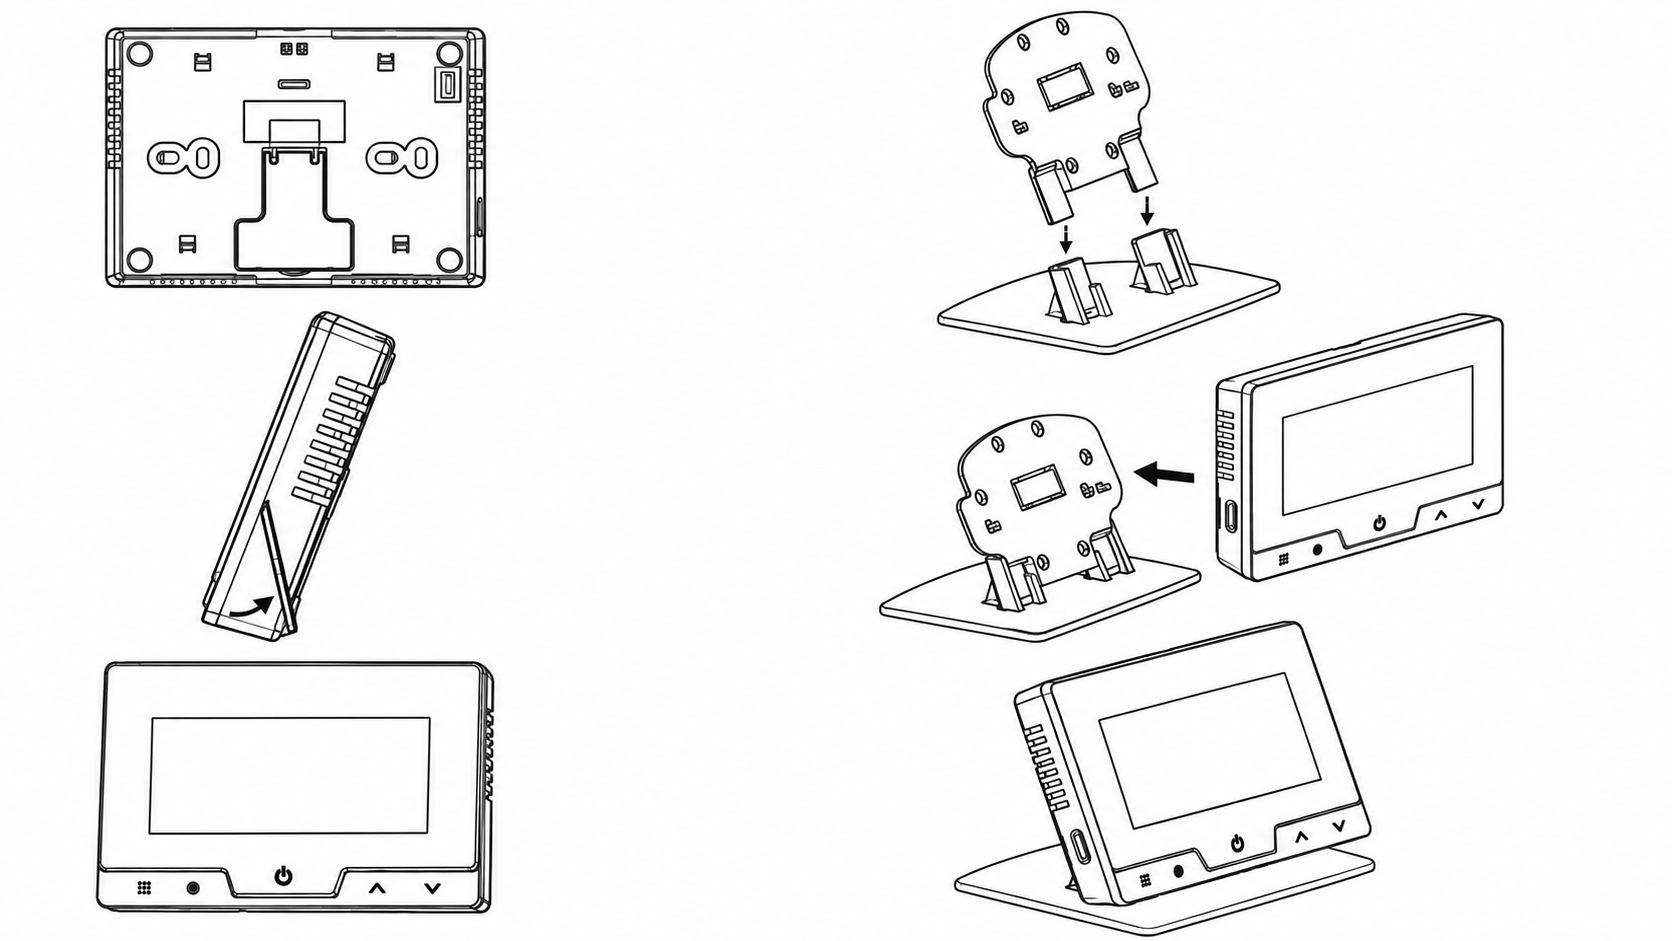 |