
USER MANUAL
Smart ZigBee Bulb P3Z
You will need the Nous Smart Home app. Scan the QR code or download it directly

Register with your mobile number/email, then login
*and you will need Nous E1, Nous E7 or other Tuya compatible ZigBee gateway/hub
- Turn on the device (your ZigBee hub should already be connected to the app)
- Make sure the light is blinking fast (if not, power off - turn on - turn off - turn on - turn off - turn on and wait until it starts blinking fast)
- Turn on Bluetooth and location on your phone (temporarily)
- Open the Nose Smart app
- Click + and add a device
- An autoscan will appear, prompting you to add a new device.
- Confirm connection and start pairing
- Once pairing is complete, you can rename your device if you like and it's ready to use.
- If autoscan does not see your device, you can select it manually from the list of devices and continue to connect from step 7.
autoscan connection or manual connection

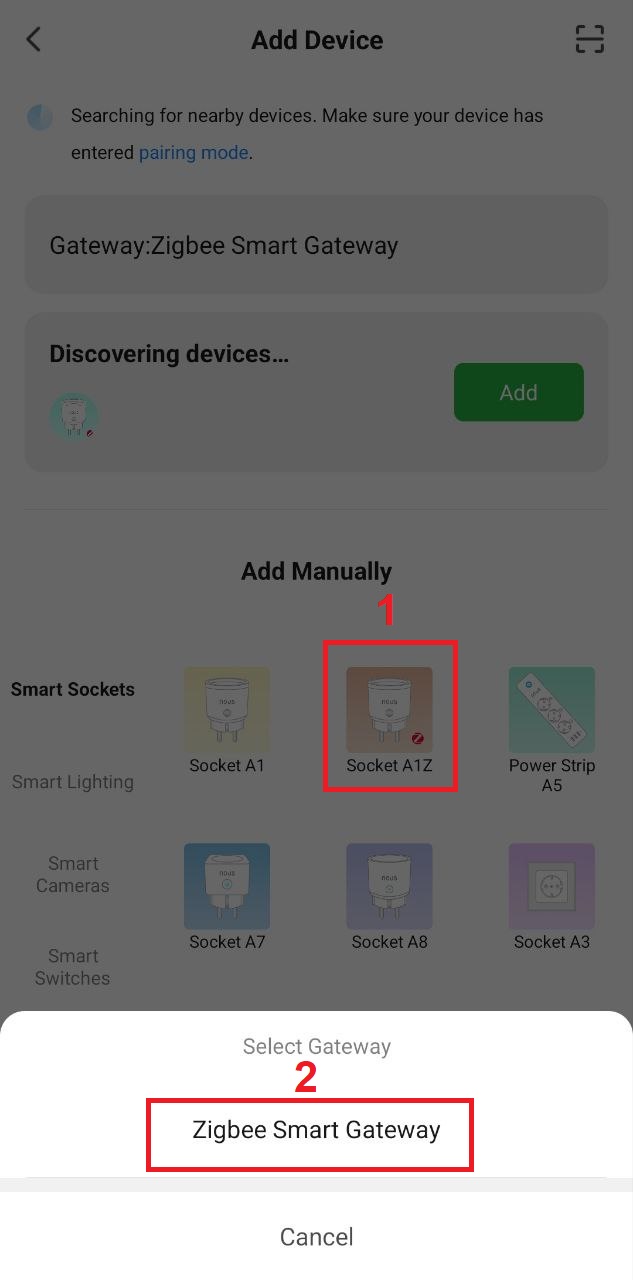
connection with zigbee hub

Note. The device name will also be used by Amazon Alexa and Google Home.
Create a group
All you have to do is go to the settings of one of the bulbs, click "create group" and then select the bulbs you want to include in that group.
Give this group a name you like, and after that it will appear in your panel as a new device.
Now you can go to this new group and control these bulbs as one device and the music will also work for all of them ;)
Using the Amazon Echo Quick Start Guide
What you will need...
Amazon Alexa APP and account
NOUS Smart Home APP and account (Users need to register their own account by selecting the US region)
Echo, Echo Dot, Tap or other Amazon voice devices.
Tip: Rename the device after successful setup. In the name of the device, it is recommended to use an easy pronunciation of English words.
(Amazon Echo temporarily supports English only)
Set up your echo speaker with the Alexa app
- Log in with your Alexa account and password (if you are not already registered, please
register first); After logging in, click the menu in the top left corner, then
click "Settings" and select "Set up a new device"; - Select a device (for example, Echo). When the desired
page appears, press and hold the small dot on
the Echo until the indicator turns yellow.
Then click "Continue" in the app. - Select custom WIFI and wait a few minutes.
- After the introductory video, click "Next Step" and it will automatically go to the
"Home" page. The Echo is now successfully connected to
the Alexa app via WiFi.
Turn on our skill in the Alexa app
- Select "Skills" in the options bar, and then search for
"NOUS Smart Home" in the search bar; In the search results, select NOUS Smart Home, and then click Enable. - Input the user name and password that you had previously registered (Only support the account in the United States); When you see the right page, it means the Alexa account is linked with NOUS Smart Home account.
Control device by Voice
After the previous operation, you can control the device via Echo.
- Discovering devices: Firstly, users need to say to Echo:
"Echo(or Alexa), Discover my devices."
Echo will start to finding the devices which is added in NOUS Smart Home APP, it will take about 20 seconds to show the result. Or you may click "Discover devices" in Alexa APP, it will show the devices that found successfully.
Note: "Echo" is one of the wake-up name, which can be
any of these three names (Settings): Alexa/Echo/Amazon. - Support Skills List
User can control devices with the following instructions:
Alexa, turn on [device]
Alexa, turn off [device]
Attention: The name of the device must match the addition of NOUS Smart Home APP.
*This translation may contain inaccuracies due to the fact that it was made using Google Translate