
OPERATING MANUAL
description
The smart Wi-Fi Matter NOUS A8M socket (hereinafter referred to as the smart socket) is designed to organize automatic and manual switching off of electrical appliances in the room, by remote access via the Internet, using a smartphone or tablet with the Nous Smart Home application installed. Communication with the smart socket is configured via a cloud server using the P2P protocol, for which a wireless Wi-Fi adapter is used. The smart socket is equipped with a mechanical button and a light indication of the device status. The smart socket is equipped with an electromechanical relay with a capacity of 16A . The device has the function of energy monitoring and recording of electricity consumption.
 WARNING:
Required hubs for connection via Matter
1. For Google Home/Google Nest
You need one of these devices:
Google Nest Hub (2nd generation or later)
Google Nest Hub Max
Google Nest Mini/Google Home Mini (with updated firmware)
Google Nest Audio
Google Nest Wifi Pro (Matter-enabled router)
2. For Apple HomeKit
You need one of these devices:
Apple HomePod (any generation)
Apple HomePod mini
Apple TV 4K (2022 or later with Thread support)
3. For Amazon Alexa
You need one of these devices:
Amazon Echo (4th generation)
Amazon Echo Dot (5th generation)
Amazon Echo Show 10 (3rd generation)
Amazon Echo Studio
eero Pro 6 (Matter-enabled router)
4. For Samsung SmartThings
Need:
SmartThings Hub (v3)
SmartThings Station
PREVENTIVE MEASURES
- Read these instructions carefully.
- Use the product within the temperature and humidity limits specified in the technical data sheet.
- Do not install the product near heat sources, such as radiators, etc.
- Do not allow the device to fall or be subjected to mechanical stress.
- Do not use chemically active or abrasive cleaning agents to clean the product. Use a damp flannel cloth.
- Do not overload the specified capacity. This may cause a short circuit and electric shock.
- Do not disassemble the product yourself - diagnostics and repair of the device should only be carried out at a certified service center.
Design and controls

| № | Name | description |
| 1 | Indicator | Shows the current status of the device |
| 2 | Button | A short press of the button switches the device "ON" "OFF". A long press of the button (5-7 C) resets the smart socket settings and Wi-Fi network connection parameters. |
Connection
To connect the bulb, you need a smartphone based on the Android or iOS mobile operating system with the Nous Smart Home application installed. This mobile application is free and available for download from the Play Market and App Store. The QR code for the application is given below:

After installing the application, for it to work correctly, you need to grant it all permissions in the appropriate section of your smartphone settings. Then you need to register a new user of this application.
To connect your device to a Wi-Fi network:
| 1 | Connect your smartphone to the access point that will be used to connect the device. Make sure the network frequency range is 2.4 GHz, otherwise the device will not connect as it is not designed to work with 5 GHz Wi-Fi networks. | |
| 2 | Turn on the device. | |
| 3 | Open the Nous Smart Home app and click the add new device button. | |
| 4 |
An auto-scan will appear, prompting you to add a new device. Confirm the connection and start pairing. |
|
| 5 |
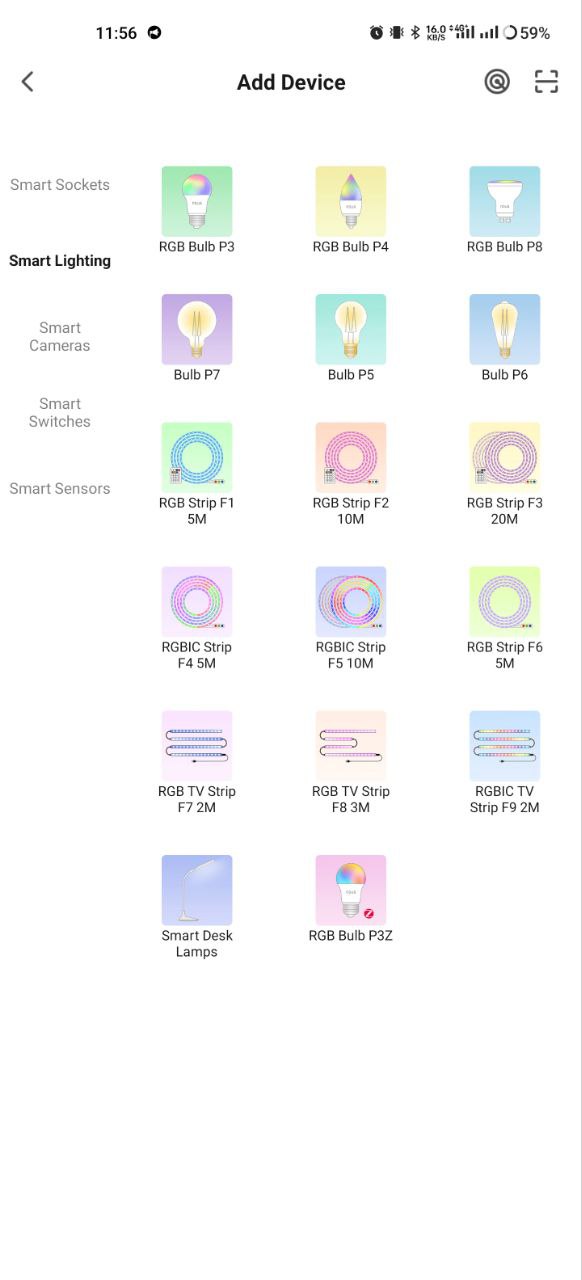
If auto-scan doesn't see your device, you can select it manually from the device list. |
|
 |
 |
|
| 6 | In the "Add manually" tab, select the "Smart sockets" category, and in it the model "A8M socket", as shown in the figure above; | |
| 7 | In the window that opens, select "next step" and click the "Next" button. | |
| 8 | In the next window, make sure that the name of the access point matches the required one, then enter the password for it in the line below and click the "Next" button. | |
 |
 |
|
| 9 | A window will appear indicating the degree of network connection and adding the current user of the application to the list of devices. | |
| 10 | Once the procedure is complete, a window will appear where you can name the device and select the room it is in. The device name will also be used by Amazon Alexa and Google Home. | |
| 11 | Adding a device to the Nous Smart Home app using a QR code. | |
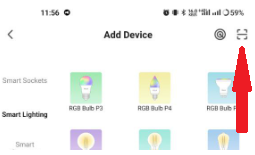
| 12 | In the "Add Manually" tab, select "Scan" as shown in the figure below. | |
 |
||
| 13 | Next, scan the QR code and wait for the device to appear in the app. | |
| 14 | To delete all data from the device, you need to "Delete device", "turn off and delete all data" in the device menu. | |
| When a device is removed from the user's device list in the application, the light bulb settings are reset to factory settings and you will need to go through the Wi-Fi connection procedure again. If the password for the Wi-Fi access point was entered incorrectly, the application will display a "Failed to connect to Wi-Fi" window after the timer expires, offering step-by-step steps to resolve the issue. | ||
Connection via Matter protocol (Google Home, Apple HomeKit, Alexa)
1. Google Home
-
Open Google Home → "+" → "Add device" .
-
Select "Matter Protocol Devices" .
-
Scan the QR code on the light bulb or enter the code manually.
-
Assign a room → done!
2. Apple HomeKit
-
Open the Home app → "+" → "Add device" .
-
Point the camera at the QR code on the light bulb.
-
Confirm addition → assign room.
3. Amazon Alexa (via Matter)
-
Open the Alexa app → "Devices" → "+" → "Add Device" .
-
Select "Matter" → "Scan for devices" .
-
Alexa will find the light bulb → confirm the addition.
-
Assign a name and group (for example, "Living Room").
If Alexa doesn't see the light bulb:
✔️ Make sure the bulb is in connection mode (blinking).
✔️ Restart the bulb (turn it off/on).
✔️ Update the Alexa app.
Importantly!
-
To work through Matter, your hub must be on the same local network as the device.
-
Some features (e.g. advanced scenarios) may only be available through the native Nous Smart Home app
-
If you are having connection problems, try:
-
Reboot the hub
-
Update hub firmware
-
Reset device
-
For further assistance, please contact NOUS support.