
MANUAL DE INSTRUCCIONES
1. DESCRIPCIÓN
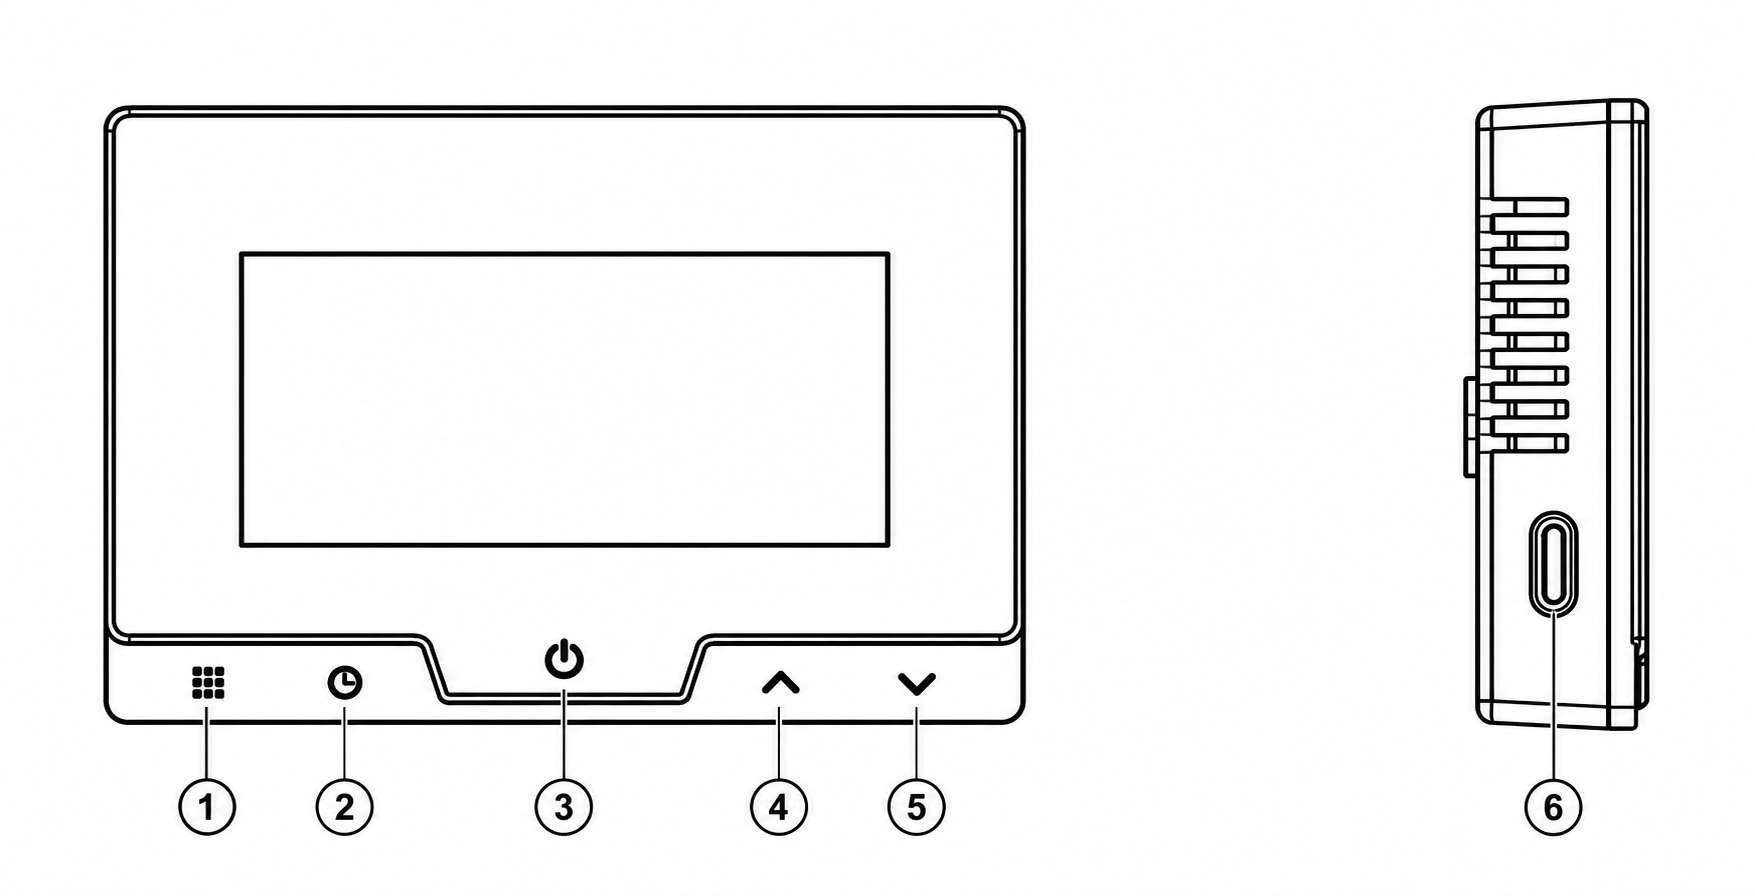 |
| No. | Nombre | Descripción |
| 1 | Menú | Permite alternar entre el funcionamiento programado y el modo manual/de espera temporal. Mantén pulsado durante más de 3 segundos para acceder a la configuración del programa de calefacción. |
| 2 | Tiempo | Muestra y ajusta la fecha y la hora. Mantén pulsado durante unos 3 segundos para acceder al modo de configuración de la hora. |
| 3 | Encendido / Confirmar | Enciende/apaga el termostato y confirma la configuración. También se utiliza para salir de los menús de configuración. |
| 4 | Arriba ▲ | Aumenta la temperatura establecida o el valor del parámetro seleccionado. |
| 5 | Abajo ▼ | Disminuye la temperatura establecida o el valor del parámetro seleccionado. |
| 6 | Despertar | Activa la pantalla/retroiluminación cuando el termostato está en modo de ahorro de energía o en modo de espera. |
| Nombre | Descripción |
1. Menú |
Pulsación corta: conmuta el termostato entre el funcionamiento programado y el control manual/temporal de la temperatura. Mantenga pulsado durante más de 3 segundos: accede a la configuración del programa de calefacción. Los valores dentro de la configuración se ajustan mediante 4 ▲ y 5 ▼ . |
2. Configuración de la hora |
Pulsación corta: alterna la visualización entre información de hora y temperatura. Press and hold for about 3 seconds: enters the date and time settings. Use 4 ▲ and 5 ▼ to change values and 3 to confirm. |
3. Power / Confirm |
Used as the main power and confirmation button. In setting modes, a short press means Confirm / Exit. In normal operation, the button is used to turn the thermostat on and off. It can also be used to wake the thermostat from power-saving mode. |
4. Up ▲ |
Increases the set temperature or the selected parameter value. It is also used when setting the time, heating schedule, and system parameters. |
5. Down ▼ |
Decreases the set temperature or the selected parameter value. |
6. Wake-up |
The side button is used to activate the display after the thermostat enters power-saving mode. In the manual, it is specifically identified as the Wake-up button. |
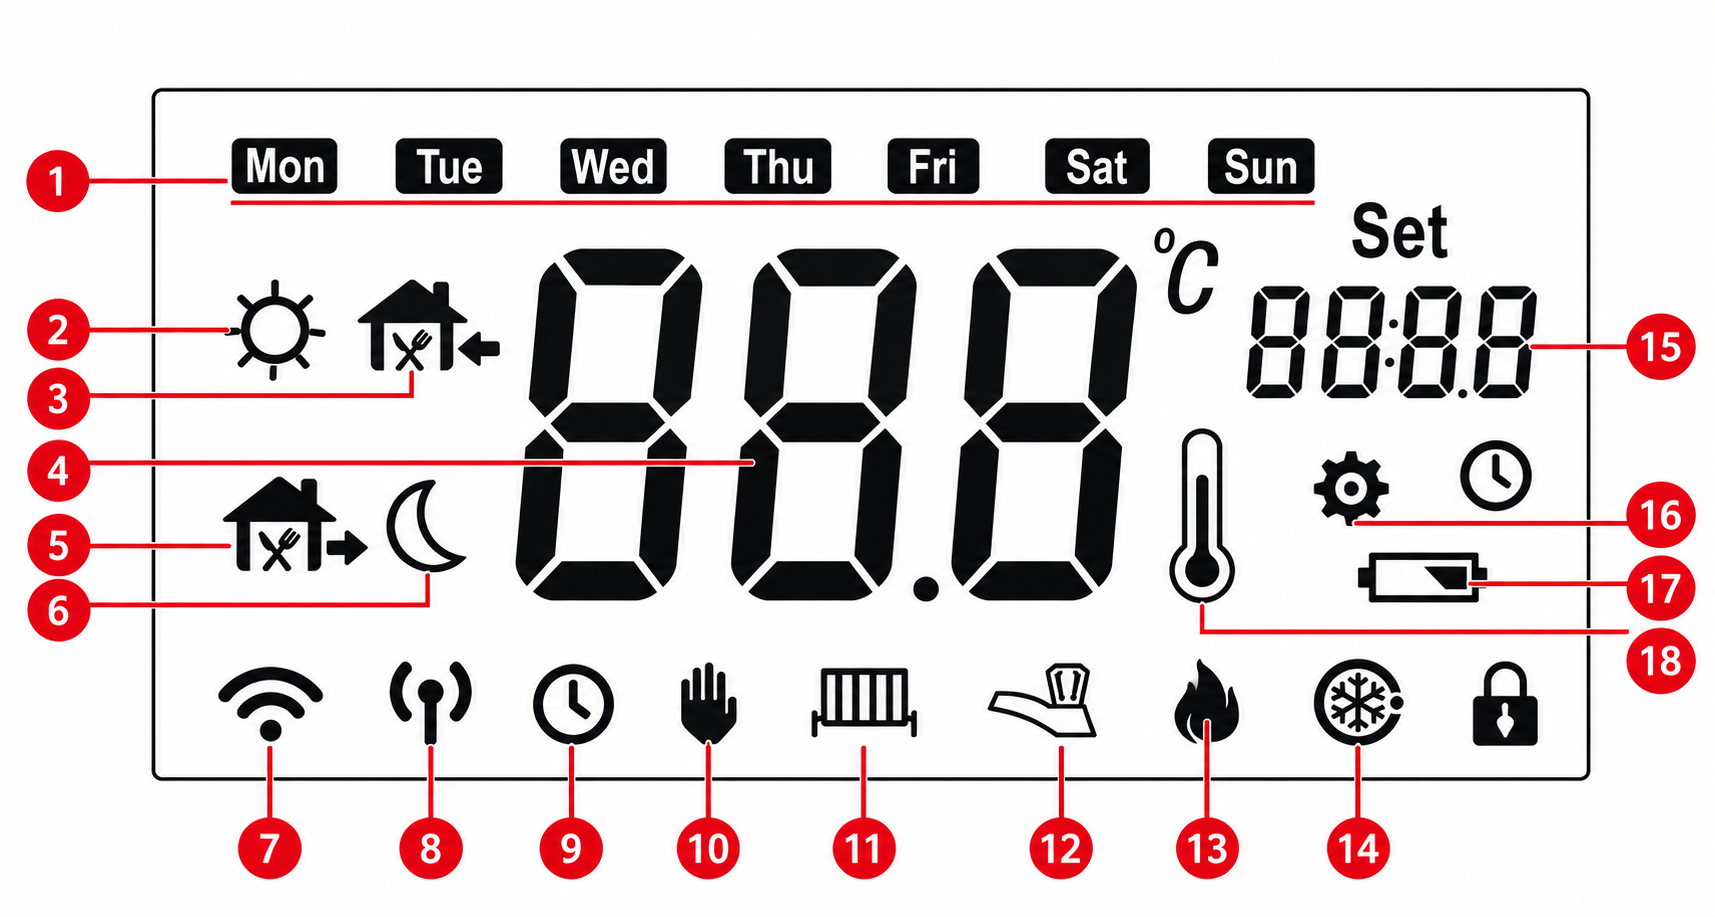 |
1. Week shows |
| 2. Time Bucket flag-Wake up | |
| 3. Time Bucket flag-Back home | |
| 4. OFF\ Temperature shows | |
| 5. Time Bucket flag-Out home | |
| 6. Time Bucket flag-Sleep | |
| 7. Communication show (blinking indicates communication error alarm) | |
| 8. Alternate button | |
| 9. Time shows, Running mode shows | |
| 10. Forever keeping mode shows | |
| 11. Alternate button | |
| 12. Alternate button | |
| 13. Output shows | |
| 14. Anti-freezing mode shows | |
| 15. Setting Time\ Temperature shows | |
| 16. Setting shows (Parameters, programming, time) | |
| 17. Low battery indicator shows | |
| 18. Meterage shows |
Brief Operating Instructions
Power On
If the thermostat is switched off, press 3 – Power.
After switching on, the display shows the current room temperature, set temperature, time, operating mode, and additional indicators. The manual provides indicators for programming, heating output, communication, anti-freeze protection, and low battery status.
Temperature Setting
Use:
4 ▲ – increase the temperature;
5 ▼ – decrease the temperature.
The thermostat temperature setting range is 5–35°C, with a setting accuracy of 0.5°C.
Manual and Programmed Mode
Short press 1 – Menu to switch between manual control and programmed operation. In programmed mode, the thermostat automatically changes the set temperature during the day. The factory program includes six periods:
|
Period |
Time |
Temperature |
|
Wake up |
06:00 |
20°C |
|
Out |
08:00 |
16°C |
|
Back home |
11:00 |
20°C |
|
Out |
14:00 |
16°C |
|
Back home |
18:00 |
20°C |
|
Sleep |
22:00 |
16°C |
Editing the Heating Schedule
Press and hold 1 – Menu for more than 3 seconds.
Then use:
4 ▲ / 5 ▼ – select and change time/temperature;
1 Menu – move to the next parameter/period;
3 Power/Confirm – save settings and exit.
The thermostat allows common or separate programming for different days of the week. The settings allow you to select 4 or 6 temperature periods per day.
Date and Time Setting
Press and hold 2 – Time for approximately 3 seconds.
Use 4 ▲ / 5 ▼ to change the date and time. Button 2 is used to move between parameters, and 3 – Power/Confirm is used to confirm and exit.
Advanced Settings
In standby mode, press and hold 1 – Menu for more than 3 seconds to open the configuration menu. Values are changed using ▲/▼. Press Menu again to move to the next item, and press Power to confirm the settings. If no button is pressed for approximately 10 seconds, the thermostat automatically exits the menu.
|
Parameter |
Function |
Range / Options |
|
CL |
Temperature display calibration |
-4…+4°C |
|
AH |
Maximum allowed temperature |
20-35°C |
|
AL |
Minimum allowed temperature |
5-20°C |
|
bL |
Display-on time |
5 / 10 / 15 sec / --- |
|
db |
Heating differential |
0.5-3°C |
|
Pro |
Weekly program |
ON / OFF |
|
Seg |
Number of periods |
4 / 6 |
|
ES |
Intelligent function |
ON / OFF |
|
PP |
Anti-freeze function |
ON / OFF |
Open Window Detection
The thermostat monitors rapid temperature drops. If the room temperature drops by approximately 1.5°C within 3 minutes, the thermostat detects this as an open window and temporarily stops heating. Normal operation is restored when any button is pressed, when the temperature rises by approximately 1.5°C, or automatically after 30 minutes.
Anti-freeze Protection
Even when the thermostat is switched off, it can still protect the room against freezing: if the temperature falls below 5°C, heating starts, and when the temperature rises above 8°C, heating stops.
Low Battery Indication
When the battery voltage drops below approximately 2.3 V, the low-battery indicator starts flashing on the display.
2. TECHNICAL CHARACTERISTICS
WiFi Frequency: 2.4 GHz
Network Protocol: IEEE802.11 b/g/n
Frequency range: 2.412- 2.484 GHz
Output: 1 channel passive linkage output (10A)
Frequency: 868 MHz (Bidirectional FSK)
Working Range: 100 m
Communicaon protocol: TCP/IP, MQTT
Temperature setting range: 5℃~35℃
Temperature setting accuracy: 0.5℃
Working Temperature: 0°C~50°C
Water resistance: IP21
Power Input: 100-240 V (AC), 50/60 Hz
Power Input (thermostat): 4 AAA batteries / USB-A (5V, 1A)
GATEWAY & RECEIVER:
WiFi Frequency: 2.4 GHz
Network Protocol: IEEE802.11 b/g/n
Frequency range: 2.412GHz- 2.484GHz
Output: 1 channel passive linkage output (10A)
Frequency: 868MHz(Bidirectional FSK)
Working Range: 100m
Communicaon protocol: TCP/IP, MQTT
Working Temperature: 0°C~50°C
Water resistance: IP21
Power Input: 100-240VAC 50/60Hz
Thermostat:
Output: 1 channel passive linkage output (8A)
Frequency: 868MHz (Bidirectional FSK)
Working Range: 100m
Working Temperature: 0°C~50°C
Water resistance: IP21
Power Input: 4 AAA batteries / USB power supply (5V, 1A)
 |
3. SAFETY AND PRECAUTIONARY MEASURES
- Please read this manual carefully.
- Use the product within the temperature and humidity limits specified in the technical data sheet.
- No instale el producto cerca de fuentes de calor como radiadores, etc.
- No permita que el dispositivo se caiga ni que sea sometido a esfuerzos mecánicos.
- No utilice detergentes químicamente activos ni abrasivos para limpiar el producto. En su lugar, utilice un paño de franela húmedo.
- No exceda la potencia nominal especificada. Esto podría provocar un cortocircuito y una descarga eléctrica.
- No desmonte usted mismo el producto; el diagnóstico y las reparaciones del dispositivo solo deben realizarse en un centro de servicio certificado.
4. CONEXIÓN
Para conectar el dispositivo Nous, necesita un smartphone con sistema operativo Android o iOS y la aplicación Nous Smart Home instalada. Esta aplicación es gratuita y se puede descargar desde Google Play y la App Store. El código QR de la aplicación se muestra a continuación:
 |
Escanee el código QR
Importante: Asegúrese de que la red Wi-Fi sea estable y tenga una señal suficiente en la ubicación de instalación elegida. Una señal débil interferirá directamente con el funcionamiento del termostato, por lo que le rogamos que confirme que la ubicación de instalación del termostato esté cubierta por Wi-Fi y tenga buena señal.
5. INSTALACIÓN
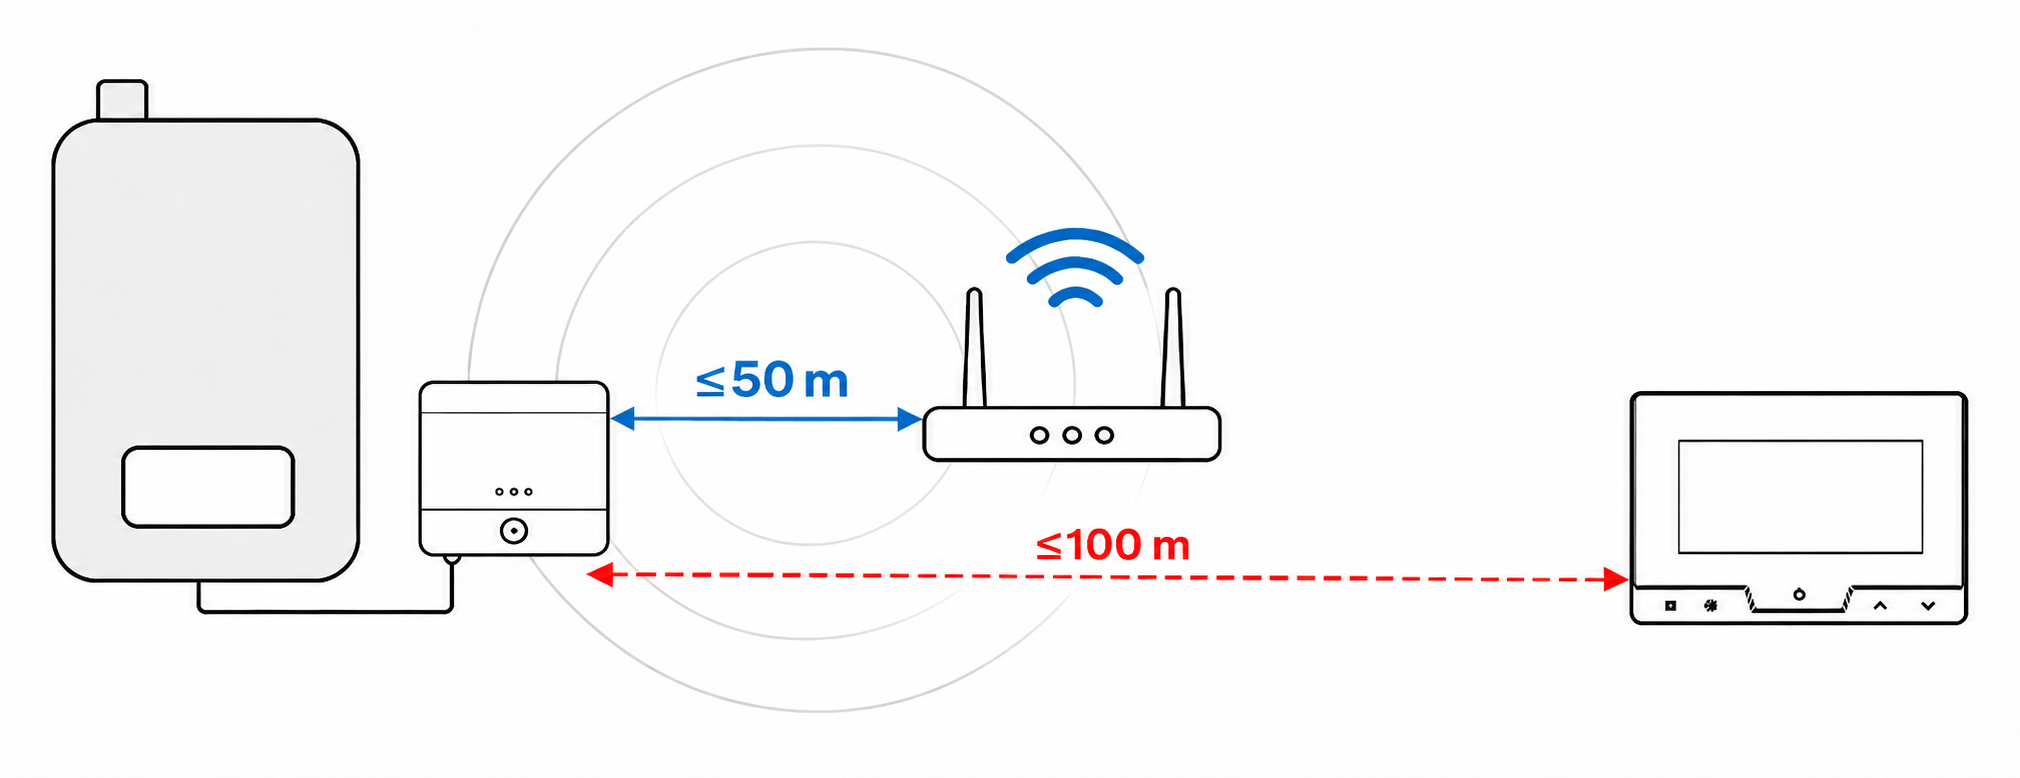
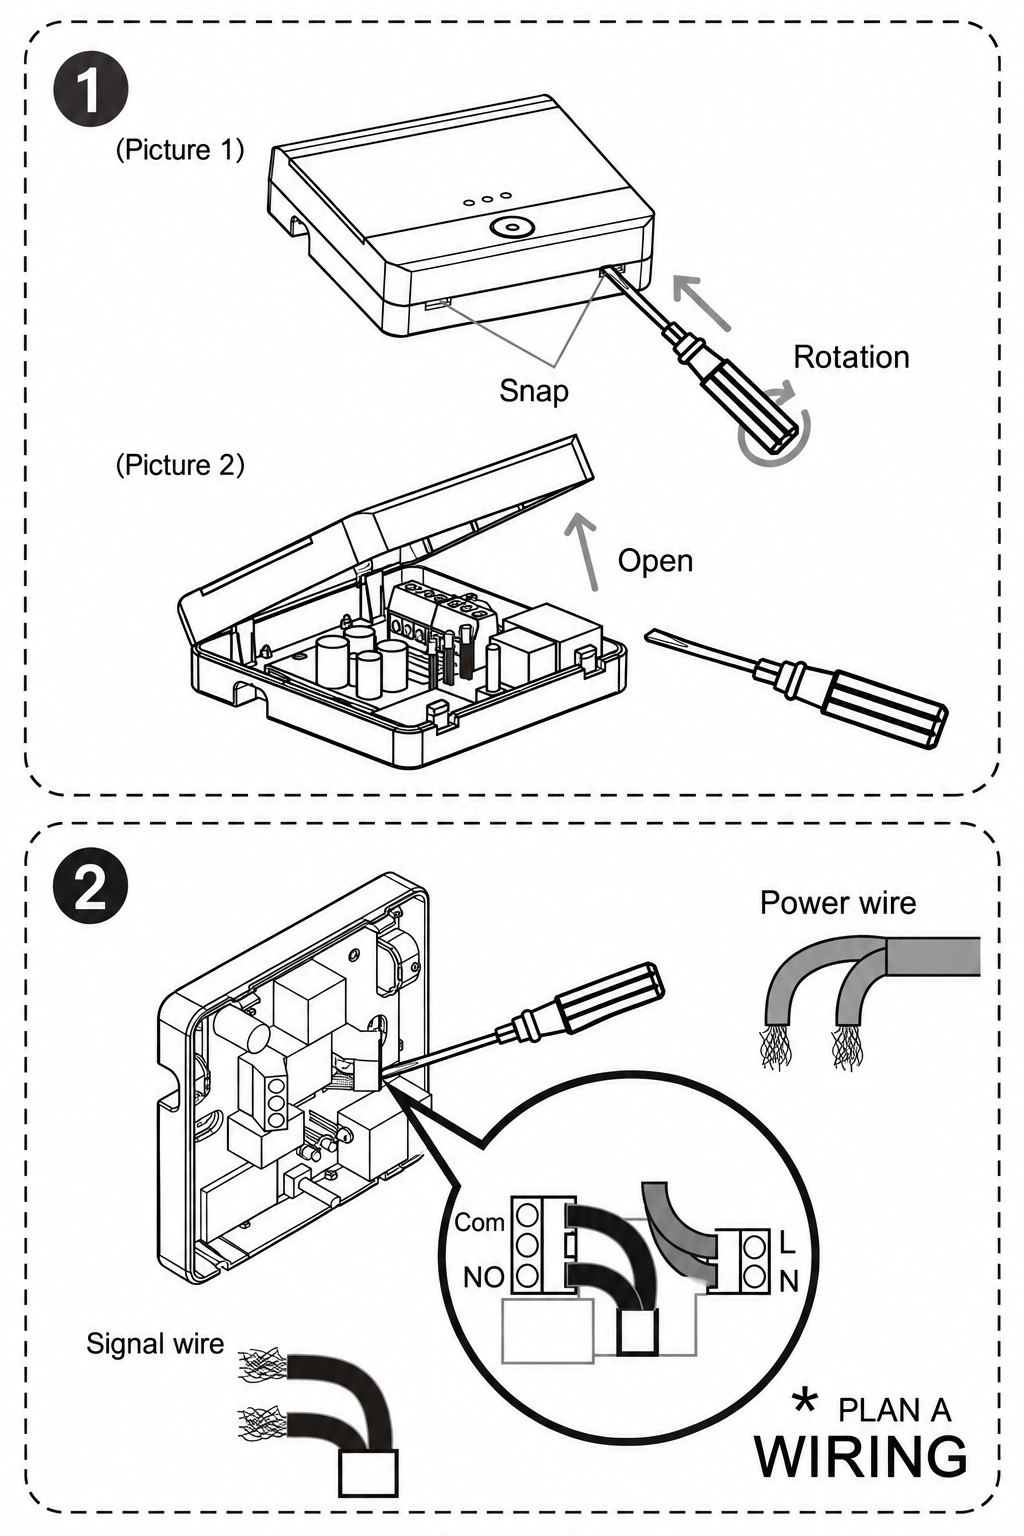
PLAN A
Cuando la señal de la caldera interfiere con la señal Wi-Fi, el receptor debe instalarse en el área de cobertura de la señal de la caldera; el transmisor puede colocarse
donde se desee.
 |
 |
|
|
2. Cableado: Coloque el cable en el terminal y luego |
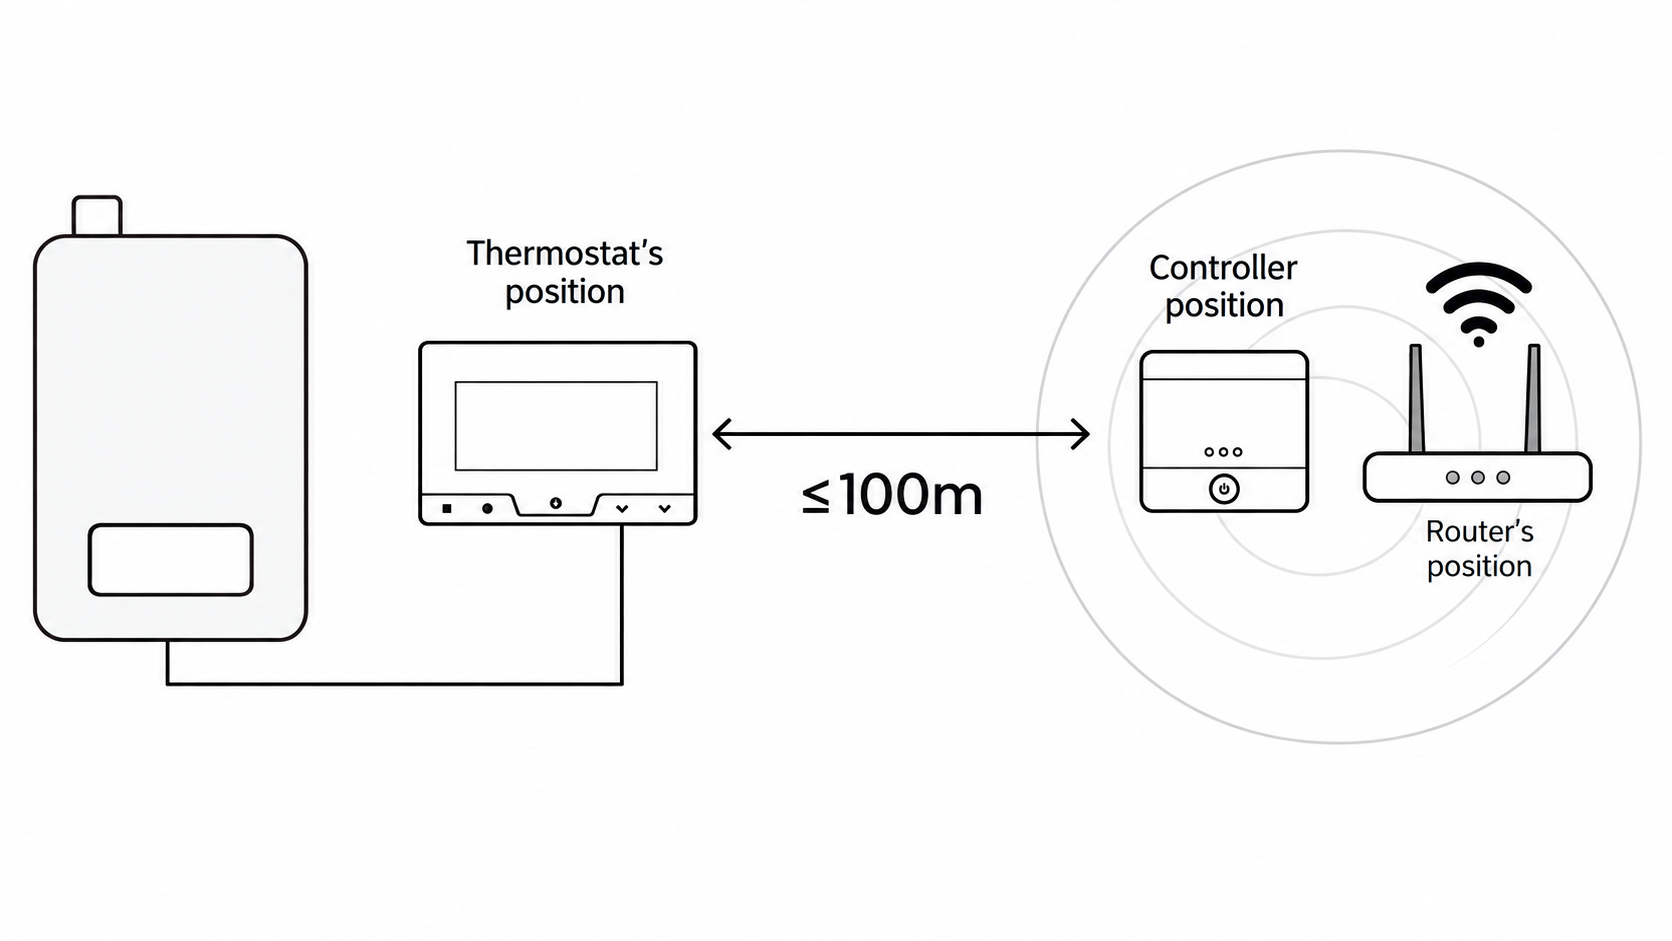
PLAN B
Cuando la señal WIFI no está cubierta por el cable de señal de la caldera,
el transmisor debe instalarse en el área de señal de la caldera y el receptor en el área de cobertura WIFI.
 |
|
|
1. Retire la tapa de seguridad. |
| 2. Conexión de cableado | |
| 3. Instale la cubierta de seguridad, realice la protección |
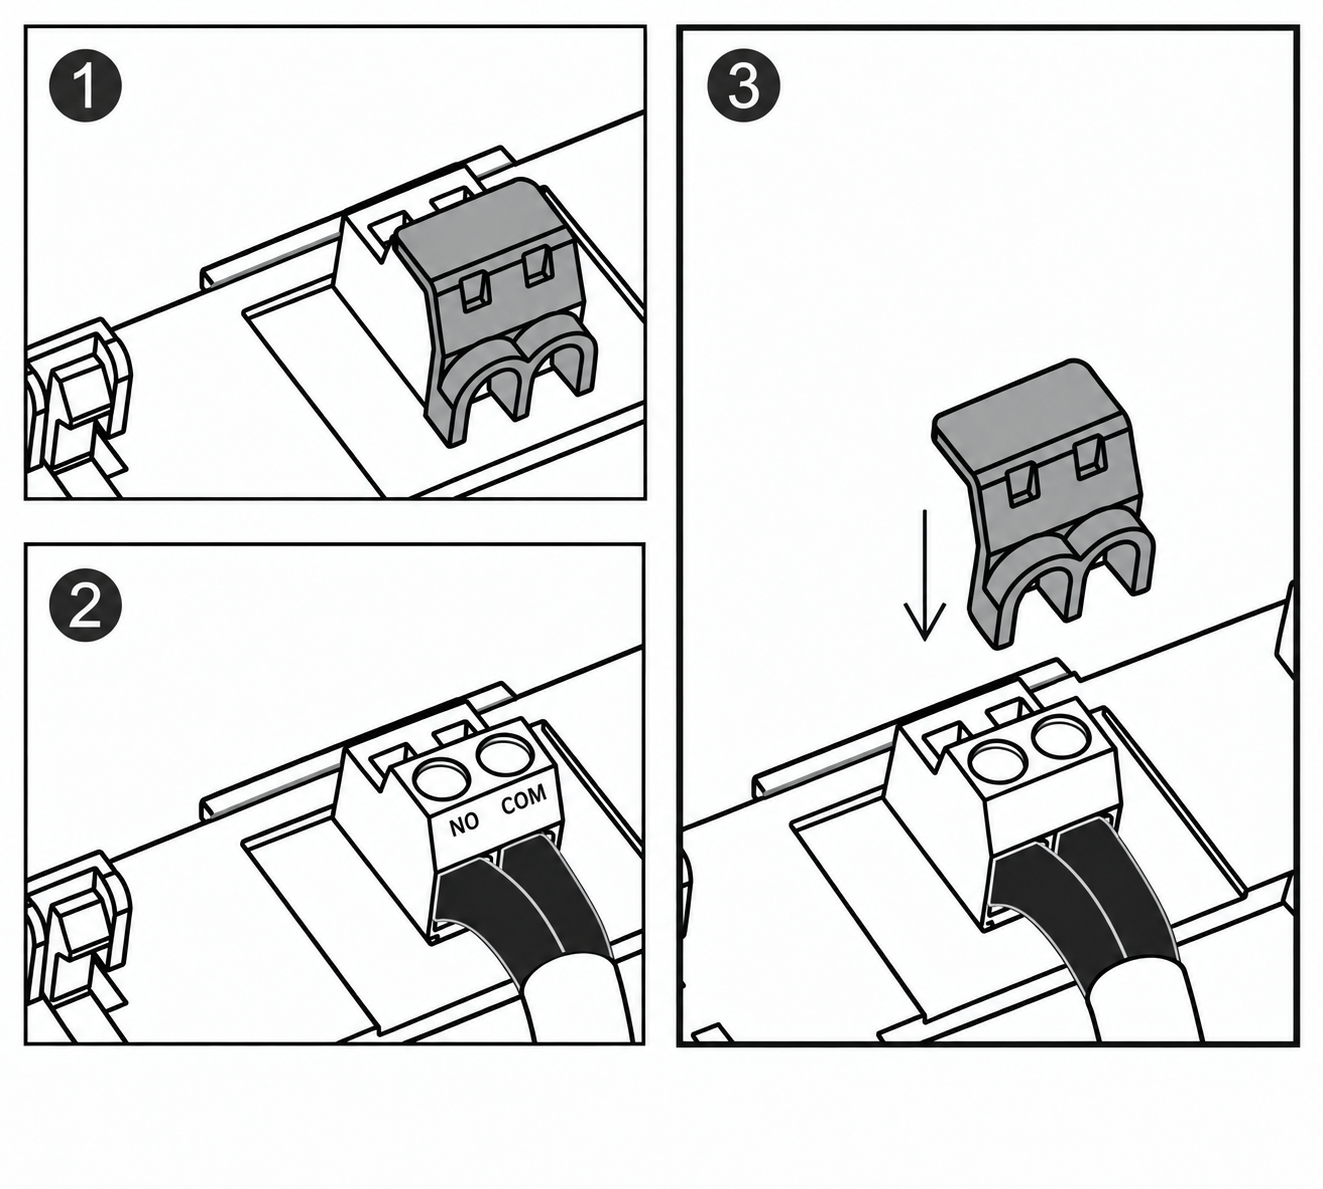
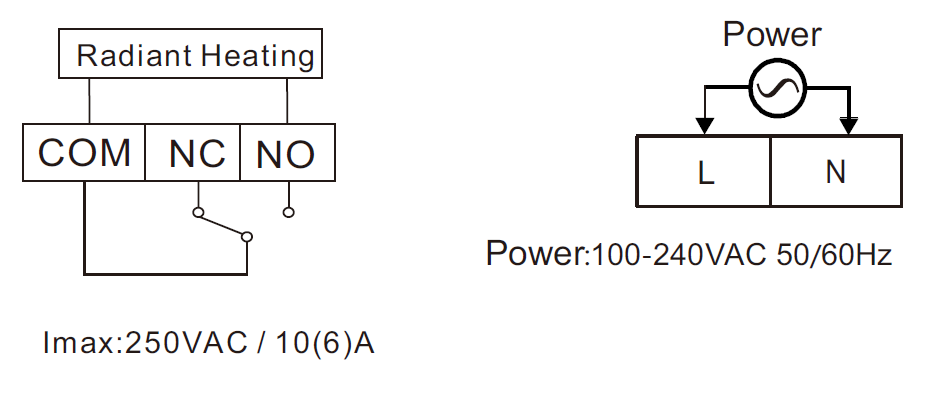
DIAGRAMA DE CABLEADO (A/B - PLANO)
 |
Instalación del termostato
En la pared
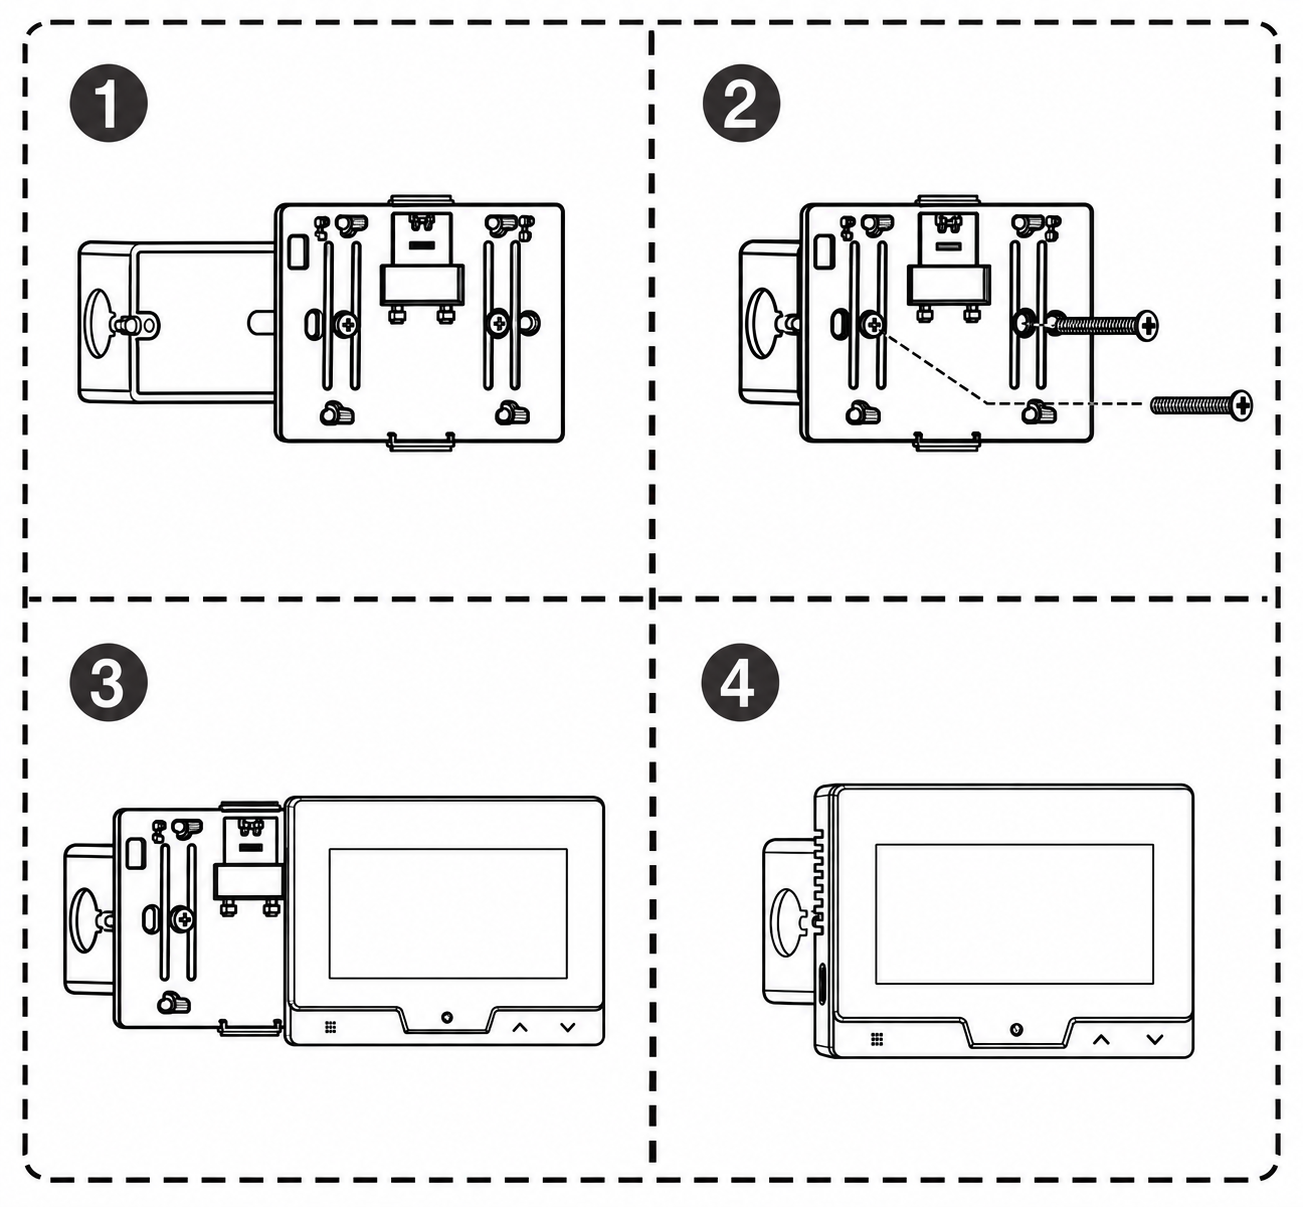 |
1. Coloque el panel trasero sobre la caja de instalación. |
|
2. Introduce el tornillo en el agujero y apriétalo. |
|
|
3. Cubra el panel. |
|
|
4. Finalización de la instalación |
Sobre el escritorio
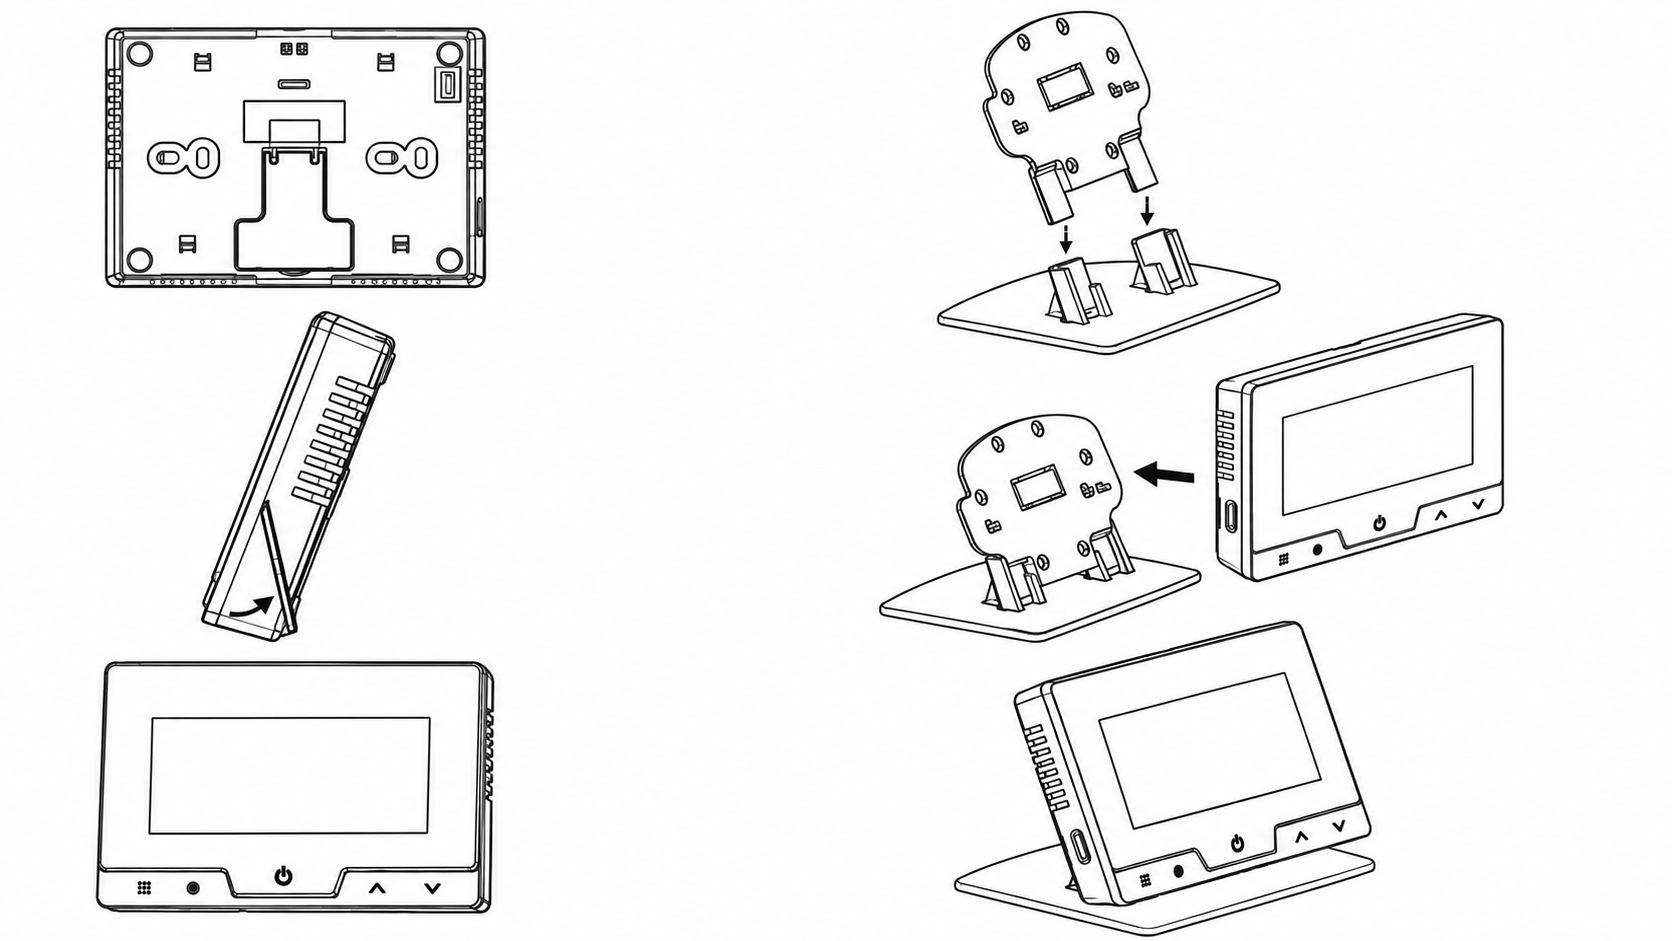 |