
MANUALE OPERATIVO
1. DESCRIZIONE
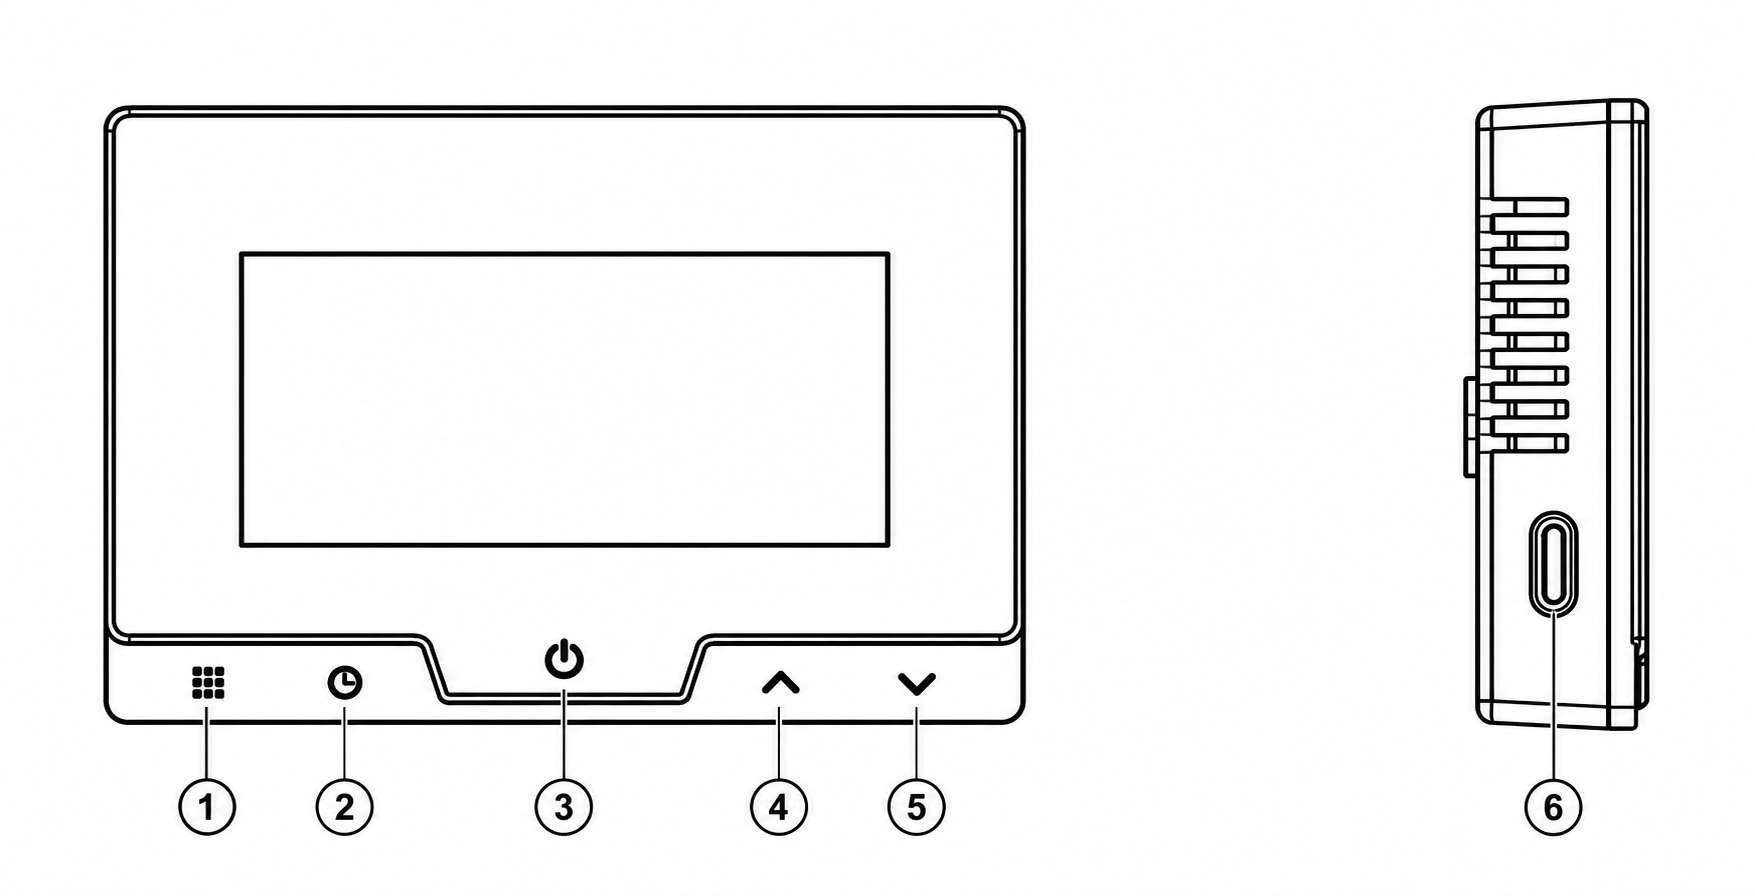 |
| NO. | Nome | Descrizione |
| 1 | Menu | Consente di passare dalla modalità di funzionamento programmata alla modalità manuale/di mantenimento temporaneo. Tenere premuto per più di 3 secondi per accedere alle impostazioni del programma di riscaldamento. |
| 2 | Tempo | Visualizza e regola le impostazioni di data e ora. Tieni premuto per circa 3 secondi per accedere alla modalità di impostazione dell'ora. |
| 3 | Accensione/Conferma | Accende/spegne il termostato e conferma le impostazioni. Viene utilizzato anche per uscire dai menu di impostazione. |
| 4 | Su ▲ | Aumenta la temperatura impostata o il valore del parametro selezionato. |
| 5 | Giù ▼ | Diminuisce la temperatura impostata o il valore del parametro selezionato. |
| 6 | Svegliati | Attiva il display/la retroilluminazione quando il termostato è in modalità di risparmio energetico o standby. |
| Nome | Descrizione |
1. Menù |
Pressione breve: commuta il termostato tra funzionamento programmato e controllo manuale/temporaneo della temperatura. Tenere premuto per più di 3 secondi: si accede alle impostazioni del programma di riscaldamento. I valori all'interno delle impostazioni si regolano utilizzando i pulsanti 4 ▲ e 5 ▼ . |
2. Impostazione dell'ora |
Pressione breve: commuta la visualizzazione tra ora e temperatura. Press and hold for about 3 seconds: enters the date and time settings. Use 4 ▲ and 5 ▼ to change values and 3 to confirm. |
3. Power / Confirm |
Used as the main power and confirmation button. In setting modes, a short press means Confirm / Exit. In normal operation, the button is used to turn the thermostat on and off. It can also be used to wake the thermostat from power-saving mode. |
4. Up ▲ |
Increases the set temperature or the selected parameter value. It is also used when setting the time, heating schedule, and system parameters. |
5. Down ▼ |
Decreases the set temperature or the selected parameter value. |
6. Wake-up |
The side button is used to activate the display after the thermostat enters power-saving mode. In the manual, it is specifically identified as the Wake-up button. |
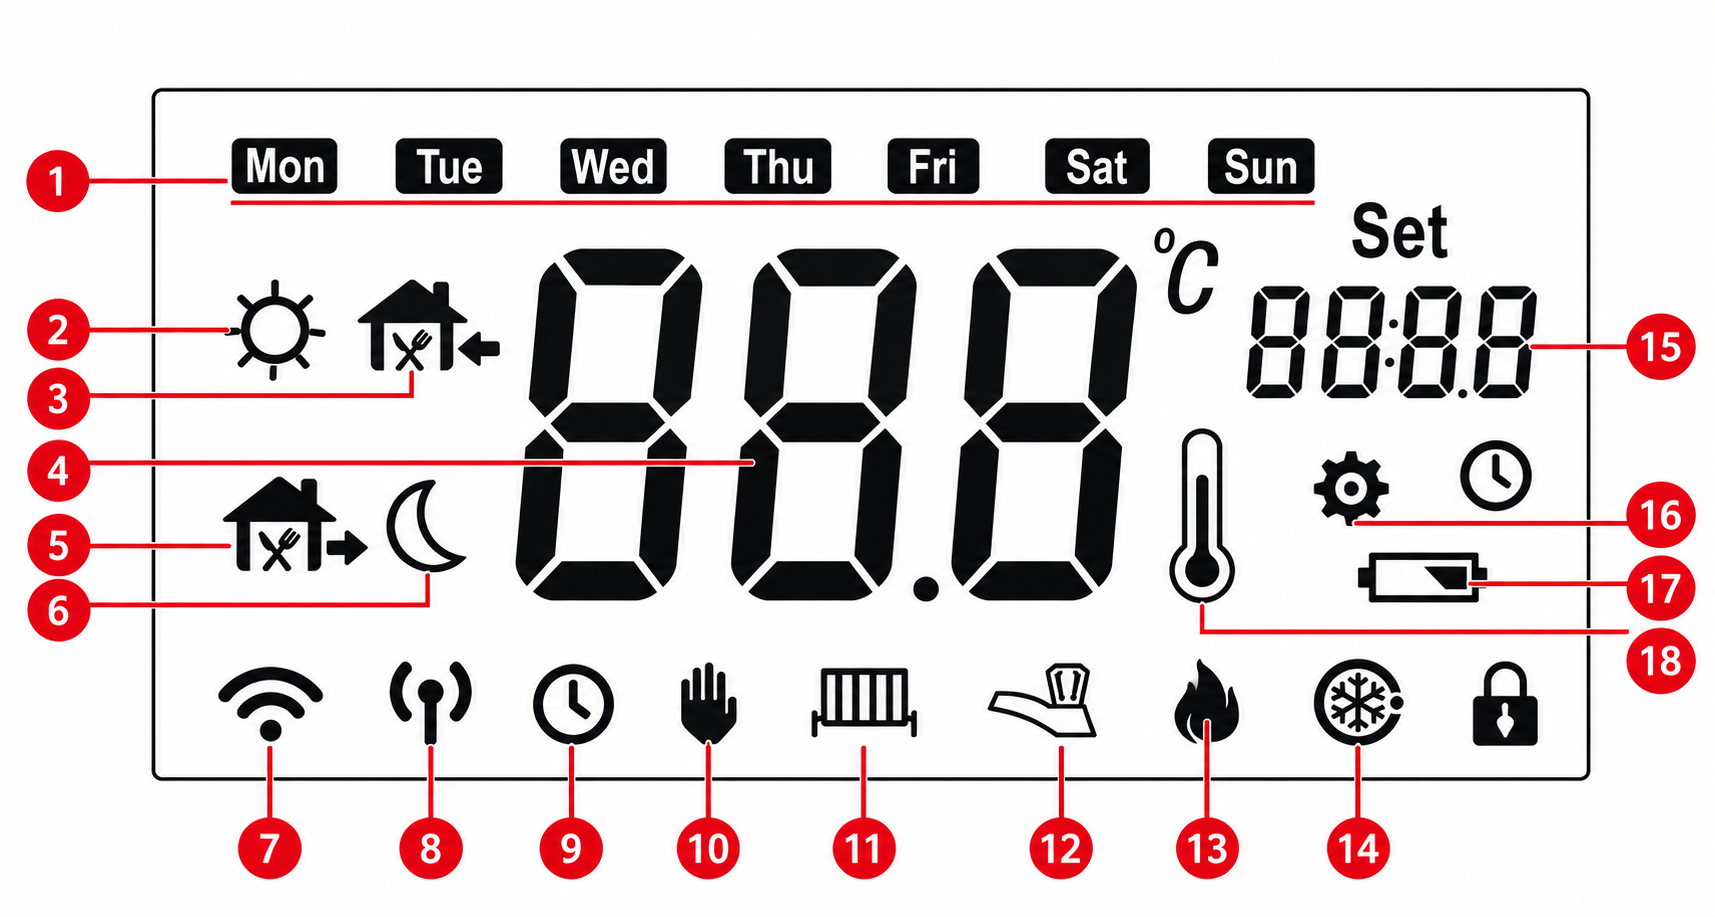 |
1. Week shows |
| 2. Time Bucket flag-Wake up | |
| 3. Time Bucket flag-Back home | |
| 4. OFF\ Temperature shows | |
| 5. Time Bucket flag-Out home | |
| 6. Time Bucket flag-Sleep | |
| 7. Communication show (blinking indicates communication error alarm) | |
| 8. Alternate button | |
| 9. Time shows, Running mode shows | |
| 10. Forever keeping mode shows | |
| 11. Alternate button | |
| 12. Alternate button | |
| 13. Output shows | |
| 14. Anti-freezing mode shows | |
| 15. Setting Time\ Temperature shows | |
| 16. Setting shows (Parameters, programming, time) | |
| 17. Low battery indicator shows | |
| 18. Meterage shows |
Brief Operating Instructions
Power On
If the thermostat is switched off, press 3 – Power.
After switching on, the display shows the current room temperature, set temperature, time, operating mode, and additional indicators. The manual provides indicators for programming, heating output, communication, anti-freeze protection, and low battery status.
Temperature Setting
Use:
4 ▲ – increase the temperature;
5 ▼ – decrease the temperature.
The thermostat temperature setting range is 5–35°C, with a setting accuracy of 0.5°C.
Manual and Programmed Mode
Short press 1 – Menu to switch between manual control and programmed operation. In programmed mode, the thermostat automatically changes the set temperature during the day. The factory program includes six periods:
|
Period |
Time |
Temperature |
|
Wake up |
06:00 |
20°C |
|
Out |
08:00 |
16°C |
|
Back home |
11:00 |
20°C |
|
Out |
14:00 |
16°C |
|
Back home |
18:00 |
20°C |
|
Sleep |
22:00 |
16°C |
Editing the Heating Schedule
Press and hold 1 – Menu for more than 3 seconds.
Then use:
4 ▲ / 5 ▼ – select and change time/temperature;
1 Menu – move to the next parameter/period;
3 Power/Confirm – save settings and exit.
The thermostat allows common or separate programming for different days of the week. The settings allow you to select 4 or 6 temperature periods per day.
Date and Time Setting
Press and hold 2 – Time for approximately 3 seconds.
Use 4 ▲ / 5 ▼ to change the date and time. Button 2 is used to move between parameters, and 3 – Power/Confirm is used to confirm and exit.
Advanced Settings
In standby mode, press and hold 1 – Menu for more than 3 seconds to open the configuration menu. Values are changed using ▲/▼. Press Menu again to move to the next item, and press Power to confirm the settings. If no button is pressed for approximately 10 seconds, the thermostat automatically exits the menu.
|
Parameter |
Function |
Range / Options |
|
CL |
Temperature display calibration |
-4…+4°C |
|
AH |
Maximum allowed temperature |
20-35°C |
|
AL |
Minimum allowed temperature |
5-20°C |
|
bL |
Display-on time |
5 / 10 / 15 sec / --- |
|
db |
Heating differential |
0.5-3°C |
|
Pro |
Weekly program |
ON / OFF |
|
Seg |
Number of periods |
4 / 6 |
|
ES |
Intelligent function |
ON / OFF |
|
PP |
Anti-freeze function |
ON / OFF |
Open Window Detection
The thermostat monitors rapid temperature drops. If the room temperature drops by approximately 1.5°C within 3 minutes, the thermostat detects this as an open window and temporarily stops heating. Normal operation is restored when any button is pressed, when the temperature rises by approximately 1.5°C, or automatically after 30 minutes.
Anti-freeze Protection
Even when the thermostat is switched off, it can still protect the room against freezing: if the temperature falls below 5°C, heating starts, and when the temperature rises above 8°C, heating stops.
Low Battery Indication
When the battery voltage drops below approximately 2.3 V, the low-battery indicator starts flashing on the display.
2. TECHNICAL CHARACTERISTICS
WiFi Frequency: 2.4 GHz
Network Protocol: IEEE802.11 b/g/n
Frequency range: 2.412- 2.484 GHz
Output: 1 channel passive linkage output (10A)
Frequency: 868 MHz (Bidirectional FSK)
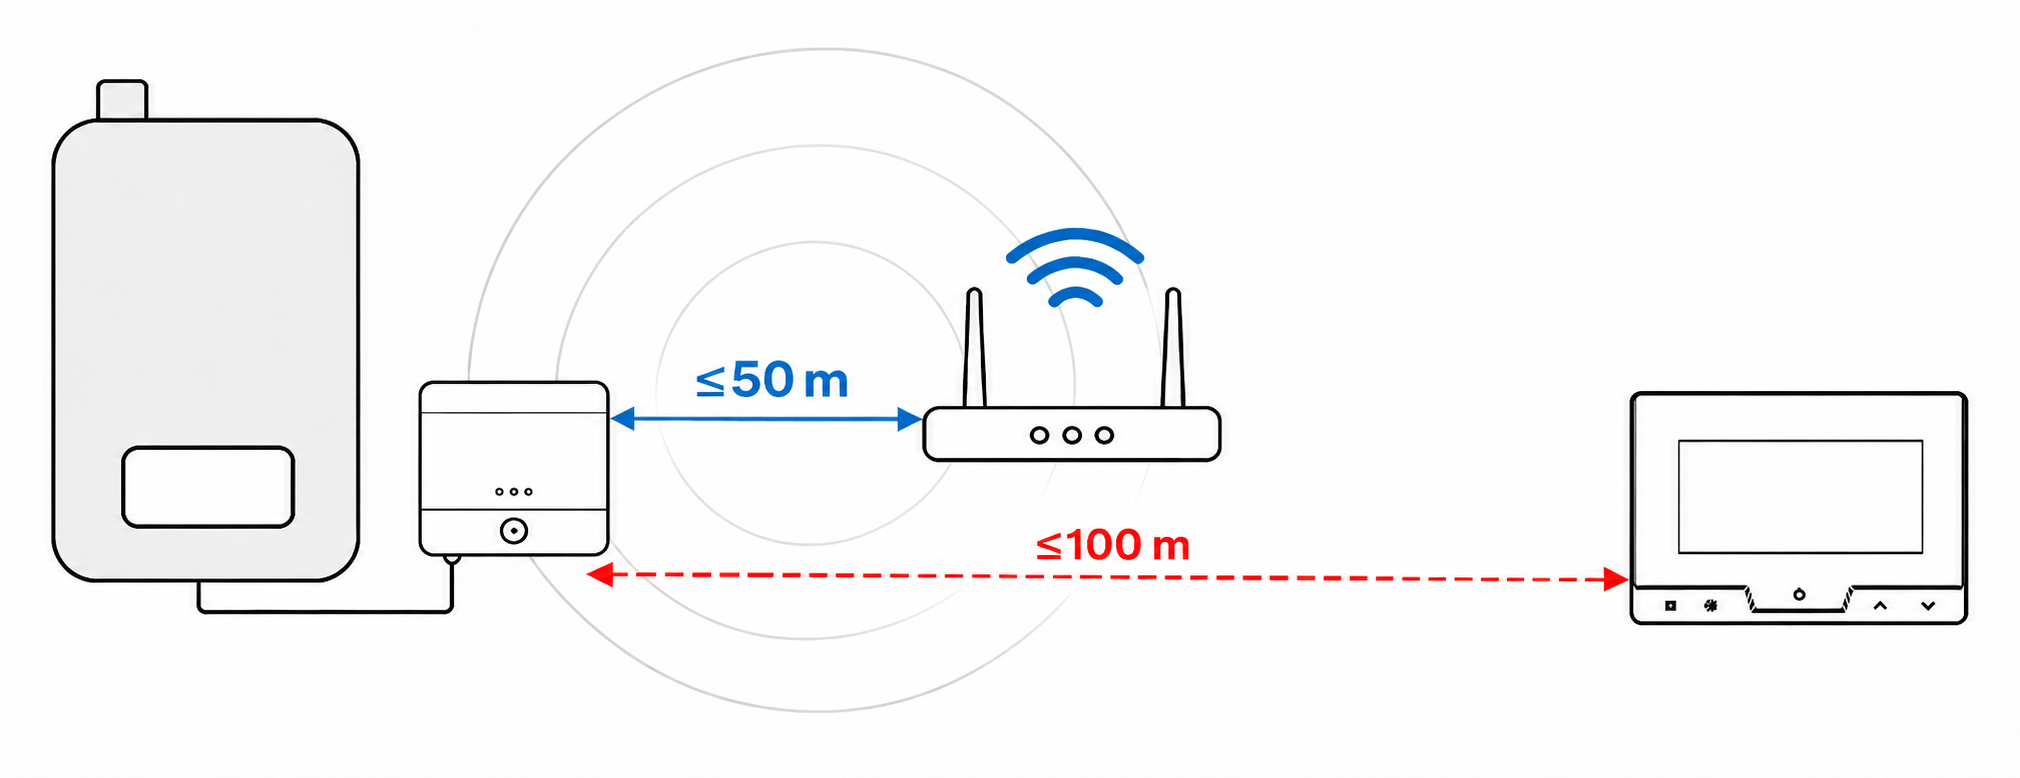
Working Range: 100 m
Communicaon protocol: TCP/IP, MQTT
Temperature setting range: 5℃~35℃
Temperature setting accuracy: 0.5℃
Working Temperature: 0°C~50°C
Water resistance: IP21
Power Input: 100-240 V (AC), 50/60 Hz
Power Input (thermostat): 4 AAA batteries / USB-A (5V, 1A)
GATEWAY & RECEIVER:
WiFi Frequency: 2.4 GHz
Network Protocol: IEEE802.11 b/g/n
Frequency range: 2.412GHz- 2.484GHz
Output: 1 channel passive linkage output (10A)
Frequency: 868MHz(Bidirectional FSK)
Working Range: 100m
Communicaon protocol: TCP/IP, MQTT
Working Temperature: 0°C~50°C
Water resistance: IP21
Power Input: 100-240VAC 50/60Hz
Thermostat:
Output: 1 channel passive linkage output (8A)
Frequency: 868MHz (Bidirectional FSK)
Working Range: 100m
Working Temperature: 0°C~50°C
Water resistance: IP21
Power Input: 4 AAA batteries / USB power supply (5V, 1A)
 |
3. SAFETY AND PRECAUTIONARY MEASURES
- Please read this manual carefully.
- Use the product within the temperature and humidity limits specified in the technical data sheet.
- Non installare il prodotto in prossimità di fonti di calore come termosifoni, ecc.
- Non permettere che il dispositivo cada o sia sottoposto a sollecitazioni meccaniche.
- Non utilizzare detergenti chimicamente aggressivi o abrasivi per pulire il prodotto. Utilizzare invece un panno di flanella umido.
- Non superare la potenza nominale specificata. Ciò potrebbe causare un cortocircuito e una scossa elettrica.
- Non smontare il prodotto autonomamente: la diagnosi e la riparazione del dispositivo devono essere eseguite esclusivamente presso un centro di assistenza autorizzato.
4. CONNESSIONE
Per connettere il dispositivo Nous, è necessario uno smartphone con sistema operativo Android o iOS e l'applicazione Nous Smart Home installata. Questa applicazione è gratuita e disponibile per il download su Play Store e App Store. Il codice QR per l'applicazione è riportato di seguito:
 |
Scansiona il codice QR
Importante: assicurarsi che la rete Wi-Fi sia stabile e abbia un segnale sufficientemente forte nel luogo di installazione scelto. Un segnale debole può interferire direttamente con il corretto funzionamento del termostato, quindi è fondamentale verificare che il luogo di installazione sia coperto dalla rete Wi-Fi e abbia un buon segnale.
5. INSTALLAZIONE
PIANO A
Quando il segnale Wi-Fi è coperto dal segnale della caldaia, il ricevitore deve essere installato nell'area coperta dal segnale della caldaia, mentre il trasmettitore può essere posizionato
dove si preferisce.
 |
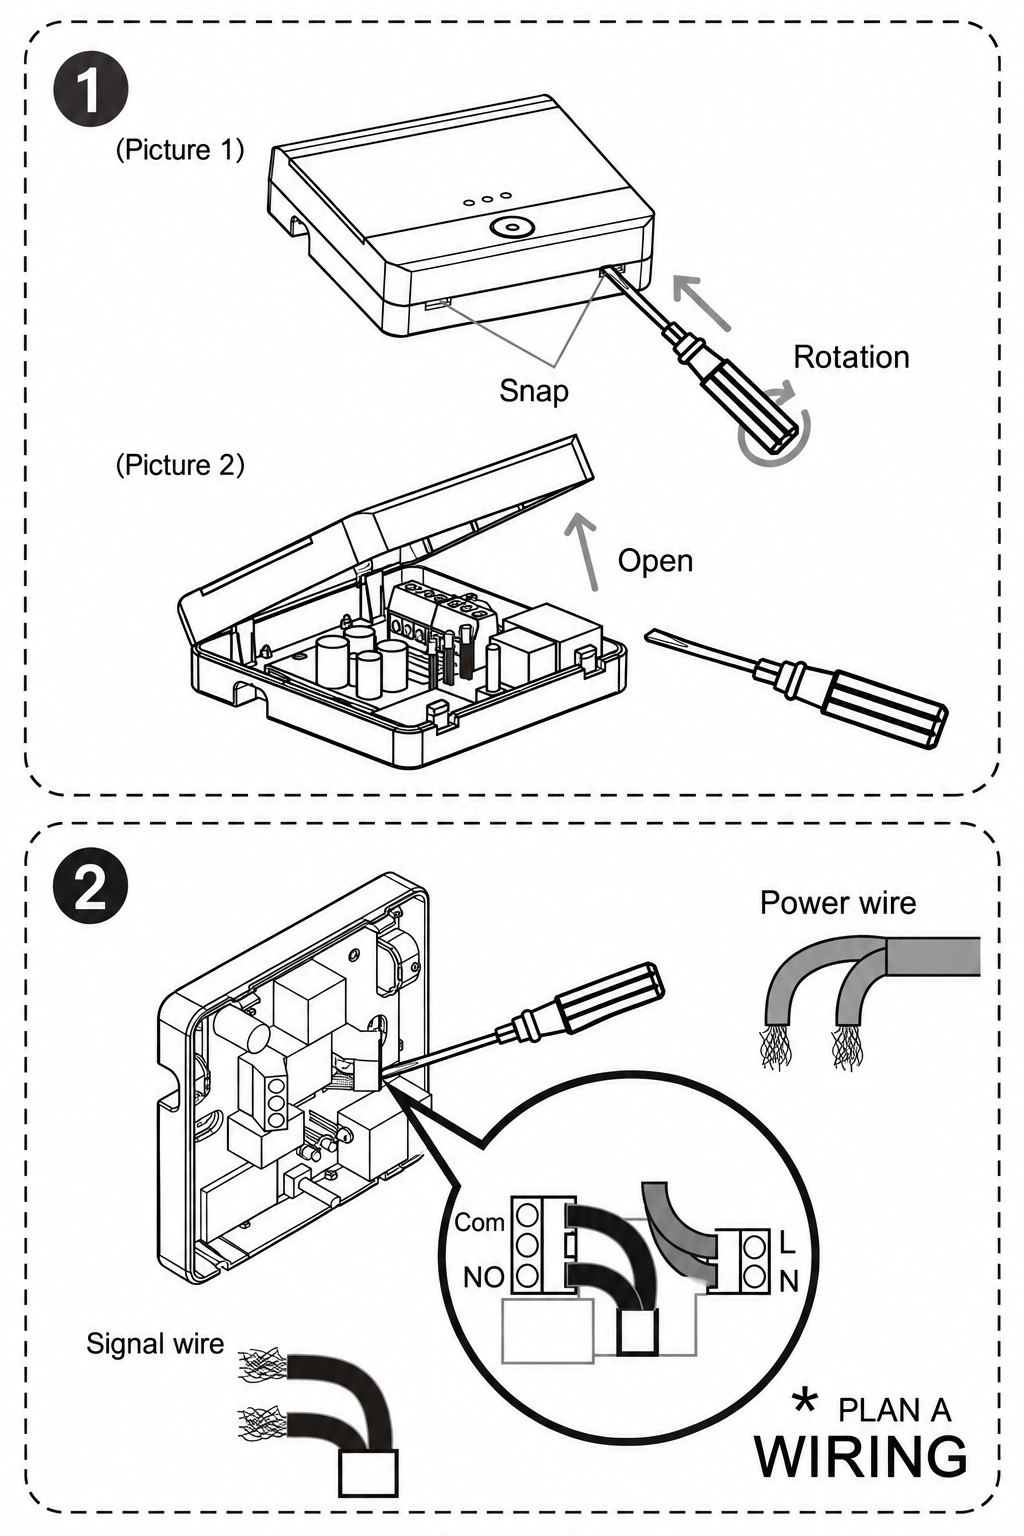 |
|
|
2. Cablaggio: Inserire il filo nel terminale e |
PIANO B
Quando il segnale Wi-Fi non è coperto dal cavo del segnale della caldaia,
il trasmettitore deve essere installato nell'area coperta dal segnale della caldaia, mentre il ricevitore deve essere installato nell'area coperta dal Wi-Fi.
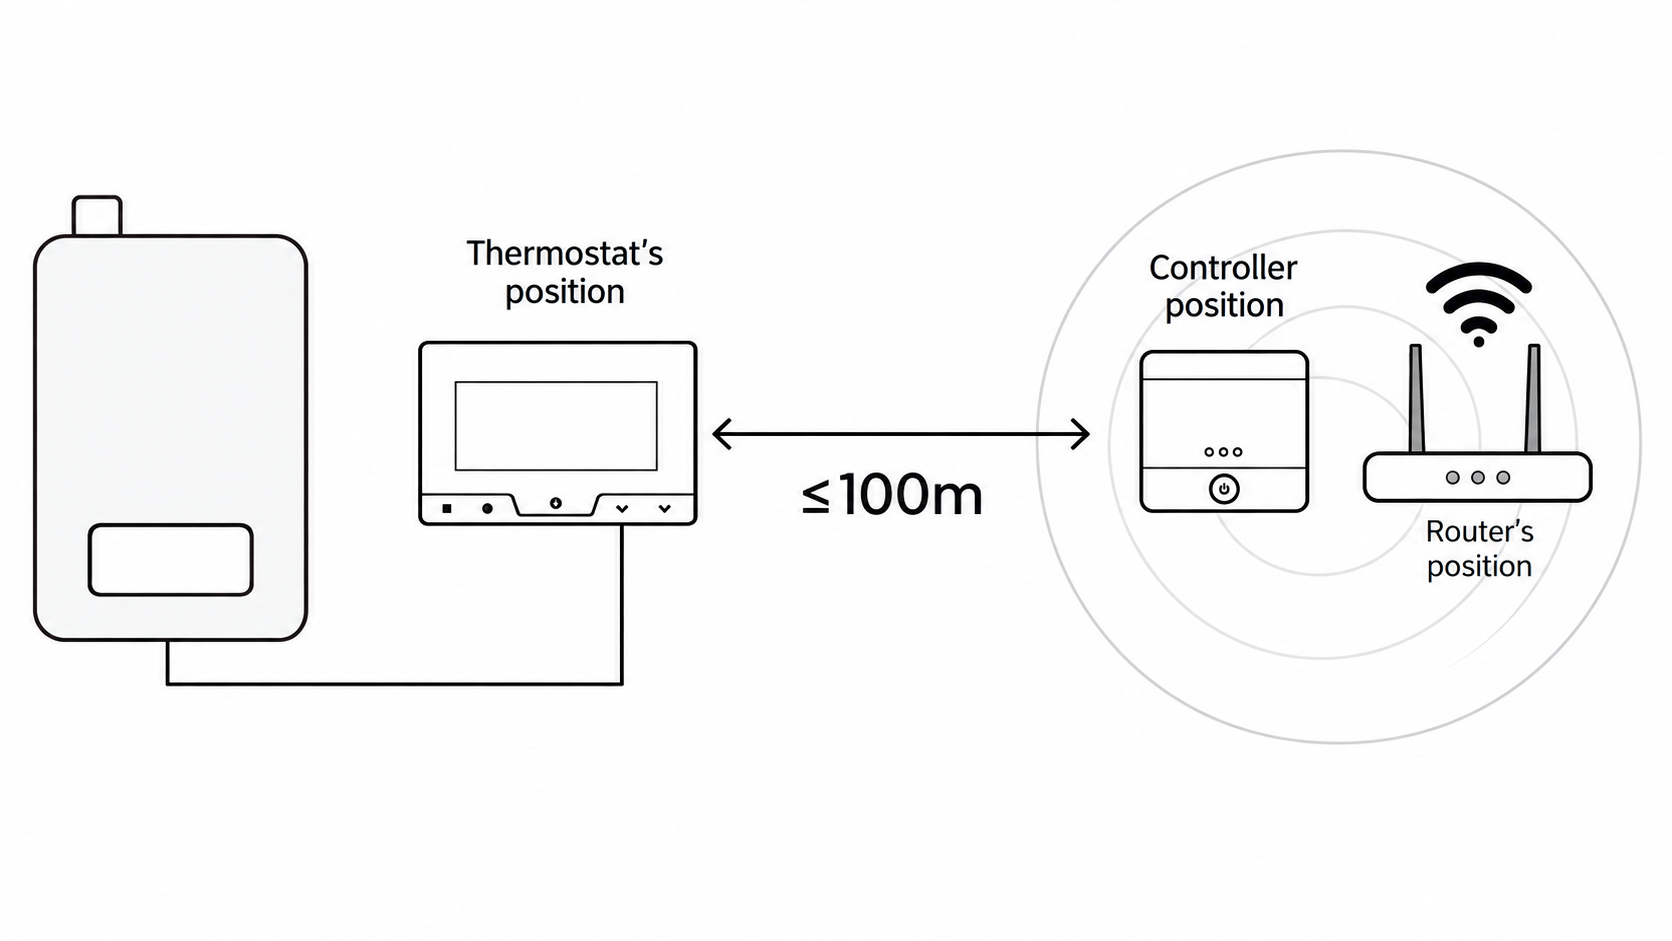 |
|
|
1. Rimuovere il coperchio di sicurezza |
| 2. Collegamento dei cavi | |
| 3. Installare il coperchio di sicurezza, eseguire la protezione |
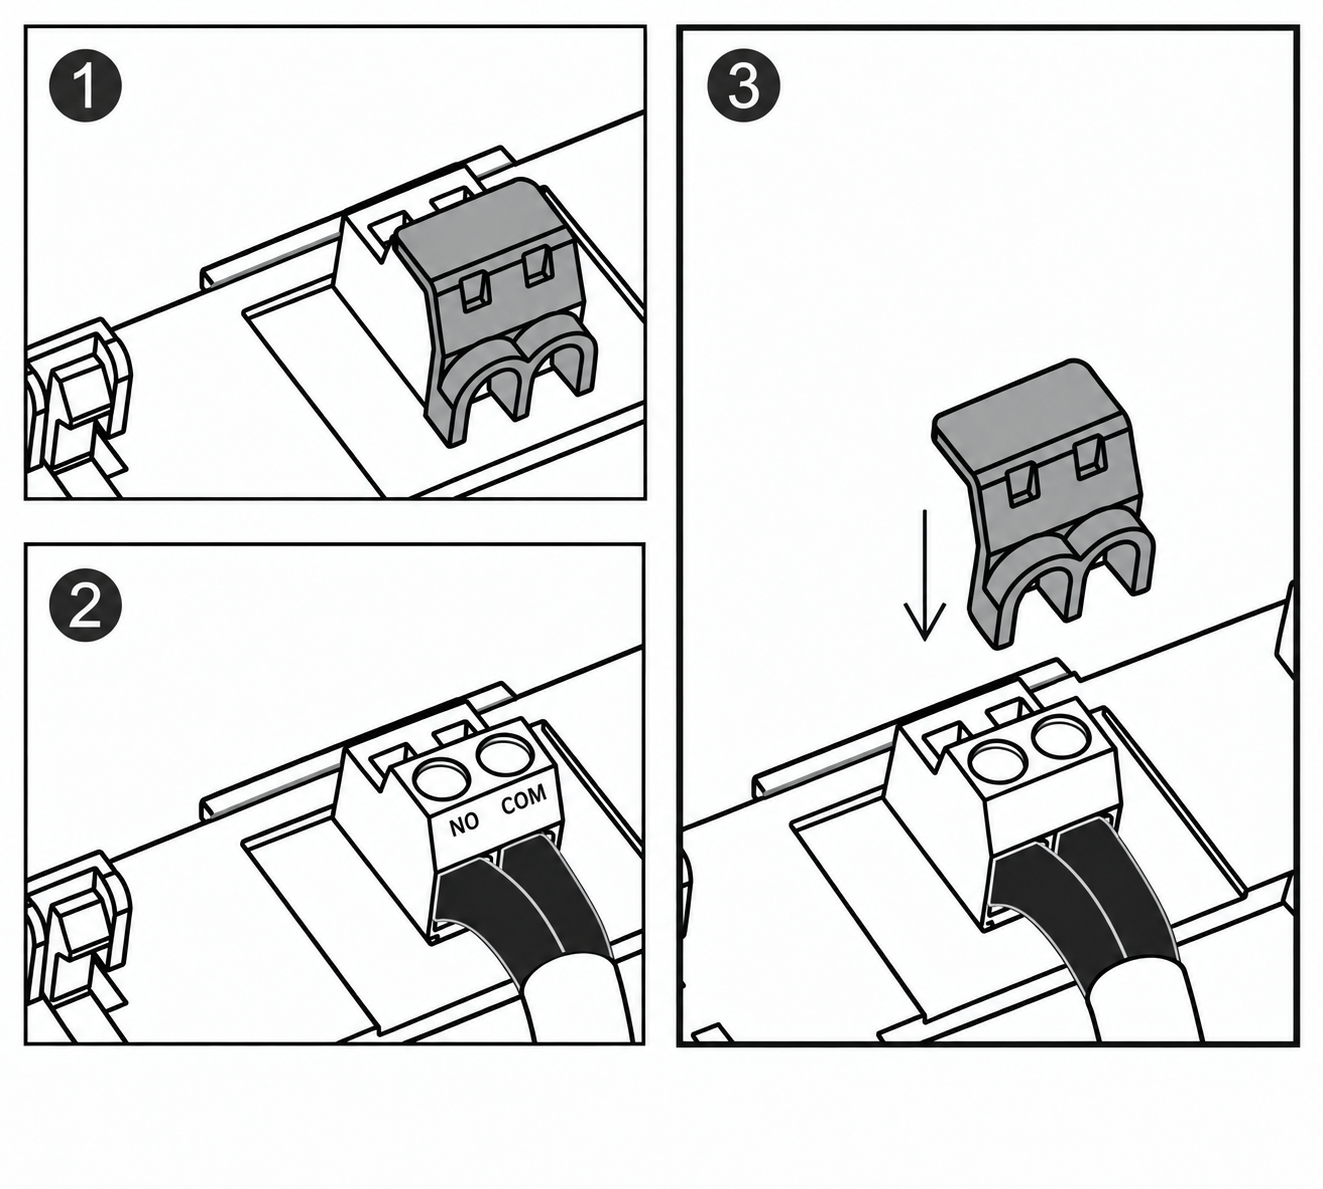
SCHEMA ELETTRICO (A/B - PIANTA)
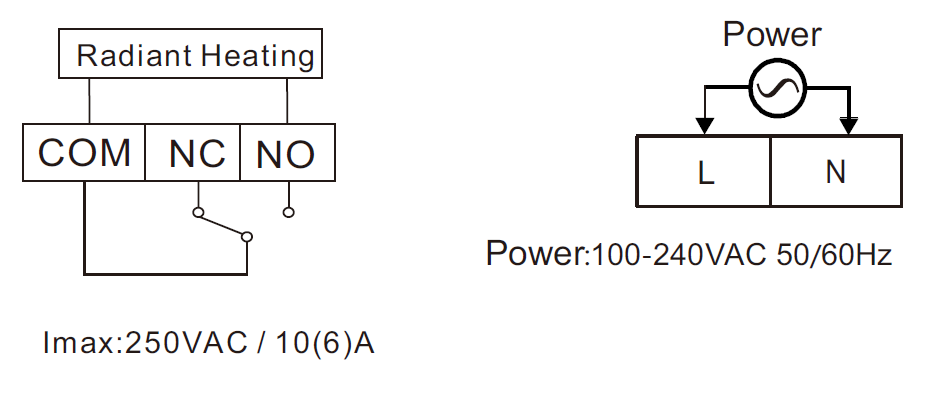 |
Installazione del termostato
Sul muro
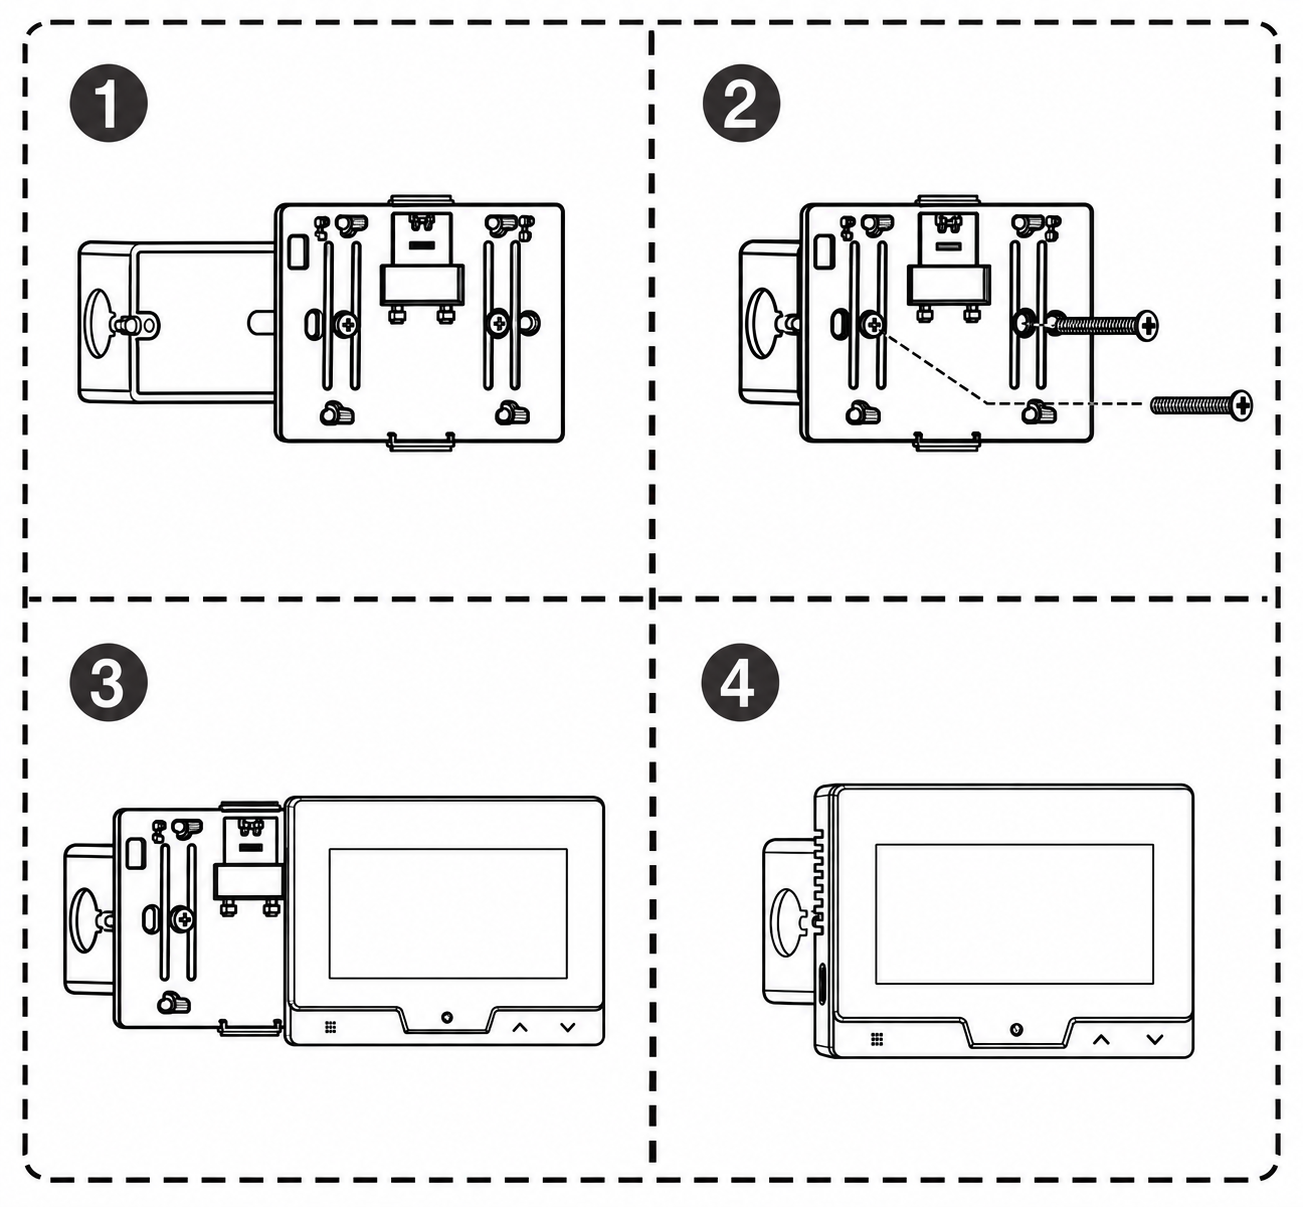 |
1. Posizionare il pannello posteriore sulla scatola di installazione |
|
2. Inserisci la vite nel foro e avvitala. |
|
|
3. Coprire il pannello |
|
|
4. Completamento dell'installazione |
Sulla scrivania
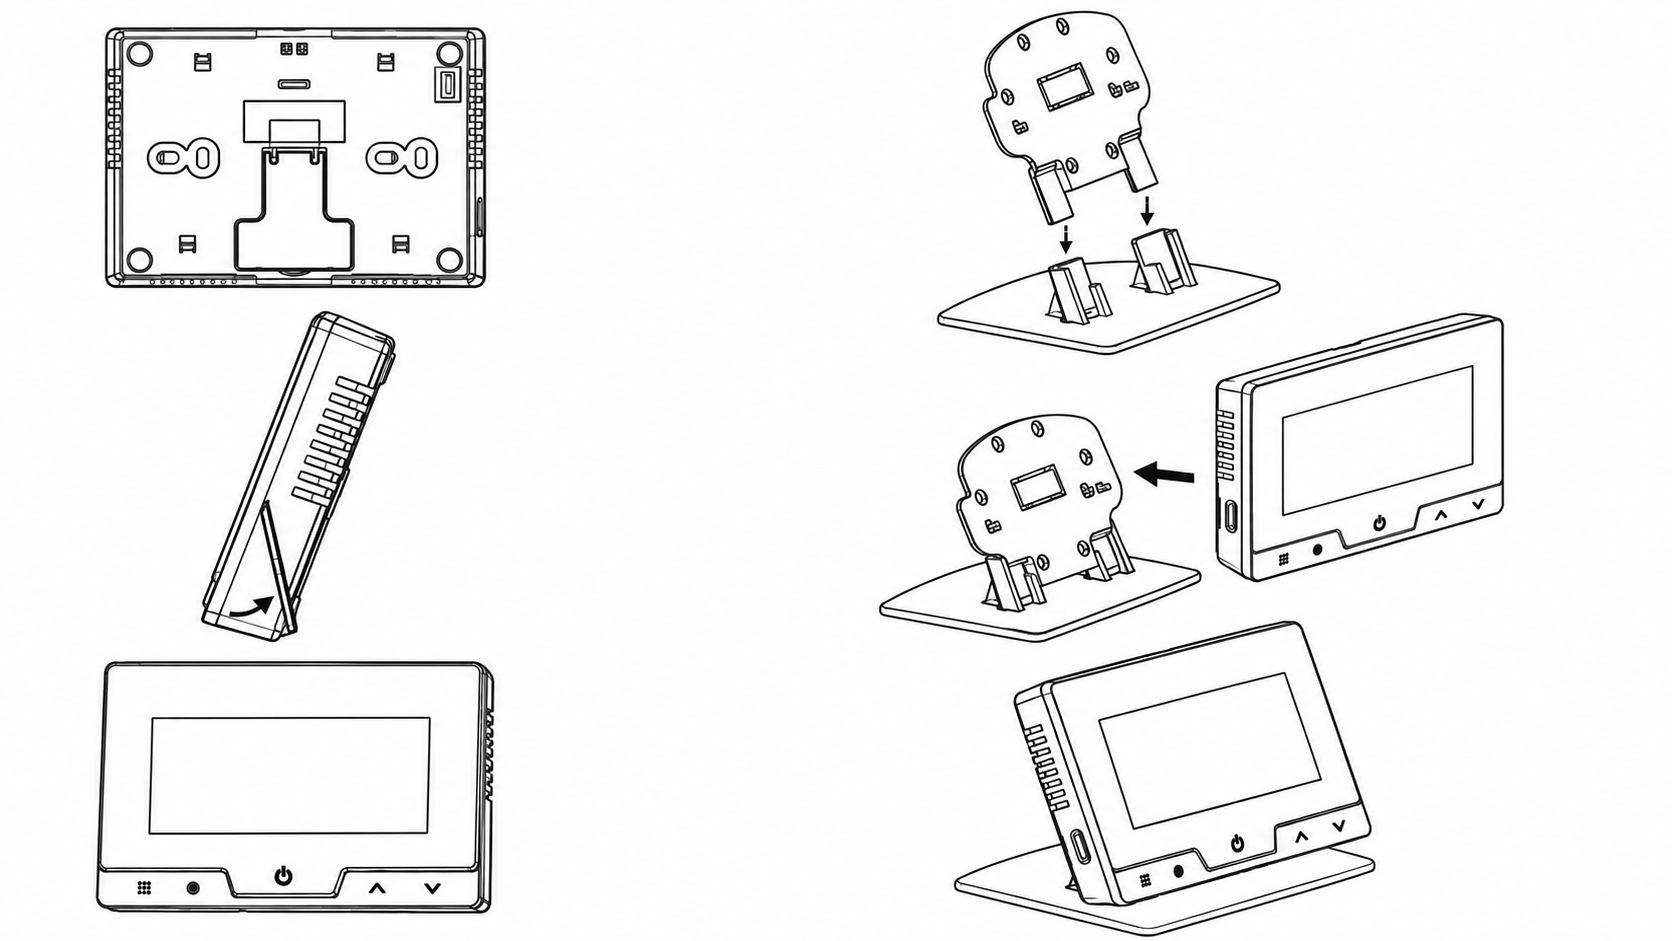 |