
NÁVOD NA POUŽITIE
1. POPIS
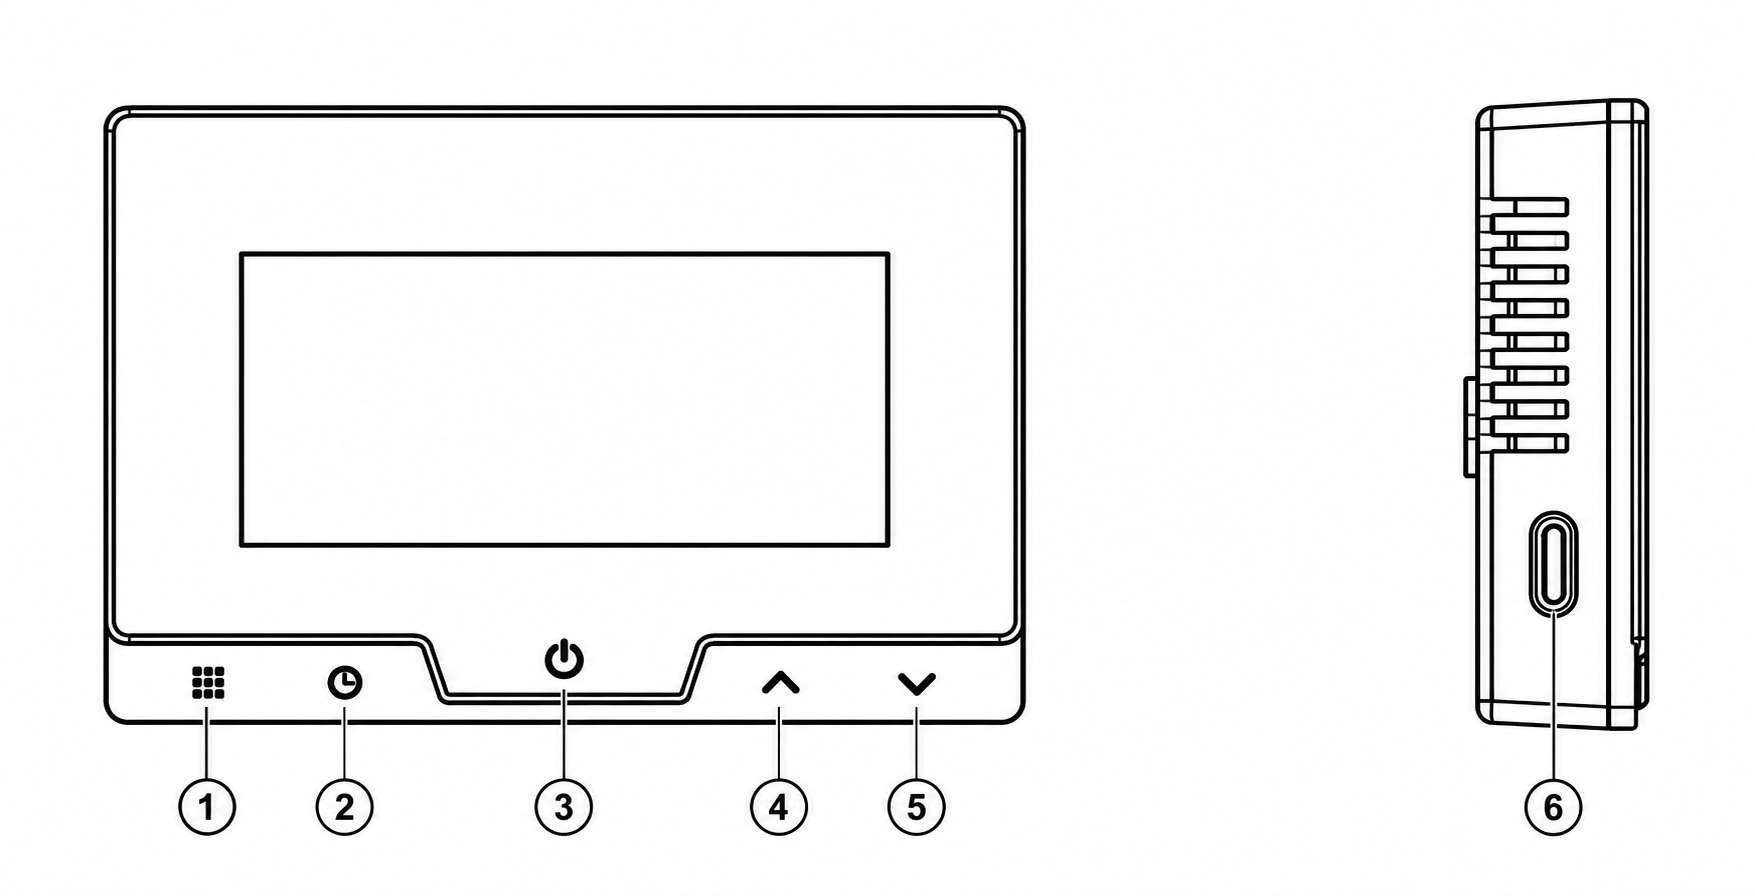 |
| Nie. | Meno | Popis |
| 1 | Menu | Prepína medzi programovanou prevádzkou a manuálnym/dočasným režimom pozastavenia. Stlačte a podržte dlhšie ako 3 sekundy pre vstup do nastavení vykurovacieho programu. |
| 2 | Čas | Zobrazuje a upravuje nastavenia dátumu a času. Stlačením a podržaním približne 3 sekundy vstúpite do režimu nastavenia času. |
| 3 | Napájanie / Potvrdiť | Zapína/vypína termostat a potvrdzuje nastavenia. Používa sa aj na ukončenie menu nastavení. |
| 4 | Hore ▲ | Zvyšuje nastavenú teplotu alebo hodnotu zvoleného parametra. |
| 5 | Dole ▼ | Znižuje nastavenú teplotu alebo hodnotu zvoleného parametra. |
| 6 | Budenie | Aktivuje displej/podsvietenie, keď je termostat v režime úspory energie alebo v pohotovostnom režime. |
| Meno | Popis |
1. Menu |
Krátke stlačenie: prepína termostat medzi programovanou prevádzkou a manuálnou/dočasnou reguláciou teploty. Stlačenie a podržanie dlhšie ako 3 sekundy: vstup do nastavení vykurovacieho programu. Hodnoty v rámci nastavení sa upravujú pomocou tlačidiel 4 ▲ a 5 ▼ . |
2. Nastavenie času |
Krátke stlačenie: prepínanie medzi zobrazením času/teploty. Press and hold for about 3 seconds: enters the date and time settings. Use 4 ▲ and 5 ▼ to change values and 3 to confirm. |
3. Power / Confirm |
Used as the main power and confirmation button. In setting modes, a short press means Confirm / Exit. In normal operation, the button is used to turn the thermostat on and off. It can also be used to wake the thermostat from power-saving mode. |
4. Up ▲ |
Increases the set temperature or the selected parameter value. It is also used when setting the time, heating schedule, and system parameters. |
5. Down ▼ |
Decreases the set temperature or the selected parameter value. |
6. Wake-up |
The side button is used to activate the display after the thermostat enters power-saving mode. In the manual, it is specifically identified as the Wake-up button. |
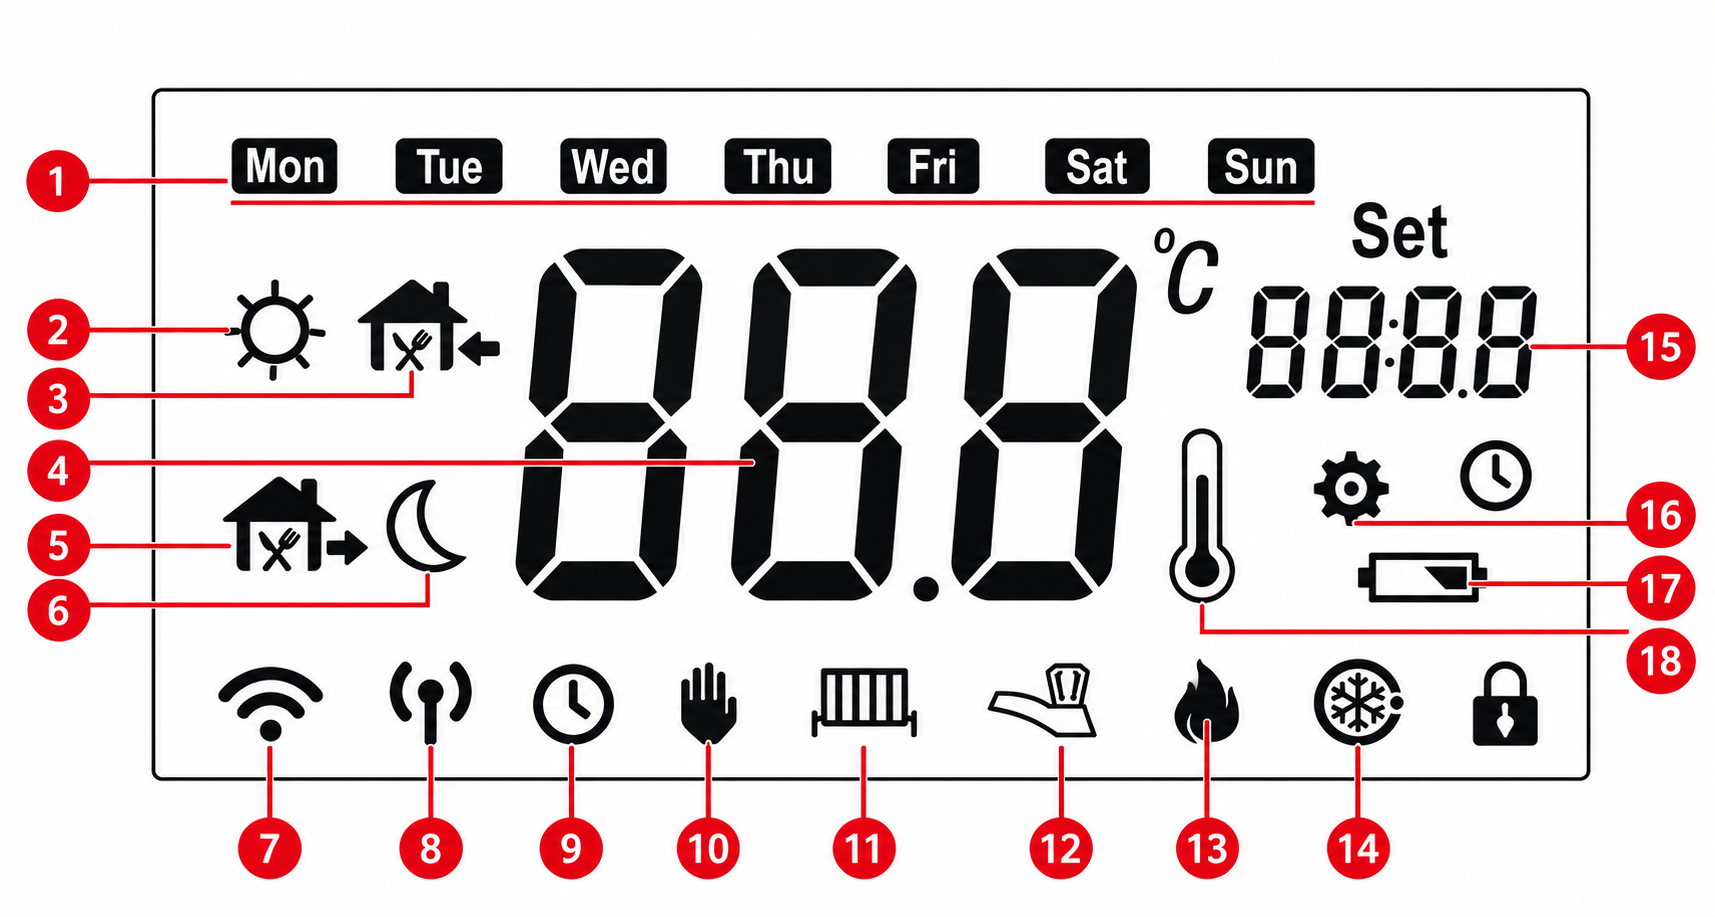 |
1. Week shows |
| 2. Time Bucket flag-Wake up | |
| 3. Time Bucket flag-Back home | |
| 4. OFF\ Temperature shows | |
| 5. Time Bucket flag-Out home | |
| 6. Time Bucket flag-Sleep | |
| 7. Communication show (blinking indicates communication error alarm) | |
| 8. Alternate button | |
| 9. Time shows, Running mode shows | |
| 10. Forever keeping mode shows | |
| 11. Alternate button | |
| 12. Alternate button | |
| 13. Output shows | |
| 14. Anti-freezing mode shows | |
| 15. Setting Time\ Temperature shows | |
| 16. Setting shows (Parameters, programming, time) | |
| 17. Low battery indicator shows | |
| 18. Meterage shows |
Brief Operating Instructions
Power On
If the thermostat is switched off, press 3 – Power.
After switching on, the display shows the current room temperature, set temperature, time, operating mode, and additional indicators. The manual provides indicators for programming, heating output, communication, anti-freeze protection, and low battery status.
Temperature Setting
Use:
4 ▲ – increase the temperature;
5 ▼ – decrease the temperature.
The thermostat temperature setting range is 5–35°C, with a setting accuracy of 0.5°C.
Manual and Programmed Mode
Short press 1 – Menu to switch between manual control and programmed operation. In programmed mode, the thermostat automatically changes the set temperature during the day. The factory program includes six periods:
|
Period |
Time |
Temperature |
|
Wake up |
06:00 |
20°C |
|
Out |
08:00 |
16°C |
|
Back home |
11:00 |
20°C |
|
Out |
14:00 |
16°C |
|
Back home |
18:00 |
20°C |
|
Sleep |
22:00 |
16°C |
Editing the Heating Schedule
Press and hold 1 – Menu for more than 3 seconds.
Then use:
4 ▲ / 5 ▼ – select and change time/temperature;
1 Menu – move to the next parameter/period;
3 Power/Confirm – save settings and exit.
The thermostat allows common or separate programming for different days of the week. The settings allow you to select 4 or 6 temperature periods per day.
Date and Time Setting
Press and hold 2 – Time for approximately 3 seconds.
Use 4 ▲ / 5 ▼ to change the date and time. Button 2 is used to move between parameters, and 3 – Power/Confirm is used to confirm and exit.
Advanced Settings
In standby mode, press and hold 1 – Menu for more than 3 seconds to open the configuration menu. Values are changed using ▲/▼. Press Menu again to move to the next item, and press Power to confirm the settings. If no button is pressed for approximately 10 seconds, the thermostat automatically exits the menu.
|
Parameter |
Function |
Range / Options |
|
CL |
Temperature display calibration |
-4…+4°C |
|
AH |
Maximum allowed temperature |
20-35°C |
|
AL |
Minimum allowed temperature |
5-20°C |
|
bL |
Display-on time |
5 / 10 / 15 sec / --- |
|
db |
Heating differential |
0.5-3°C |
|
Pro |
Weekly program |
ON / OFF |
|
Seg |
Number of periods |
4 / 6 |
|
ES |
Intelligent function |
ON / OFF |
|
PP |
Anti-freeze function |
ON / OFF |
Open Window Detection
The thermostat monitors rapid temperature drops. If the room temperature drops by approximately 1.5°C within 3 minutes, the thermostat detects this as an open window and temporarily stops heating. Normal operation is restored when any button is pressed, when the temperature rises by approximately 1.5°C, or automatically after 30 minutes.
Anti-freeze Protection
Even when the thermostat is switched off, it can still protect the room against freezing: if the temperature falls below 5°C, heating starts, and when the temperature rises above 8°C, heating stops.
Low Battery Indication
When the battery voltage drops below approximately 2.3 V, the low-battery indicator starts flashing on the display.
2. TECHNICAL CHARACTERISTICS
WiFi Frequency: 2.4 GHz
Network Protocol: IEEE802.11 b/g/n
Frequency range: 2.412- 2.484 GHz
Output: 1 channel passive linkage output (10A)
Frequency: 868 MHz (Bidirectional FSK)
Working Range: 100 m
Communicaon protocol: TCP/IP, MQTT
Temperature setting range: 5℃~35℃
Temperature setting accuracy: 0.5℃
Working Temperature: 0°C~50°C
Water resistance: IP21
Power Input: 100-240 V (AC), 50/60 Hz
Power Input (thermostat): 4 AAA batteries / USB-A (5V, 1A)
GATEWAY & RECEIVER:
WiFi Frequency: 2.4 GHz
Network Protocol: IEEE802.11 b/g/n
Frequency range: 2.412GHz- 2.484GHz
Output: 1 channel passive linkage output (10A)
Frequency: 868MHz(Bidirectional FSK)
Working Range: 100m
Communicaon protocol: TCP/IP, MQTT
Working Temperature: 0°C~50°C
Water resistance: IP21
Power Input: 100-240VAC 50/60Hz
Thermostat:
Output: 1 channel passive linkage output (8A)
Frequency: 868MHz (Bidirectional FSK)
Working Range: 100m
Working Temperature: 0°C~50°C
Water resistance: IP21
Power Input: 4 AAA batteries / USB power supply (5V, 1A)
 |
3. SAFETY AND PRECAUTIONARY MEASURES
- Please read this manual carefully.
- Use the product within the temperature and humidity limits specified in the technical data sheet.
- Neinštalujte výrobok v blízkosti zdrojov tepla, ako sú radiátory atď.
- Nedovoľte, aby zariadenie spadlo alebo bolo vystavené mechanickému namáhaniu.
- Na čistenie výrobku nepoužívajte chemicky aktívne ani abrazívne čistiace prostriedky. Namiesto toho použite vlhkú flanelovú handričku.
- Neprekračujte uvedený menovitý výkon. Môže to spôsobiť skrat a úraz elektrickým prúdom.
- Nerozoberajte výrobok sami - diagnostiku a opravy zariadenia by malo vykonávať iba certifikované servisné stredisko.
4. PRIPOJENIE
Na pripojenie zariadenia Nous potrebujete smartfón s mobilným operačným systémom Android alebo iOS s nainštalovanou aplikáciou Nous Smart Home. Táto mobilná aplikácia je bezplatná a dostupná na stiahnutie z Play Marketu a App Store. QR kód aplikácie je uvedený nižšie:
 |
Naskenujte QR kód
Dôležité: Uistite sa, že sieť Wi-Fi je stabilná a má dostatočnú úroveň signálu na zvolenom mieste inštalácie. Sila signálu bude priamo ovplyvňovať prevádzku termostatu, preto sa uistite, že miesto inštalácie termostatu je pokryté sieťou Wi-Fi a má dobrý signál.
5. INŠTALÁCIA
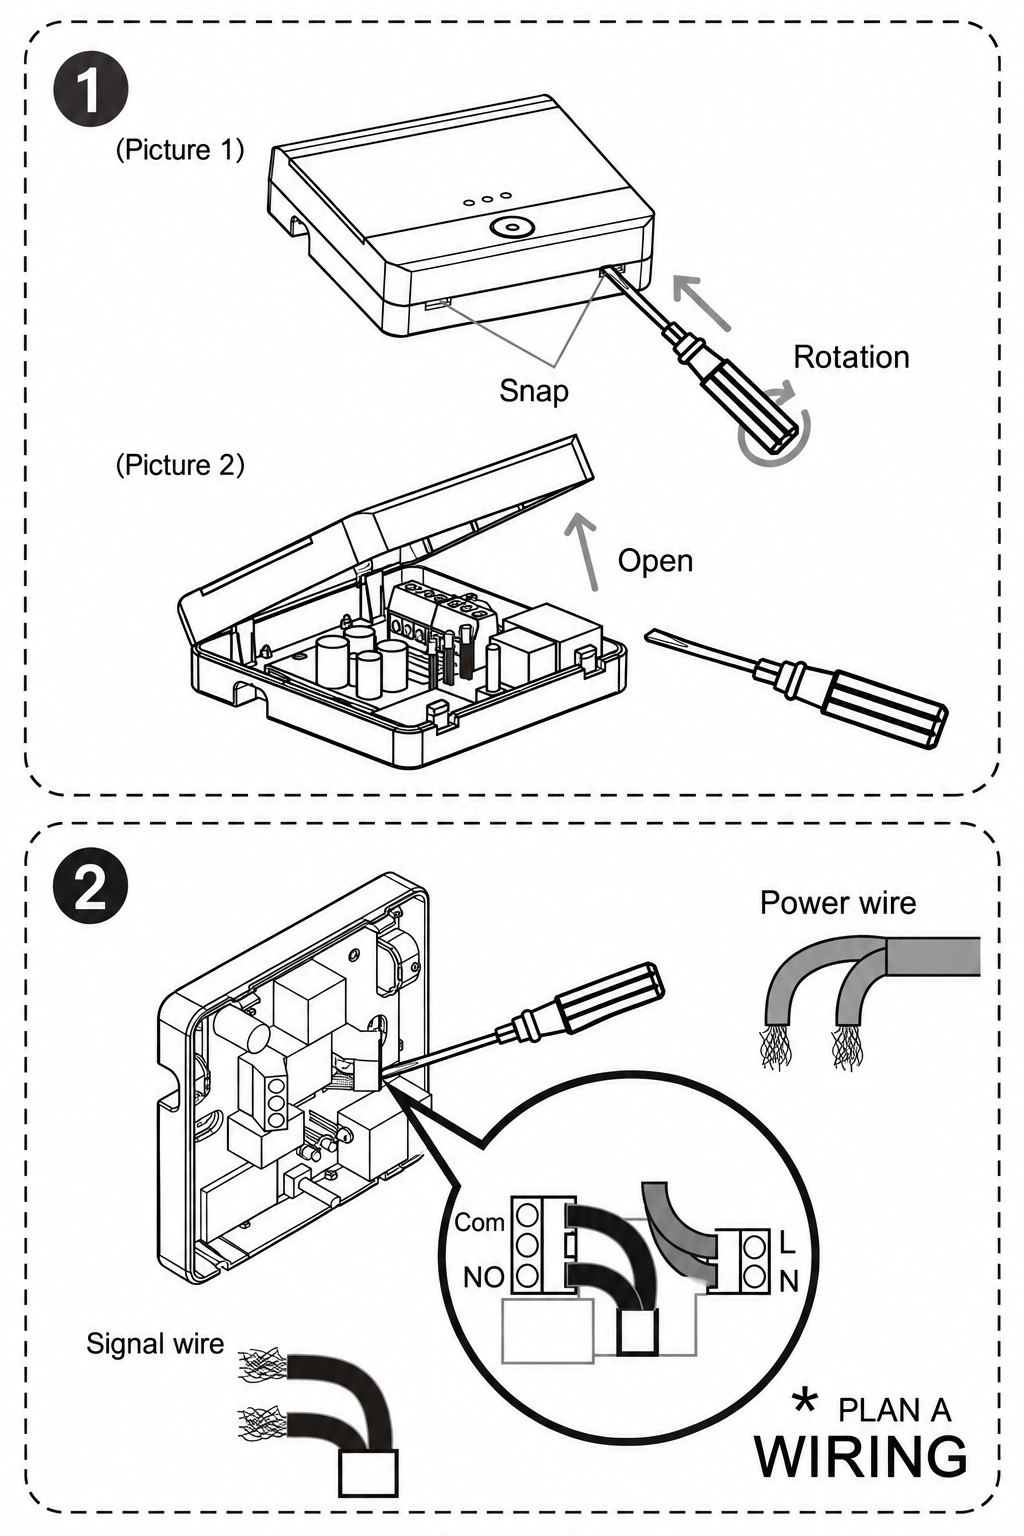
PLÁN A
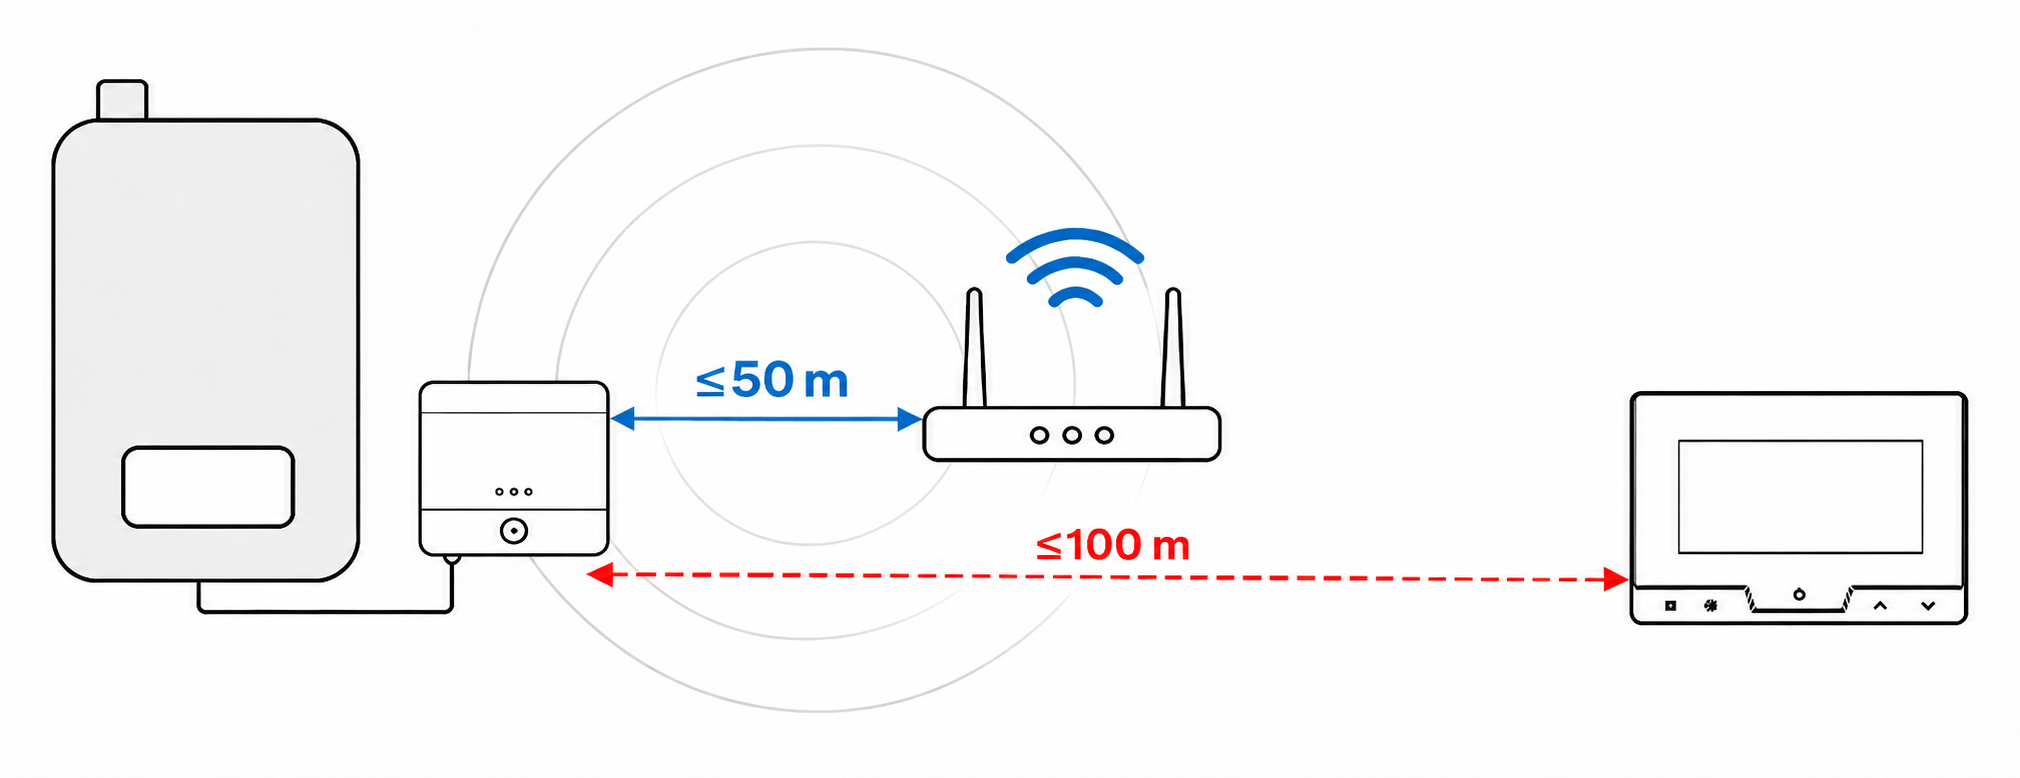
Ak je Wi-Fi sieť pokrytá signálom kotla, prijímač je potrebné nainštalovať v oblasti signálu kotla a vysielač je možné umiestniť
kamkoľvek chcete.
 |
 |
|
|
2. Zapojenie: Vložte kábel do svorky a potom |
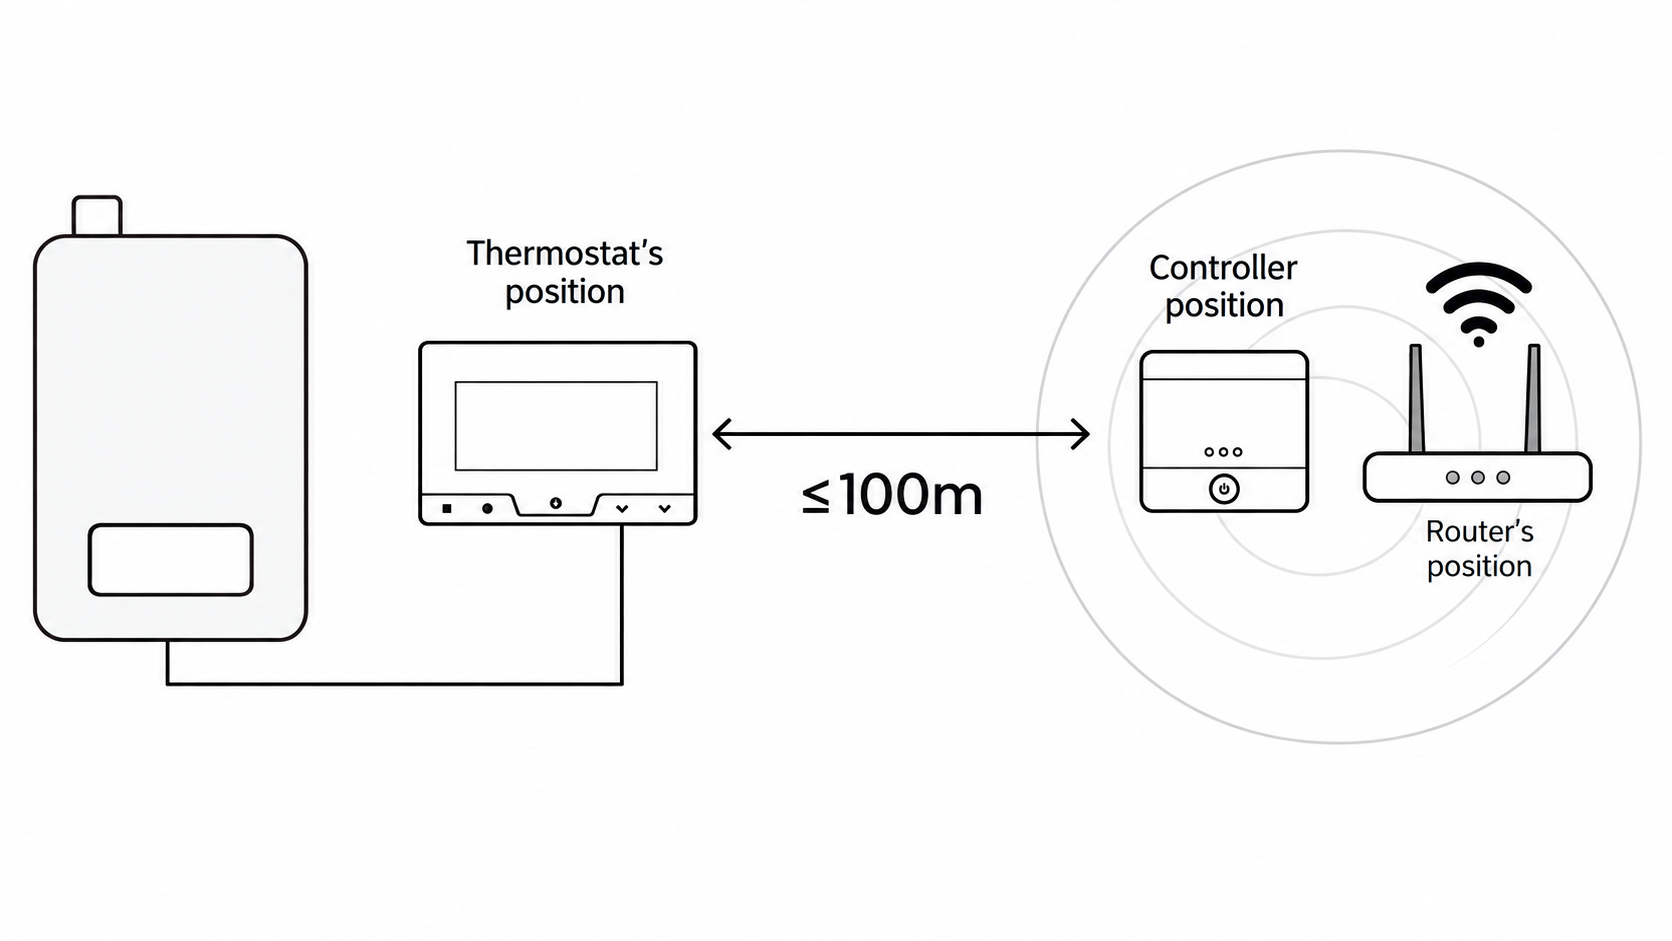
PLÁN B
Ak Wi-Fi nie je pokrytý signálom kotla,
vysielač musí byť nainštalovaný v oblasti signálu kotla a prijímač musí byť nainštalovaný v oblasti pokrytia Wi-Fi.
 |
|
|
1. Odstráňte bezpečnostný kryt |
| 2. Pripojenie káblov | |
| 3. Nainštalujte bezpečnostný kryt a vykonajte ochranu |
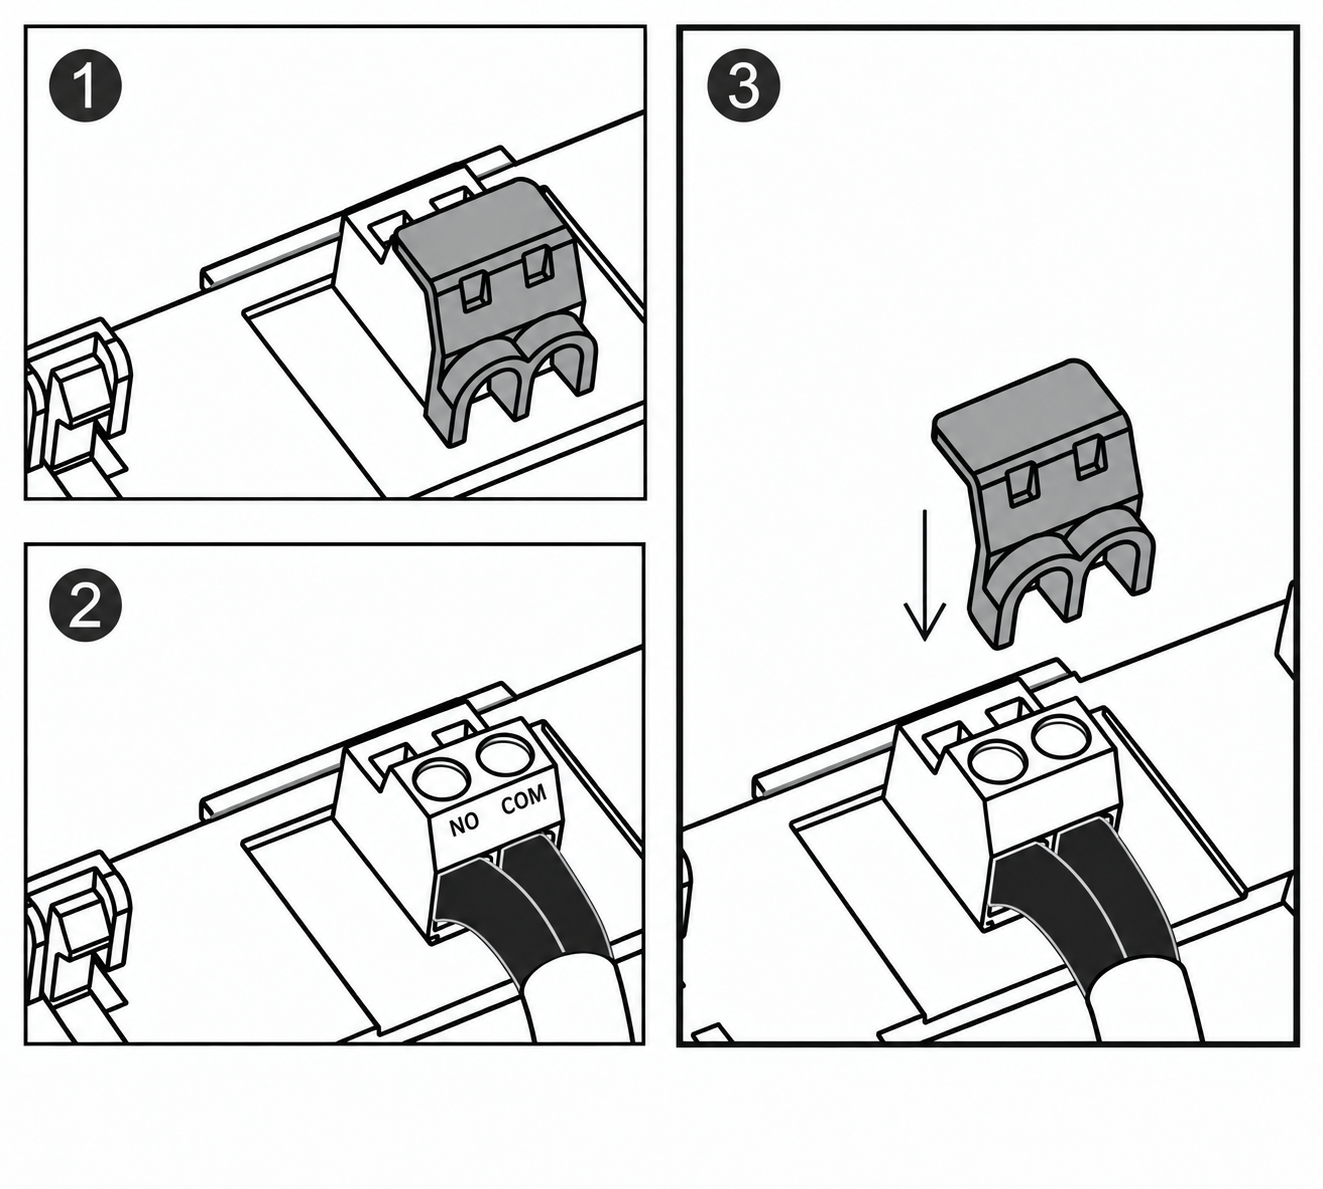
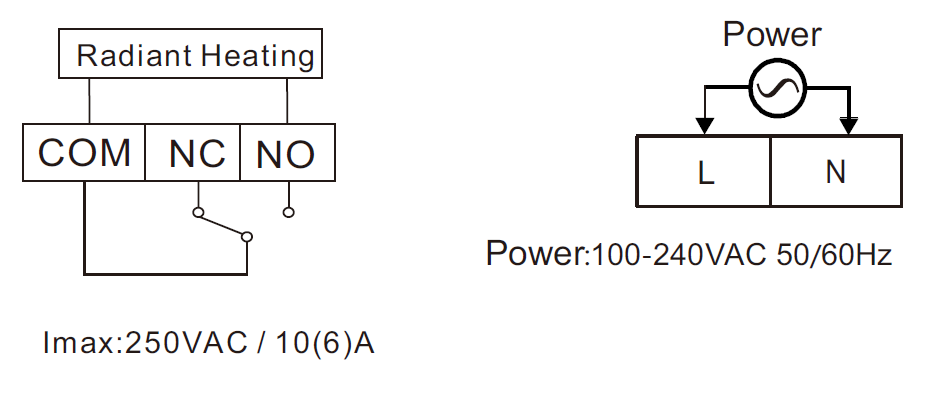
SCHÉMA ZAPOJENIA (A/B - PLÁN)
 |
Inštalácia termostatu
Na stene
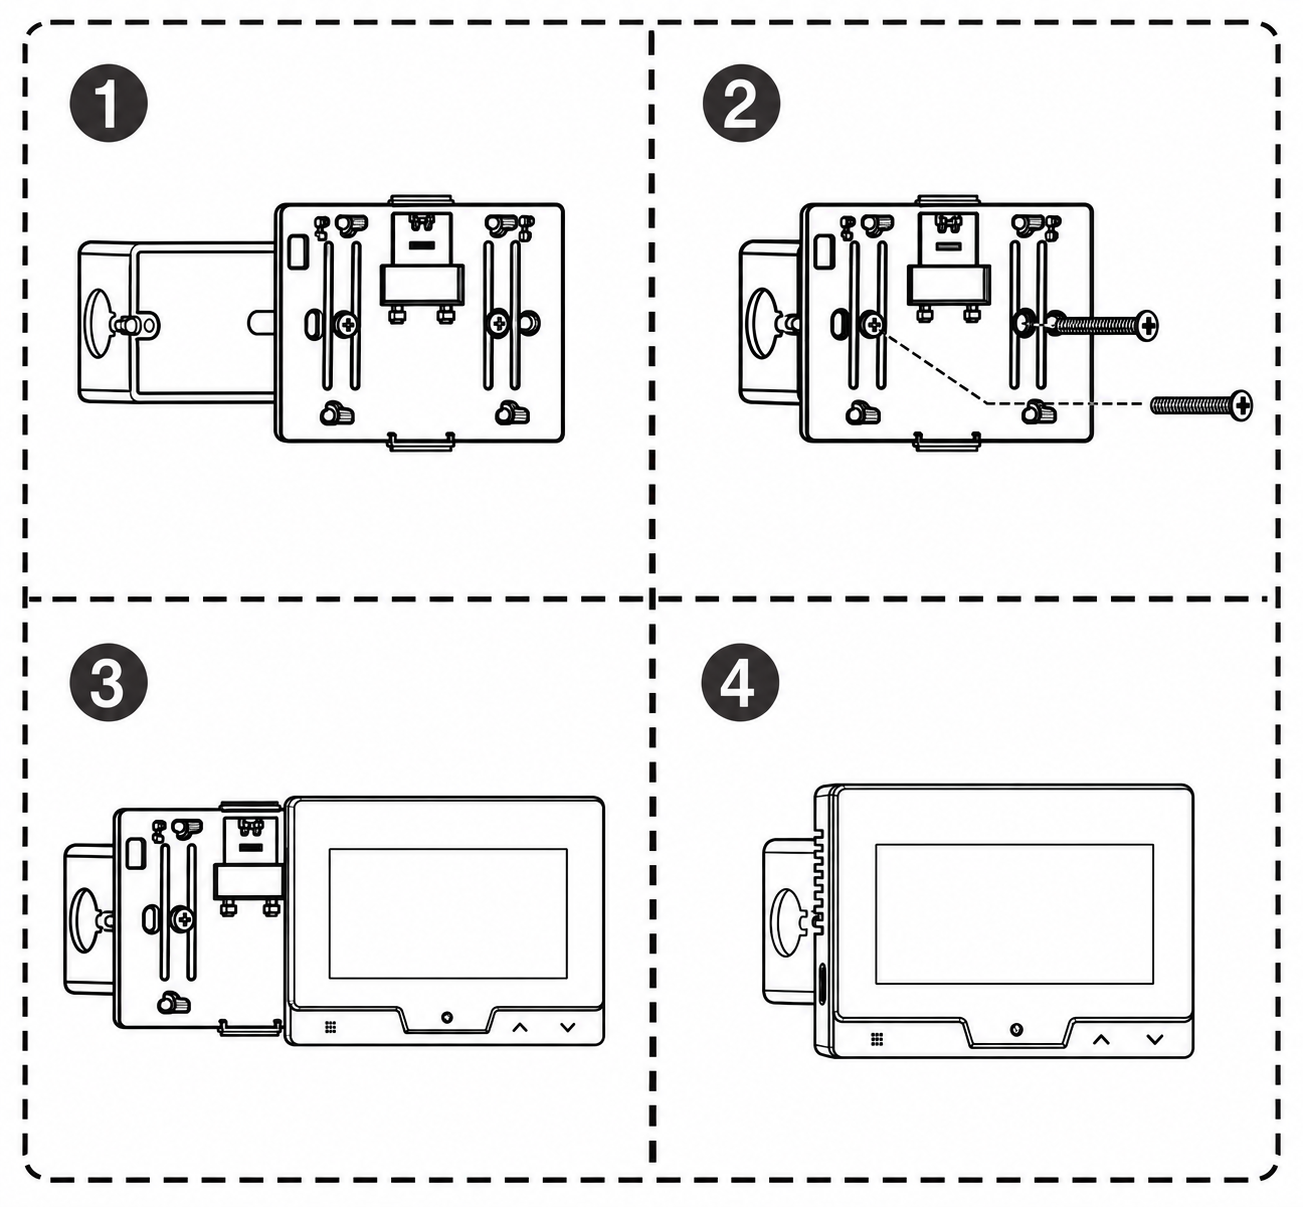 |
1. Nasaďte zadnú dosku na inštalačnú krabicu |
|
2. Vložte skrutku do otvoru a zaskrutkujte ju |
|
|
3. Zakryte panel |
|
|
4. Dokončenie inštalácie |
Na stole
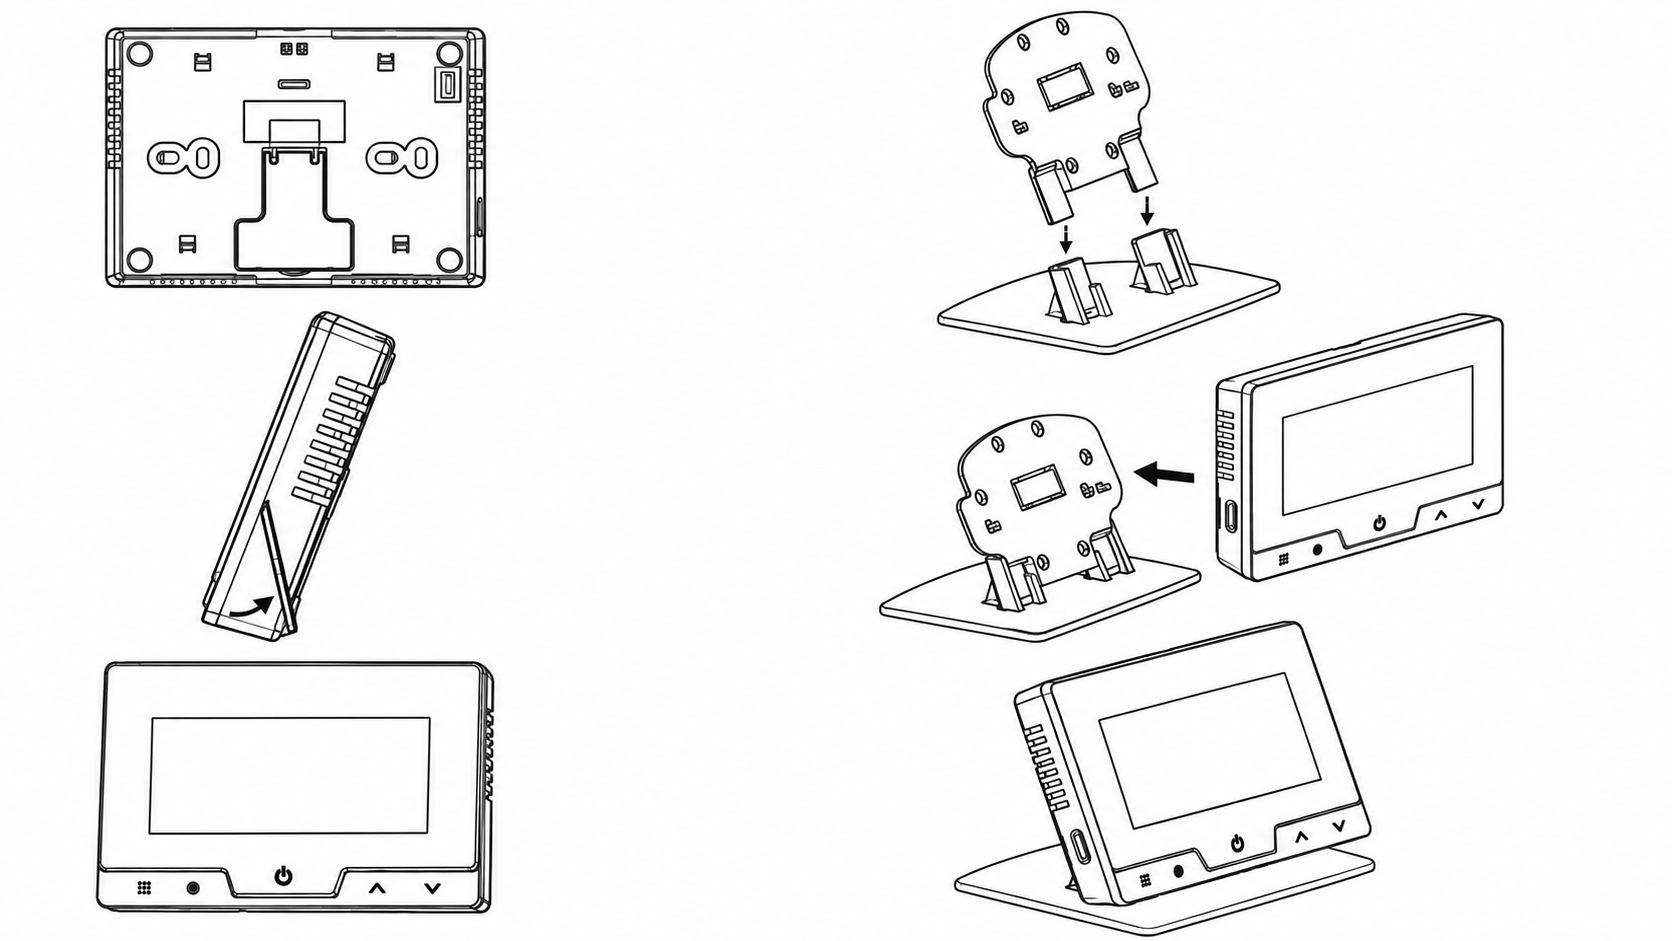 |