
INSTRUCTION MANUAL
Description
The Wi-Fi Nous W3 PTZ camera (hereinafter referred to as the video camera) is designed to organize video surveillance and audio monitoring in order to use remote access via the Internet using a smartphone or tablet with the Nous Smart Home application installed. Communication with the camera is built through a cloud server using the P2P protocol, for which a 2.4 GHz Wi-Fi wireless adapter is used. The camcorder is equipped with a microphone and a speaker to support two-way audio communication. The device has a microSD card slot and supports memory card up to 128 GB expandable. The camcorder records video with sound on the memory card. Continuous recording or motion detection recording is possible. The camcorder can send push notifications when it detects a motion detector associated with it by a smartphone. The Nous Smart Home application has the function of accessing a paid cloud archive, the user can purchase a subscription to such an archive. A more detailed rationale for the operation of the video camera is discussed below.
 ATTENTION: Communication with the camera over the Internet cannot be guaranteed in all cases, as it depends on many conditions: the quality of the communication channel and intermediate network equipment, the brand and model of the mobile device, the version of the operating system, etc.
PRECAUTIONARY MEASURES
- Read this instruction carefully.
- Use the product in temperature and humidity ranges indicated in the technical passport.
- Do not install the product near heat sources, for example, heating radiators, etc.
- Do not allow the fall of the device and the effects of mechanical loads on it.
- Do not use chemically active and abrasive detergents for cleaning the product. Use wet flannel rag for this.
- Exclude strong excesses of connecting wires. This can cause a short circuit and electric shock.
- Do not disassemble the product yourself - the diagnosis and repair of the device should only be done in a certified service center.
Safety information
- The device is recommended for use indoors and in a dry location only, camera shall be used within it's published outlet rating on the instructions.
- Please contact seller for replacement if there is any damage caused by transportation.
- Please plug in the cam in proper condition and away from children.
- Please do not disassemble the , otherwise there may cause product damaged or security risks.
Design and controls
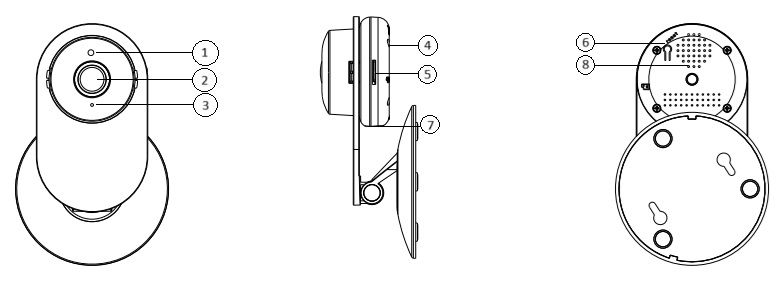
| № | Name | Description |
| 1 | Light sensor | Used to automatically switch the image from the color mode to black and white and vice versa, as well as the inclusion of IR backing |
| 2 | Video camera lens | Used to form an image |
| 3 | Indicator | Shows the current state of the device |
| 4 | Microphone | Used to form an audio flow |
| 5 | microSD card slot | To install a Microsd Class 10 memory card with a capacity of up to 128 GB inclusive |
| 6 | Button "Reset" (Reset) | Long-term clicking of the button (5-7 C) resets the settings of the video camera and the settings for connecting to the Wi-Fi network |
| 7 | Port DC | Used to power the device |
| 8 | Speaker | Used to transmit sound from a smartphone, as well as voice support when tuning and starting |
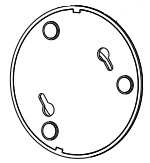
Installation
The video camera can be fixed on the ceiling using the mounting plate from the delivery kit, or installed on a flat horizontal surface - the base of the video camera is rubberized and will not slide over the surface.
| Installation procedure using the mounting plate: | ||
| 1 | Select the installation site and lay the DC cable from the power supply source 5 V from the supply kit; |
|
| 2 | Fix the mounting plate to the installation site using the fastener from the delivery kit or another with similar characteristics, taking into account the mounting material; | |
| 3 | Install a video camera on a fixed plate; | |
| 4 | When the installation is completed, you can serve. | |
|
Important: |
Make sure that in the selected place of installation the Wi-Fi network is stable and has a sufficient level. |
Connection
To connect the Nous W6 Smart WiFi Camera, you need to use a smartphone based on the Android or iOS mobile operating system with the Nous Smart Home application installed. This mobile application is free and available for download from Play Market and App Store. The QR code for the app link is below:

After installing the application, for its correct operation, it is necessary to provide him with all the permits in the corresponding section of the smartphone settings. Then it is necessary to register a new user of this application.
Procedure for connecting the camcorder to a Wi-Fi network:
| 1 | Connect the smartphone to the access point that will be used to connect the video camera. Make sure that the frequency range of the 2,4 GHz network, otherwise the Smart WiFi Camera do not connect, since the video camera is not designed for working with Wi-Fi 5 GHz networks; | |
| 2 | Power on the camcorder, wait for the voice prompt. If there was no voice prompt, then press the reset button for 5-7 seconds to reset the camcorder settings to factory defaults | |
| 3 | Open the Nous Smart Home application and click on the new device adds button: | |
 |
 |
|
| 4 | In the opened tab "Add manually" Select the category "Video cameras", and in it the model "Camera W3", as shown in the figure above; | |
| 5 | In the window that opens, select the “next step” and press the “forward” button; | |
| 6 | In the next window, make sure that the name of the access point corresponds to the necessary, then enter the password for it into the line below and press the "Next" button; | |
 |
 |
|
| 7 | A window will appear, which explains how to arrange the smartphone screen opposite the video camera lens so that it managed to consider the QR code to connect to the access point, as shown in the figure above; | |
| 8 | On the screen of the smartphone will appear a QR code with data of access point, you need to "show" its camera. With the successful reading of the code, a short sound signal and voice message "Connecting Network" will sound. Click on the "heard signal" button; | |
| 9 | A window will appear with an indication of the degree of connection to the network and adding to the list of devices of the current user of the application: | |
 |
 |
|
| 10 | At the end of the procedure, a window will appear in which you can set the name of the device and select the room in which it is located. | |
| When a device is removed from the application user's device list, the camera settings are reset to factory defaults and the Wi-Fi connection procedure will need to be repeated. If the password for the Wi-Fi access point was entered incorrectly, then after the timer expires, the application will display the “Failed to connect the camcorder to Wi-Fi” window with a suggestion of step-by-step actions to resolve the problem. | ||
Desktop access
To watch the streaming video from the surveillance camera in the browser, go to the website https://ipc-eu.ismartlife.me/login

In the Nous Smart Home application, select the QR code scan button and scan the resulting code from the site.

* This translation can be inaccurate because it was made using the Google Translate service.