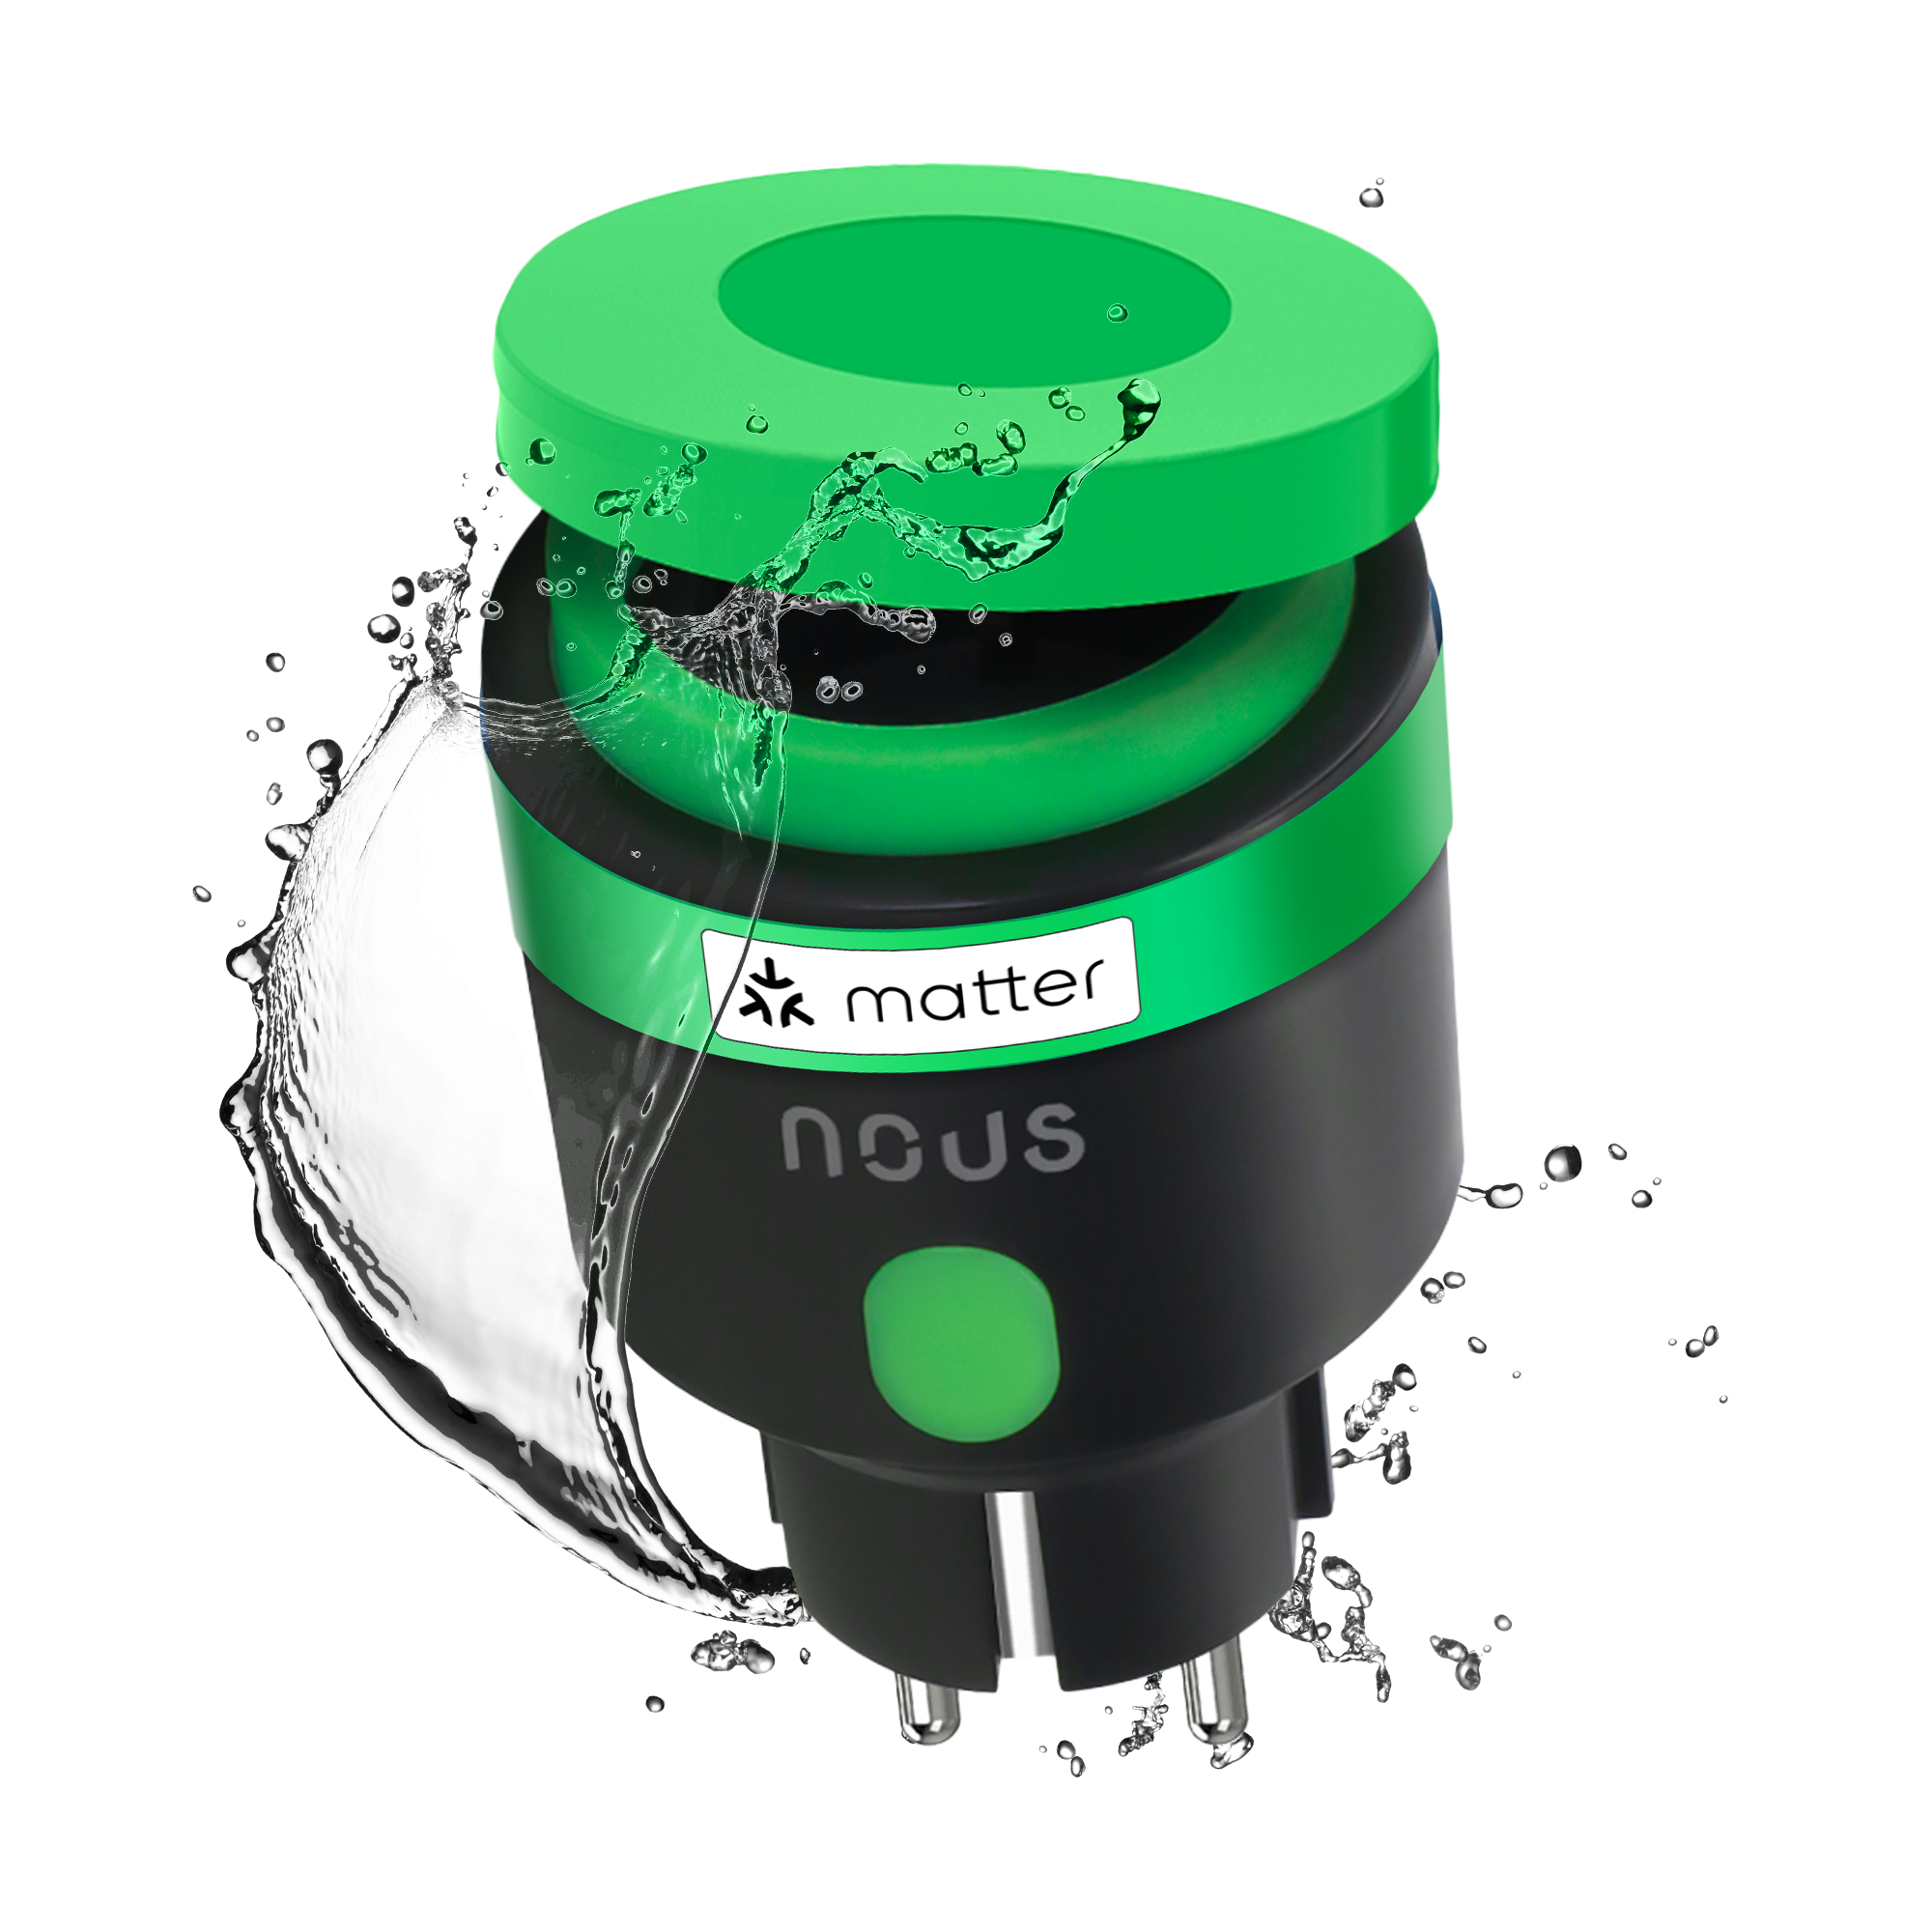
NOUS A6M Matter Smart Outdoor Socket
| Main settings | |
|---|---|
| EAN | 5903206938335 |
| Brand | NOUS |
| Special features | Energy Monitoring |
| Electric power | 3680W |
| Certificate | CE, RoHS, RED |
| Specifications | |
| Device dimensions | 58*58*100 mm |
| Body material | Heat resistant plastic |
| Maximum load | 16A |
| Operating temperature | -5°C ~ 40°C |
| Operating voltage range | 220-240V |
| Level of moisture protection | IP44 |
| Device weight | 109 g |
| Standby power consumption: | 1.3W |
| Network | |
| Protocol | IEEE802.11 b/g/n |
| Type of wireless transmission | 2,4 GHz |
| System requirements | iOS 8 or Android 4.4 or higher |
| Control from a smartphone | Apple Home,Tuya Smart Life, Amazon Alexa, Google Home, Smart things etc |
| Max.Transmit Power | 17 dBm |
| Frequency range: | 2.400 - 2.4835 GHz |
| Communication standard | Matter |
| Other | |
| Comes in the box | Socket, user manual, packaging |
| Warranty | 24 Months |
OPERATING MANUAL
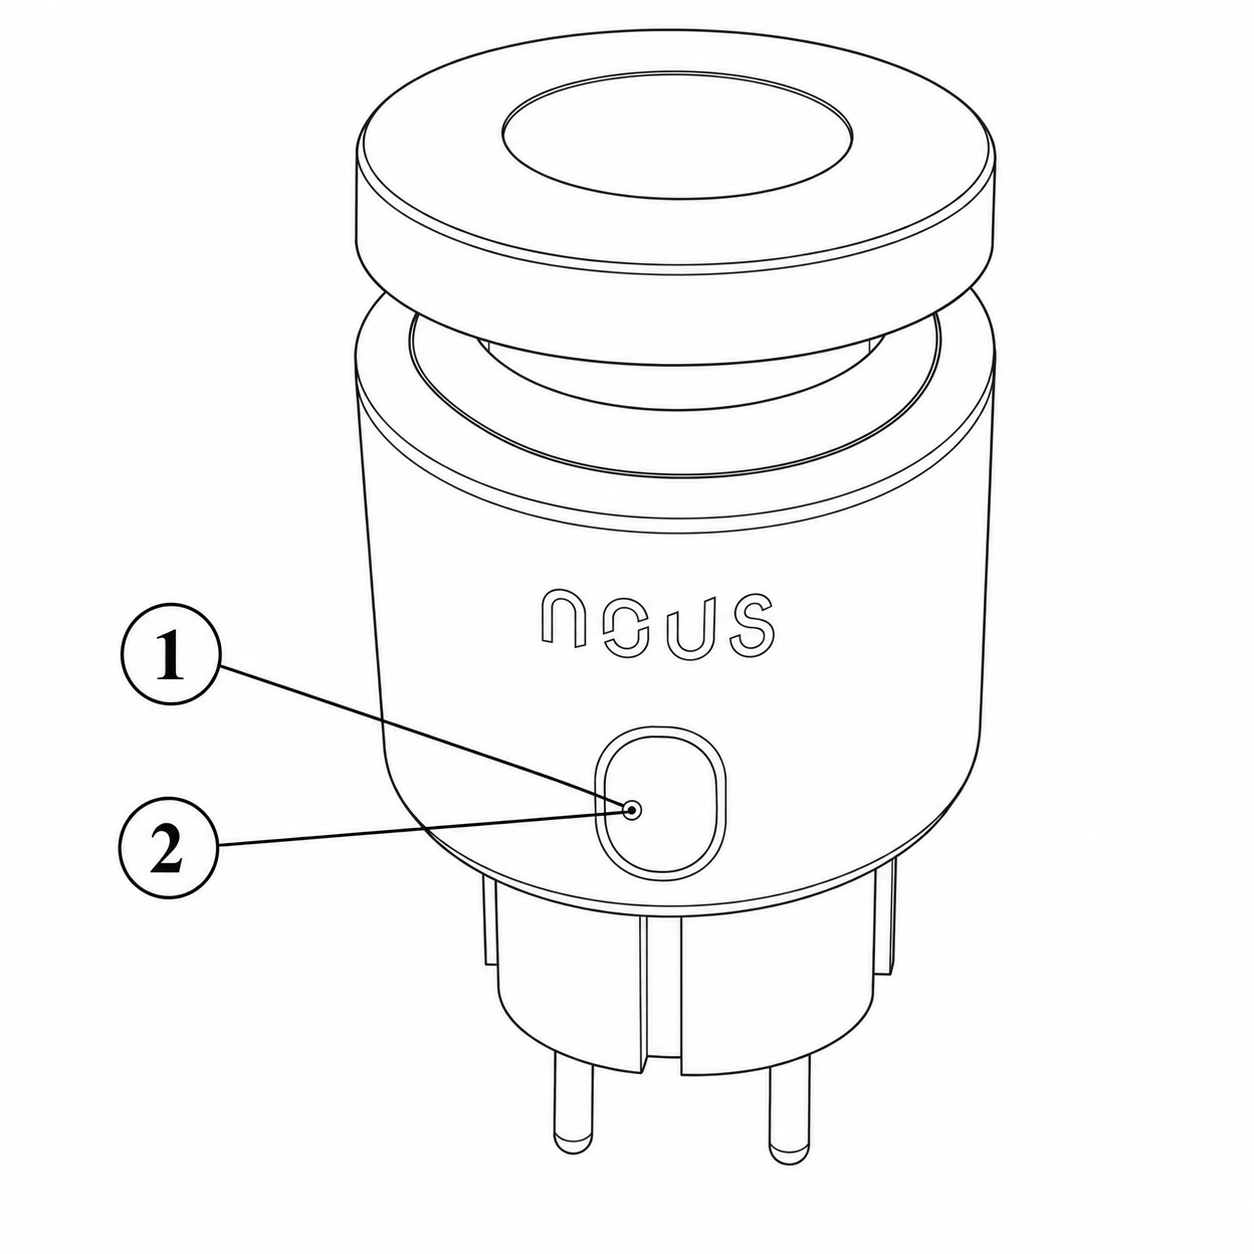
1. DESCRIPTION
 |
| № | Name | Description |
| 1 | Button | A short press of the button switches the device "ON" "OFF". A long press of the button (5-7 C) resets the device settings and network connection parameters. |
| 2 | Indicator | Shows the current state of the device |
WARNING!
Required hubs for connection via Matter
1. For Google Home/Google Nest.
You need one of these devices: Google Nest Hub (2nd generation or later), Google Nest Hub Max, Google Nest Mini/Google Home Mini (with updated firmware), Google Nest Audio, Google Nest Wifi Pro (Matter-enabled router)
2. For Apple HomeKit
You need one of these devices: Apple HomePod (any generation), Apple HomePod mini, Apple TV 4K (2022 or later with Thread support),
3. For Amazon Alexa
You need one of these devices: Amazon Echo (4th generation), Amazon Echo Dot (5th generation), Amazon Echo Show 10 (3rd generation), Amazon Echo Studio, eero Pro 6 (Matter-enabled router)
4. For Samsung SmartThings
Need: SmartThings Hub (v3), SmartThings Station
2. TECHNICAL CHARACTERISTICS
WiFi Frequency: 2.4 GHz
Network Protocol: IEEE802.11 b/g/n
Output Power: 3680W
Rated Voltage: 100-240VAC
Rated Current: 16A
Working Temperature: -5°C ~ 40°C
Water resistance: IP44
Frequency range: 2.400 - 2.4835 GHz
Max.Transmit Power: 17 dBm
Dimensions: 56*50*84mm
3. SAFETY AND PRECAUTIONARY MEASURES
- Please read this manual carefully.
- Use the product within the temperature and humidity limits specified in the technical data sheet.
- Do not install the product near heat sources such as radiators, etc.
- Do not allow the device to fall or be subject to mechanical stress.
- Do not use chemically active or abrasive detergents to clean the product. Use a damp flannel cloth instead.
- Do not exceed the specified power rating. This may result in a short circuit and electric shock.
- Do not disassemble the product yourself - diagnostics and repairs of the device should only be carried out at a certified service center.
4. CONNECTION
To connect the Nous device, you need a smartphone based on the Android or iOS mobile operating system with the Nous Smart Home application installed. This mobile application is free and available for download from Play Market and App Store. The QR code for the application is given below:
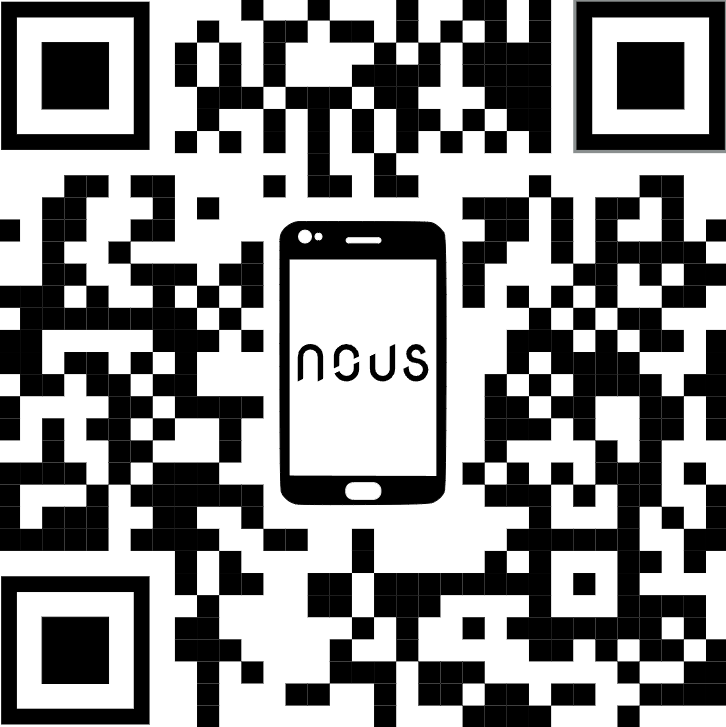 |
Scan the QR code
Importantly: Make sure that the Wi-Fi network is stable and has a sufficient level in the chosen installation location.
To connect your device to a Wi-Fi network:
| 1 | Connect your smartphone to the access point that will be used to connect the device. Make sure the network frequency range is 2.4 GHz, otherwise the device will not connect as it is not designed to work with 5 GHz Wi-Fi networks. | |
| 2 | Turn on the device. | |
| 3 | Open the Nous Smart Home app and click the add new device button. | |
| 4 |
An auto-scan will appear, prompting you to add a new device. Confirm the connection and start pairing. |
|
| 5 |
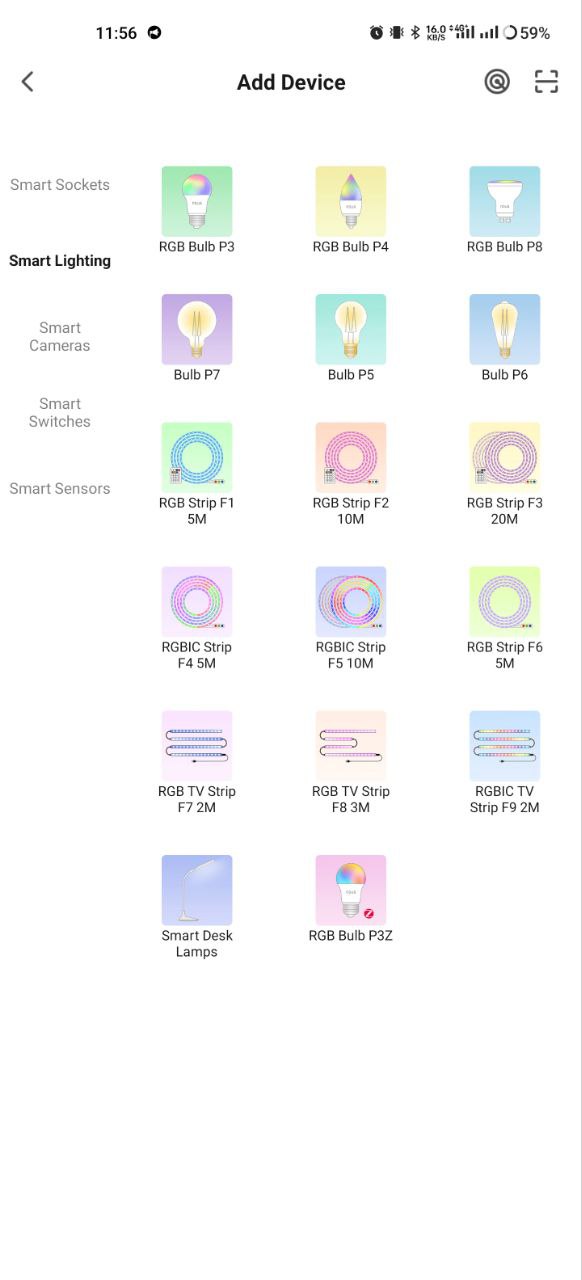
If auto-scan doesn't see your device, you can select it manually from the device list. |
|
 |
 |
|
| 6 | In the "Add manually" tab, select the "Smart sockets" category, and in it the model "A6M socket", as shown in the figure above; | |
| 7 | In the window that opens, select "next step" and click the "Next" button. | |
| 8 | In the next window, make sure that the name of the access point matches the required one, then enter the password for it in the line below and click the "Next" button. | |
 |
 |
|
| 9 | A window will appear indicating the degree of network connection and adding the current user of the application to the list of devices. | |
| 10 | Once the procedure is complete, a window will appear where you can name the device and select the room it is in. The device name will also be used by Amazon Alexa and Google Home. | |
| 11 | Adding a device to the Nous Smart Home app using a QR code. | |
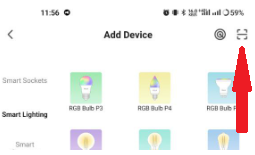
| 12 | In the "Add Manually" tab, select "Scan" as shown in the figure below. | |
 |
||
| 13 | Next, scan the QR code and wait for the device to appear in the app. | |
| 14 | To delete all data from the device, you need to "Delete device", "turn off and delete all data" in the device menu. | |
| When a device is removed from the user's device list in the application, the device settings are reset to factory settings and you will need to go through the Wi-Fi connection procedure again. If the password for the Wi-Fi access point was entered incorrectly, the application will display a "Failed to connect to Wi-Fi" window after the timer expires, offering step-by-step steps to resolve the issue. | ||
5. Connection via Matter protocol (Google Home, Apple HomeKit, Alexa)
1. Google Home
-
Open Google Home → "+" → "Add device" .
-
Select "Matter Protocol Devices" .
-
Scan the QR code on the light bulb or enter the code manually.
-
Assign a room → done!
2. Apple HomeKit
-
Open the Home app → "+" → "Add device" .
-
Point the camera at the QR code on the light bulb.
-
Confirm addition → assign room.
3. Amazon Alexa (via Matter)
-
Open the Alexa app → "Devices" → "+" → "Add Device" .
-
Select "Matter" → "Scan for devices" .
-
Alexa will find the light bulb → confirm the addition.
-
Assign a name and group (for example, "Living Room").
Importantly!
-
To work through Matter, your hub must be on the same local network as the device.
-
Some features (e.g. advanced scenarios) may only be available through the native Nous Smart Home app
-
If you are having connection problems, try:
-
Reboot the hub
-
Update hub firmware
-
Reset device
-
For further assistance, please contact NOUS support.
BEDIENUNGSANLEITUNG
1. BESCHREIBUNG
|
| Nr. | Name | Beschreibung |
| 1 | Taste | Ein kurzer Druck auf die Taste schaltet das Gerät ein/aus. Ein langer Druck auf die Taste (5-7 C) setzt die Geräteeinstellungen und Netzwerkverbindungsparameter zurück. |
| 2 | Indikator | Zeigt den aktuellen Status des Geräts an |
WARNUNG!
Erforderliche Hubs für die Verbindung über Matter
1. Für Google Home/Google Nest:
Sie benötigen eines der folgenden Geräte: Google Nest Hub (2. Generation oder neuer), Google Nest Hub Max, Google Nest Mini/Google Home Mini (mit aktualisierter Firmware), Google Nest Audio, Google Nest Wifi Pro (Router mit Matter-Unterstützung).
2. Für Apple HomeKit:
Sie benötigen eines der folgenden Geräte: Apple HomePod (beliebige Generation), Apple HomePod mini, Apple TV 4K (ab 2022 mit Thread-Unterstützung).
3. Für Amazon Alexa:
Sie benötigen eines der folgenden Geräte: Amazon Echo (4. Generation), Amazon Echo Dot (5. Generation), Amazon Echo Show 10 (3. Generation), Amazon Echo Studio, eero Pro 6 (Router mit Matter-Unterstützung).
4. Für Samsung SmartThings
: Sie benötigen einen SmartThings Hub (Version 3) oder eine SmartThings Station.
2. TECHNISCHE MERKMALE
WLAN-Frequenz: 2,4 GHz;
Netzwerkprotokoll: IEEE 802.11 b/g/n;
Ausgangsleistung: 3680 W;
Nennspannung: 100–240 V
AC; Nennstrom: 16 A;
Betriebstemperatur: -5 °C bis 40 °C;
Schutzart: IP44;
Frequenzbereich: 2,400–2,4835 GHz;
Maximale Sendeleistung: 17 dBm;
Abmessungen: 56 × 50 × 84 mm
3. Sicherheits- und Vorsichtsmaßnahmen
- Bitte lesen Sie diese Bedienungsanleitung sorgfältig durch.
- Das Produkt ist innerhalb der im technischen Datenblatt angegebenen Temperatur- und Feuchtigkeitsgrenzen zu verwenden.
- Installieren Sie das Produkt nicht in der Nähe von Wärmequellen wie Heizkörpern usw.
- Das Gerät darf nicht herunterfallen oder mechanischen Belastungen ausgesetzt werden.
- Verwenden Sie zur Reinigung des Produkts keine chemisch aktiven oder scheuernden Reinigungsmittel. Verwenden Sie stattdessen ein feuchtes Flanelltuch.
- Die angegebene Nennleistung darf nicht überschritten werden. Andernfalls kann es zu einem Kurzschluss und einem Stromschlag kommen.
- Zerlegen Sie das Produkt nicht selbst – Diagnose und Reparatur des Geräts sollten nur in einem zertifizierten Servicecenter durchgeführt werden.
4. VERBINDUNG
Um das Nous-Gerät zu verbinden, benötigen Sie ein Smartphone mit Android- oder iOS-Betriebssystem und der installierten Nous Smart Home-App. Diese App ist kostenlos und kann im Play Store bzw. App Store heruntergeladen werden. Den QR-Code für die App finden Sie unten.
|
Scannen Sie den QR-Code
Wichtig: Stellen Sie sicher, dass das WLAN-Netzwerk am gewählten Installationsort stabil ist und eine ausreichende Signalstärke aufweist.
So verbinden Sie Ihr Gerät mit einem WLAN-Netzwerk:
| 1 | Verbinden Sie Ihr Smartphone mit dem Zugangspunkt, über den das Gerät verbunden werden soll. Stellen Sie sicher, dass der Netzwerkfrequenzbereich 2,4 GHz beträgt, da das Gerät sonst keine Verbindung herstellen kann, da es nicht für die Verwendung mit 5-GHz-WLAN-Netzwerken ausgelegt ist. | |
| 2 | Schalten Sie das Gerät ein. | |
| 3 | Öffnen Sie die Nous Smart Home App und klicken Sie auf die Schaltfläche „Neues Gerät hinzufügen“. | |
| 4 |
Es erscheint ein automatischer Scan, der Sie auffordert, ein neues Gerät hinzuzufügen. Bestätigen Sie die Verbindung und starten Sie den Kopplungsvorgang. |
|
| 5 |
Falls Ihr Gerät beim automatischen Scan nicht gefunden wird, können Sie es manuell aus der Geräteliste auswählen. |
|
|
|
|
| 6 | Wählen Sie auf der Registerkarte „Manuell hinzufügen“ die Kategorie „Intelligente Steckdosen“ und darin das Modell „A6M-Steckdose“ aus, wie in der obigen Abbildung gezeigt; | |
| 7 | Im sich öffnenden Fenster wählen Sie „nächster Schritt“ und klicken auf die Schaltfläche „Weiter“. | |
| 8 | Im nächsten Fenster stellen Sie sicher, dass der Name des Zugriffspunkts mit dem erforderlichen Namen übereinstimmt. Geben Sie dann das Passwort in die Zeile darunter ein und klicken Sie auf die Schaltfläche „Weiter“. | |
|
|
|
| 9 | Es erscheint ein Fenster, das den Grad der Netzwerkverbindung anzeigt und den aktuellen Benutzer der Anwendung zur Geräteliste hinzufügt. | |
| 10 | Nach Abschluss des Vorgangs erscheint ein Fenster, in dem Sie dem Gerät einen Namen geben und den Raum auswählen können, in dem es sich befindet. Der Gerätename wird auch von Amazon Alexa und Google Home verwendet. | |
| 11 | Hinzufügen eines Geräts zur Nous Smart Home App mithilfe eines QR-Codes. | |
| 12 | Im Menüpunkt „Manuell hinzufügen“ wählen Sie die Option „Scannen“, wie in der Abbildung unten dargestellt. | |
| |
||
| 13 | Scannen Sie anschließend den QR-Code und warten Sie, bis das Gerät in der App angezeigt wird. | |
| 14 | Um alle Daten vom Gerät zu löschen, müssen Sie im Gerätemenü „Gerät löschen“ und anschließend „Ausschalten und alle Daten löschen“ auswählen. | |
| Wird ein Gerät aus der Geräteliste des Benutzers in der Anwendung entfernt, werden die Geräteeinstellungen auf die Werkseinstellungen zurückgesetzt und die WLAN-Verbindung muss erneut hergestellt werden. Wurde das WLAN-Passwort falsch eingegeben, zeigt die Anwendung nach Ablauf des Timers ein Fenster mit der Meldung „Verbindung zum WLAN fehlgeschlagen“ an und bietet eine Schritt-für-Schritt-Anleitung zur Problembehebung. | ||
5. Verbindung über das Matter-Protokoll (Google Home, Apple HomeKit, Alexa)
1. Google Home
-
Google Home öffnen → "+" → "Gerät hinzufügen" .
-
Wählen Sie „Matter Protocol Devices“ .
-
Scannen Sie den QR-Code auf der Glühbirne oder geben Sie den Code manuell ein.
-
Zimmer zuweisen → erledigt!
2. Apple HomeKit
-
Öffnen Sie die Home-App → "+" → "Gerät hinzufügen" .
-
Richten Sie die Kamera auf den QR-Code auf der Glühbirne.
-
Hinzufügung bestätigen → Zimmer zuweisen.
3. Amazon Alexa (über Matter)
-
Öffnen Sie die Alexa-App → "Geräte" → "+" → "Gerät hinzufügen" .
-
Wählen Sie „Matter“ → „Nach Geräten suchen“ .
-
Alexa findet die Glühbirne → bestätige das Hinzufügen.
-
Weisen Sie einen Namen und eine Gruppe zu (zum Beispiel „Wohnzimmer“).
Wichtig!
-
Für die Nutzung von Matter muss sich Ihr Hub im selben lokalen Netzwerk wie das Gerät befinden.
-
Einige Funktionen (z. B. erweiterte Szenarien) sind möglicherweise nur über die native Nous Smart Home App verfügbar.
-
Falls Sie Verbindungsprobleme haben, versuchen Sie Folgendes:
-
Starten Sie den Hub neu.
-
Hub-Firmware aktualisieren
-
Gerät zurücksetzen
-
Für weitere Unterstützung wenden Sie sich bitte an den NOUS-Support.
MANUEL D'UTILISATION
1. DESCRIPTION
|
| Non. | Nom | Description |
| 1 | Bouton | Une brève pression sur le bouton permet d'allumer ou d'éteindre l'appareil. Une pression prolongée (5 à 7 secondes) réinitialise les paramètres de l'appareil et de la connexion réseau. |
| 2 | Indicateur | Affiche l'état actuel de l'appareil |
AVERTISSEMENT!
Hubs requis pour la connexion via Matter
1. Pour Google Home/Google Nest :
vous avez besoin de l’un des appareils suivants : Google Nest Hub (2e génération ou ultérieure), Google Nest Hub Max, Google Nest Mini/Google Home Mini (avec micrologiciel mis à jour), Google Nest Audio, Google Nest Wifi Pro (routeur compatible Matter).
2. Pour Apple HomeKit
: vous avez besoin de l’un des appareils suivants : Apple HomePod (toutes générations), Apple HomePod mini, Apple TV 4K (2022 ou ultérieure avec prise en charge Thread).
3. Pour Amazon Alexa :
vous avez besoin de l’un des appareils suivants : Amazon Echo (4e génération), Amazon Echo Dot (5e génération), Amazon Echo Show 10 (3e génération), Amazon Echo Studio, eero Pro 6 (routeur compatible Matter).
4. Pour Samsung SmartThings
: vous avez besoin de : SmartThings Hub (v3) ou SmartThings Station.
2. CARACTÉRISTIQUES TECHNIQUES
WiFi Frequency: 2.4 GHz
Network Protocol: IEEE802.11 b/g/n
Output Power: 3680W
Rated Voltage: 100-240VAC
Rated Current: 16A
Working Temperature: -5°C ~ 40°C
Water resistance: IP44
Frequency range: 2.400 - 2.4835 GHz
Max.Transmit Power: 17 dBm
Dimensions: 56*50*84mm
3. SAFETY AND PRECAUTIONARY MEASURES
- Please read this manual carefully.
- Use the product within the temperature and humidity limits specified in the technical data sheet.
- Do not install the product near heat sources such as radiators, etc.
- Do not allow the device to fall or be subject to mechanical stress.
- Do not use chemically active or abrasive detergents to clean the product. Use a damp flannel cloth instead.
- Do not exceed the specified power rating. This may result in a short circuit and electric shock.
- Do not disassemble the product yourself - diagnostics and repairs of the device should only be carried out at a certified service center.
4. CONNECTION
To connect the Nous device, you need a smartphone based on the Android or iOS mobile operating system with the Nous Smart Home application installed. This mobile application is free and available for download from Play Market and App Store. The QR code for the application is given below:
|
Scan the QR code
Importantly: Make sure that the Wi-Fi network is stable and has a sufficient level in the chosen installation location.
To connect your device to a Wi-Fi network:
| 1 | Connect your smartphone to the access point that will be used to connect the device. Make sure the network frequency range is 2.4 GHz, otherwise the device will not connect as it is not designed to work with 5 GHz Wi-Fi networks. | |
| 2 | Turn on the device. | |
| 3 | Open the Nous Smart Home app and click the add new device button. | |
| 4 |
An auto-scan will appear, prompting you to add a new device. Confirm the connection and start pairing. |
|
| 5 |
If auto-scan doesn't see your device, you can select it manually from the device list. |
|
|
|
|
| 6 | In the "Add manually" tab, select the "Smart sockets" category, and in it the model "A6M socket", as shown in the figure above; | |
| 7 | In the window that opens, select "next step" and click the "Next" button. | |
| 8 | In the next window, make sure that the name of the access point matches the required one, then enter the password for it in the line below and click the "Next" button. | |
|
|
|
| 9 | A window will appear indicating the degree of network connection and adding the current user of the application to the list of devices. | |
| 10 | Once the procedure is complete, a window will appear where you can name the device and select the room it is in. The device name will also be used by Amazon Alexa and Google Home. | |
| 11 | Adding a device to the Nous Smart Home app using a QR code. | |
| 12 | In the "Add Manually" tab, select "Scan" as shown in the figure below. | |
| |
||
| 13 | Next, scan the QR code and wait for the device to appear in the app. | |
| 14 | Pour supprimer toutes les données de l'appareil, vous devez sélectionner « Supprimer l'appareil », « Éteindre et supprimer toutes les données » dans le menu de l'appareil. | |
| Lorsqu'un appareil est supprimé de la liste des appareils de l'utilisateur dans l'application, ses paramètres sont réinitialisés aux valeurs d'usine et vous devrez effectuer à nouveau la procédure de connexion Wi-Fi. Si le mot de passe du point d'accès Wi-Fi a été saisi incorrectement, l'application affichera une fenêtre « Échec de la connexion Wi-Fi » après l'expiration du délai, proposant des instructions détaillées pour résoudre le problème. | ||
5. Connexion via le protocole Matter (Google Home, Apple HomeKit, Alexa)
1. Google Home
-
Ouvrez Google Home → "+" → "Ajouter un appareil" .
-
Sélectionnez « Périphériques du protocole Matter » .
-
Scannez le code QR sur l'ampoule ou saisissez le code manuellement.
-
Attribuer une chambre → fait !
2. Apple HomeKit
-
Ouvrez l'application Maison → "+" → "Ajouter un appareil" .
-
Pointez l'appareil photo vers le code QR sur l'ampoule.
-
Confirmer l'ajout → attribuer une chambre.
3. Amazon Alexa (via Matter)
-
Ouvrez l'application Alexa → "Appareils" → "+" → "Ajouter un appareil" .
-
Sélectionnez « Matière » → « Rechercher des appareils » .
-
Alexa va trouver l'ampoule → confirmer l'ajout.
-
Attribuez un nom et un groupe (par exemple, « Salon »).
Important!
-
Pour fonctionner avec Matter, votre hub doit se trouver sur le même réseau local que l'appareil.
-
Certaines fonctionnalités (par exemple, les scénarios avancés) peuvent n'être disponibles que via l'application native Nous Smart Home.
-
Si vous rencontrez des problèmes de connexion, essayez :
-
Redémarrez le hub
-
Centre de mise à jour du micrologiciel
-
Réinitialiser l'appareil
-
Pour obtenir de l'aide supplémentaire, veuillez contacter le support NOUS.
INSTRUKCJA OBSŁUGI
1. OPIS
|
| NIE. | Nazwa | Opis |
| 1 | Przycisk | Krótkie naciśnięcie przycisku włącza lub wyłącza urządzenie. Długie naciśnięcie przycisku (5-7°C) resetuje ustawienia urządzenia i parametry połączenia sieciowego. |
| 2 | Wskaźnik | Pokazuje aktualny stan urządzenia |
OSTRZEŻENIE!
Wymagane koncentratory do połączenia przez Matter
1. W przypadku Google Home/Google Nest.
Potrzebujesz jednego z następujących urządzeń: Google Nest Hub (2. generacji lub nowszy), Google Nest Hub Max, Google Nest Mini/Google Home Mini (z zaktualizowanym oprogramowaniem układowym), Google Nest Audio, Google Nest Wifi Pro (router obsługujący Matter)
2. W przypadku Apple HomeKit
potrzebujesz jednego z następujących urządzeń: Apple HomePod (dowolnej generacji), Apple HomePod mini, Apple TV 4K (2022 lub nowszy z obsługą Thread),
3. W przypadku Amazon Alexa
potrzebujesz jednego z następujących urządzeń: Amazon Echo (4. generacji), Amazon Echo Dot (5. generacji), Amazon Echo Show 10 (3. generacji), Amazon Echo Studio, eero Pro 6 (router obsługujący Matter)
4. W przypadku Samsung SmartThings
potrzebujesz: SmartThings Hub (v3), SmartThings Station
2. DANE TECHNICZNE
WiFi Frequency: 2.4 GHz
Network Protocol: IEEE802.11 b/g/n
Output Power: 3680W
Rated Voltage: 100-240VAC
Rated Current: 16A
Working Temperature: -5°C ~ 40°C
Water resistance: IP44
Frequency range: 2.400 - 2.4835 GHz
Max.Transmit Power: 17 dBm
Dimensions: 56*50*84mm
3. SAFETY AND PRECAUTIONARY MEASURES
- Please read this manual carefully.
- Use the product within the temperature and humidity limits specified in the technical data sheet.
- Do not install the product near heat sources such as radiators, etc.
- Do not allow the device to fall or be subject to mechanical stress.
- Do not use chemically active or abrasive detergents to clean the product. Use a damp flannel cloth instead.
- Do not exceed the specified power rating. This may result in a short circuit and electric shock.
- Do not disassemble the product yourself - diagnostics and repairs of the device should only be carried out at a certified service center.
4. CONNECTION
To connect the Nous device, you need a smartphone based on the Android or iOS mobile operating system with the Nous Smart Home application installed. This mobile application is free and available for download from Play Market and App Store. The QR code for the application is given below:
|
Scan the QR code
Importantly: Make sure that the Wi-Fi network is stable and has a sufficient level in the chosen installation location.
To connect your device to a Wi-Fi network:
| 1 | Connect your smartphone to the access point that will be used to connect the device. Make sure the network frequency range is 2.4 GHz, otherwise the device will not connect as it is not designed to work with 5 GHz Wi-Fi networks. | |
| 2 | Turn on the device. | |
| 3 | Open the Nous Smart Home app and click the add new device button. | |
| 4 |
An auto-scan will appear, prompting you to add a new device. Confirm the connection and start pairing. |
|
| 5 |
If auto-scan doesn't see your device, you can select it manually from the device list. |
|
|
|
|
| 6 | In the "Add manually" tab, select the "Smart sockets" category, and in it the model "A6M socket", as shown in the figure above; | |
| 7 | In the window that opens, select "next step" and click the "Next" button. | |
| 8 | In the next window, make sure that the name of the access point matches the required one, then enter the password for it in the line below and click the "Next" button. | |
|
|
|
| 9 | A window will appear indicating the degree of network connection and adding the current user of the application to the list of devices. | |
| 10 | Once the procedure is complete, a window will appear where you can name the device and select the room it is in. The device name will also be used by Amazon Alexa and Google Home. | |
| 11 | Adding a device to the Nous Smart Home app using a QR code. | |
| 12 | In the "Add Manually" tab, select "Scan" as shown in the figure below. | |
| |
||
| 13 | Next, scan the QR code and wait for the device to appear in the app. | |
| 14 | Aby usunąć wszystkie dane z urządzenia, należy w menu urządzenia wybrać opcję „Usuń urządzenie”, „Wyłącz i usuń wszystkie dane”. | |
| Po usunięciu urządzenia z listy urządzeń użytkownika w aplikacji, ustawienia urządzenia zostaną przywrócone do ustawień fabrycznych i konieczne będzie ponowne przeprowadzenie procedury połączenia z siecią Wi-Fi. Jeśli hasło do punktu dostępowego Wi-Fi zostało wprowadzone nieprawidłowo, po upływie ustawionego czasu aplikacja wyświetli okno „Nie udało się połączyć z siecią Wi-Fi”, oferując instrukcje krok po kroku, jak rozwiązać problem. | ||
5. Połączenie za pomocą protokołu Matter (Google Home, Apple HomeKit, Alexa)
1. Google Home
-
Otwórz Google Home → „+” → „Dodaj urządzenie” .
-
Wybierz „Urządzenia protokołu Matter” .
-
Zeskanuj kod QR znajdujący się na żarówce lub wprowadź kod ręcznie.
-
Przypisz pokój → gotowe!
2. Apple HomeKit
-
Otwórz aplikację Dom → „+” → „Dodaj urządzenie” .
-
Skieruj kamerę na kod QR znajdujący się na żarówce.
-
Potwierdź dodanie → przypisz pokój.
3. Amazon Alexa (przez Matter)
-
Otwórz aplikację Alexa → „Urządzenia” → „+” → „Dodaj urządzenie” .
-
Wybierz „Matter” → „Skanuj urządzenia” .
-
Alexa znajdzie żarówkę → potwierdzi dodanie.
-
Przypisz nazwę i grupę (na przykład „Salon”).
Ważny!
-
Aby móc korzystać z platformy Matter, Twój hub musi być w tej samej sieci lokalnej co urządzenie.
-
Niektóre funkcje (np. zaawansowane scenariusze) mogą być dostępne wyłącznie za pośrednictwem natywnej aplikacji Nous Smart Home
-
Jeśli masz problemy z połączeniem, spróbuj:
-
Zrestartuj hub
-
Aktualizacja oprogramowania układowego Hub
-
Zresetuj urządzenie
-
Jeśli potrzebujesz dalszej pomocy, skontaktuj się z pomocą techniczną NOUS.
MANUALE OPERATIVO
1. DESCRIZIONE
|
| NO. | Nome | Descrizione |
| 1 | Pulsante | Una breve pressione del pulsante accende o spegne il dispositivo. Una pressione prolungata del pulsante (5-7 °C) ripristina le impostazioni del dispositivo e i parametri di connessione di rete. |
| 2 | Indicatore | Mostra lo stato attuale del dispositivo |
AVVERTIMENTO!
Hub necessari per la connessione tramite Matter
1. Per Google Home/Google Nest.
È necessario uno di questi dispositivi: Google Nest Hub (2a generazione o successiva), Google Nest Hub Max, Google Nest Mini/Google Home Mini (con firmware aggiornato), Google Nest Audio, Google Nest Wifi Pro (router abilitato per Matter)
2. Per Apple HomeKit
È necessario uno di questi dispositivi: Apple HomePod (qualsiasi generazione), Apple HomePod mini, Apple TV 4K (2022 o successiva con supporto Thread)
3. Per Amazon Alexa
È necessario uno di questi dispositivi: Amazon Echo (4a generazione), Amazon Echo Dot (5a generazione), Amazon Echo Show 10 (3a generazione), Amazon Echo Studio, eero Pro 6 (router abilitato per Matter)
4. Per Samsung SmartThings
È necessario: SmartThings Hub (v3), SmartThings Station
2. CARATTERISTICHE TECNICHE
WiFi Frequency: 2.4 GHz
Network Protocol: IEEE802.11 b/g/n
Output Power: 3680W
Rated Voltage: 100-240VAC
Rated Current: 16A
Working Temperature: -5°C ~ 40°C
Water resistance: IP44
Frequency range: 2.400 - 2.4835 GHz
Max.Transmit Power: 17 dBm
Dimensions: 56*50*84mm
3. SAFETY AND PRECAUTIONARY MEASURES
- Please read this manual carefully.
- Use the product within the temperature and humidity limits specified in the technical data sheet.
- Do not install the product near heat sources such as radiators, etc.
- Do not allow the device to fall or be subject to mechanical stress.
- Do not use chemically active or abrasive detergents to clean the product. Use a damp flannel cloth instead.
- Do not exceed the specified power rating. This may result in a short circuit and electric shock.
- Do not disassemble the product yourself - diagnostics and repairs of the device should only be carried out at a certified service center.
4. CONNECTION
To connect the Nous device, you need a smartphone based on the Android or iOS mobile operating system with the Nous Smart Home application installed. This mobile application is free and available for download from Play Market and App Store. The QR code for the application is given below:
|
Scan the QR code
Importantly: Make sure that the Wi-Fi network is stable and has a sufficient level in the chosen installation location.
To connect your device to a Wi-Fi network:
| 1 | Connect your smartphone to the access point that will be used to connect the device. Make sure the network frequency range is 2.4 GHz, otherwise the device will not connect as it is not designed to work with 5 GHz Wi-Fi networks. | |
| 2 | Turn on the device. | |
| 3 | Open the Nous Smart Home app and click the add new device button. | |
| 4 |
An auto-scan will appear, prompting you to add a new device. Confirm the connection and start pairing. |
|
| 5 |
If auto-scan doesn't see your device, you can select it manually from the device list. |
|
|
|
|
| 6 | In the "Add manually" tab, select the "Smart sockets" category, and in it the model "A6M socket", as shown in the figure above; | |
| 7 | In the window that opens, select "next step" and click the "Next" button. | |
| 8 | In the next window, make sure that the name of the access point matches the required one, then enter the password for it in the line below and click the "Next" button. | |
|
|
|
| 9 | A window will appear indicating the degree of network connection and adding the current user of the application to the list of devices. | |
| 10 | Once the procedure is complete, a window will appear where you can name the device and select the room it is in. The device name will also be used by Amazon Alexa and Google Home. | |
| 11 | Adding a device to the Nous Smart Home app using a QR code. | |
| 12 | In the "Add Manually" tab, select "Scan" as shown in the figure below. | |
| |
||
| 13 | Next, scan the QR code and wait for the device to appear in the app. | |
| 14 | Per eliminare tutti i dati dal dispositivo, è necessario selezionare "Elimina dispositivo", quindi "Spegni ed elimina tutti i dati" nel menu del dispositivo. | |
| Quando un dispositivo viene rimosso dall'elenco dei dispositivi dell'utente nell'applicazione, le impostazioni del dispositivo vengono ripristinate alle impostazioni di fabbrica e sarà necessario ripetere la procedura di connessione Wi-Fi. Se la password per il punto di accesso Wi-Fi è stata inserita in modo errato, l'applicazione visualizzerà una finestra "Impossibile connettersi al Wi-Fi" allo scadere del timer, offrendo istruzioni dettagliate per risolvere il problema. | ||
5. Connessione tramite protocollo Matter (Google Home, Apple HomeKit, Alexa)
1. Google Home
-
Apri Google Home → "+" → "Aggiungi dispositivo" .
-
Selezionare "Dispositivi del protocollo Matter" .
-
Scansiona il codice QR sulla lampadina oppure inserisci il codice manualmente.
-
Assegna una stanza → fatto!
2. Apple HomeKit
-
Apri l'app Casa → "+" → "Aggiungi dispositivo" .
-
Punta la fotocamera sul codice QR presente sulla lampadina.
-
Conferma aggiunta → assegna camera.
3. Amazon Alexa (tramite Matter)
-
Apri l'app Alexa → "Dispositivi" → "+" → "Aggiungi dispositivo" .
-
Seleziona "Matter" → "Cerca dispositivi" .
-
Alexa troverà la lampadina → confermerà l'aggiunta.
-
Assegna un nome e un gruppo (ad esempio, "Soggiorno").
Importante!
-
Per funzionare tramite Matter, l'hub deve trovarsi sulla stessa rete locale del dispositivo.
-
Alcune funzionalità (ad esempio scenari avanzati) potrebbero essere disponibili solo tramite l'app nativa Nous Smart Home.
-
Se riscontri problemi di connessione, prova a:
-
Riavvia l'hub
-
Aggiornamento del firmware dell'hub
-
Ripristina il dispositivo
-
Per ulteriore assistenza, si prega di contattare il supporto NOUS.
MANUAL DE INSTRUCCIONES
1. DESCRIPCIÓN
|
| No. | Nombre | Descripción |
| 1 | Botón | Una pulsación corta del botón enciende o apaga el dispositivo. Una pulsación larga (5-7 C) restablece la configuración del dispositivo y los parámetros de conexión de red. |
| 2 | Indicador | Muestra el estado actual del dispositivo. |
¡ADVERTENCIA!
Hubs necesarios para la conexión a través de Matter
1. Para Google Home/Google Nest.
Necesitas uno de estos dispositivos: Google Nest Hub (2.ª generación o posterior), Google Nest Hub Max, Google Nest Mini/Google Home Mini (con firmware actualizado), Google Nest Audio, Google Nest Wifi Pro (router compatible con Matter).
2. Para Apple HomeKit.
Necesitas uno de estos dispositivos: Apple HomePod (cualquier generación), Apple HomePod mini, Apple TV 4K (2022 o posterior con soporte Thread).
3. Para Amazon Alexa.
Necesitas uno de estos dispositivos: Amazon Echo (4.ª generación), Amazon Echo Dot (5.ª generación), Amazon Echo Show 10 (3.ª generación), Amazon Echo Studio, eero Pro 6 (router compatible con Matter).
4. Para Samsung SmartThings.
Necesitas: SmartThings Hub (v3), SmartThings Station.
2. CARACTERÍSTICAS TÉCNICAS
WiFi Frequency: 2.4 GHz
Network Protocol: IEEE802.11 b/g/n
Output Power: 3680W
Rated Voltage: 100-240VAC
Rated Current: 16A
Working Temperature: -5°C ~ 40°C
Water resistance: IP44
Frequency range: 2.400 - 2.4835 GHz
Max.Transmit Power: 17 dBm
Dimensions: 56*50*84mm
3. SAFETY AND PRECAUTIONARY MEASURES
- Please read this manual carefully.
- Use the product within the temperature and humidity limits specified in the technical data sheet.
- Do not install the product near heat sources such as radiators, etc.
- Do not allow the device to fall or be subject to mechanical stress.
- Do not use chemically active or abrasive detergents to clean the product. Use a damp flannel cloth instead.
- Do not exceed the specified power rating. This may result in a short circuit and electric shock.
- Do not disassemble the product yourself - diagnostics and repairs of the device should only be carried out at a certified service center.
4. CONNECTION
To connect the Nous device, you need a smartphone based on the Android or iOS mobile operating system with the Nous Smart Home application installed. This mobile application is free and available for download from Play Market and App Store. The QR code for the application is given below:
|
Scan the QR code
Importantly: Make sure that the Wi-Fi network is stable and has a sufficient level in the chosen installation location.
To connect your device to a Wi-Fi network:
| 1 | Connect your smartphone to the access point that will be used to connect the device. Make sure the network frequency range is 2.4 GHz, otherwise the device will not connect as it is not designed to work with 5 GHz Wi-Fi networks. | |
| 2 | Turn on the device. | |
| 3 | Open the Nous Smart Home app and click the add new device button. | |
| 4 |
An auto-scan will appear, prompting you to add a new device. Confirm the connection and start pairing. |
|
| 5 |
If auto-scan doesn't see your device, you can select it manually from the device list. |
|
|
|
|
| 6 | In the "Add manually" tab, select the "Smart sockets" category, and in it the model "A6M socket", as shown in the figure above; | |
| 7 | In the window that opens, select "next step" and click the "Next" button. | |
| 8 | In the next window, make sure that the name of the access point matches the required one, then enter the password for it in the line below and click the "Next" button. | |
|
|
|
| 9 | A window will appear indicating the degree of network connection and adding the current user of the application to the list of devices. | |
| 10 | Once the procedure is complete, a window will appear where you can name the device and select the room it is in. The device name will also be used by Amazon Alexa and Google Home. | |
| 11 | Adding a device to the Nous Smart Home app using a QR code. | |
| 12 | In the "Add Manually" tab, select "Scan" as shown in the figure below. | |
| |
||
| 13 | Next, scan the QR code and wait for the device to appear in the app. | |
| 14 | Para eliminar todos los datos del dispositivo, debe seleccionar "Eliminar dispositivo" y luego "Apagar y eliminar todos los datos" en el menú del dispositivo. | |
| Cuando se elimina un dispositivo de la lista de dispositivos del usuario en la aplicación, la configuración del dispositivo se restablece a los valores de fábrica y deberá repetir el procedimiento de conexión Wi-Fi. Si la contraseña del punto de acceso Wi-Fi se ingresó incorrectamente, la aplicación mostrará una ventana de "Error al conectar con Wi-Fi" después de que expire el temporizador, con instrucciones paso a paso para solucionar el problema. | ||
5. Conexión mediante el protocolo Matter (Google Home, Apple HomeKit, Alexa)
1. Google Home
-
Abre Google Home → "+" → "Añadir dispositivo" .
-
Seleccione "Dispositivos de protocolo de materia" .
-
Escanee el código QR de la bombilla o introduzca el código manualmente.
-
Asignar una habitación → ¡listo!
2. Apple HomeKit
-
Abre la aplicación Casa → "+" → "Añadir dispositivo" .
-
Apunta la cámara al código QR de la bombilla.
-
Confirmar adición → asignar habitación.
3. Amazon Alexa (a través de Matter)
-
Abre la aplicación Alexa → "Dispositivos" → "+" → "Agregar dispositivo" .
-
Seleccione "Asunto" → "Buscar dispositivos" .
-
Alexa encontrará la bombilla → confirmar la adición.
-
Asigne un nombre y un grupo (por ejemplo, "Sala de estar").
¡Importante!
-
Para que Matter funcione correctamente, su hub debe estar en la misma red local que el dispositivo.
-
Algunas funciones (por ejemplo, escenarios avanzados) solo estarán disponibles a través de la aplicación nativa Nous Smart Home.
-
Si tiene problemas de conexión, pruebe lo siguiente:
-
Reinicia el hub
-
Actualizar el firmware del hub
-
Reiniciar dispositivo
-
Para obtener más ayuda, póngase en contacto con el soporte técnico de NOUS.
NÁVOD NA POUŽITIE
1. POPIS
|
| Nie. | Meno | Popis |
| 1 | Tlačidlo | Krátkym stlačením tlačidla sa zariadenie „ZAPNIE“ alebo „VYPNIE“. Dlhým stlačením tlačidla (5-7 °C) sa vynulujú nastavenia zariadenia a parametre sieťového pripojenia. |
| 2 | Indikátor | Zobrazuje aktuálny stav zariadenia |
POZOR!
Požadované uzly pre pripojenie cez Matter
1. Pre Google Home/Google Nest.
Potrebujete jedno z týchto zariadení: Google Nest Hub (2. generácia alebo novší), Google Nest Hub Max, Google Nest Mini/Google Home Mini (s aktualizovaným firmvérom), Google Nest Audio, Google Nest Wifi Pro (router s podporou Matter).
2. Pre Apple HomeKit
Potrebujete jedno z týchto zariadení: Apple HomePod (ľubovoľná generácia), Apple HomePod mini, Apple TV 4K (2022 alebo novší s podporou Thread).
3. Pre Amazon Alexa
Potrebujete jedno z týchto zariadení: Amazon Echo (4. generácia), Amazon Echo Dot (5. generácia), Amazon Echo Show 10 (3. generácia), Amazon Echo Studio, eero Pro 6 (router s podporou Matter).
4. Pre Samsung SmartThings
Potrebujete: SmartThings Hub (v3), SmartThings Station.
2. TECHNICKÉ CHARAKTERISTIKY
WiFi Frequency: 2.4 GHz
Network Protocol: IEEE802.11 b/g/n
Output Power: 3680W
Rated Voltage: 100-240VAC
Rated Current: 16A
Working Temperature: -5°C ~ 40°C
Water resistance: IP44
Frequency range: 2.400 - 2.4835 GHz
Max.Transmit Power: 17 dBm
Dimensions: 56*50*84mm
3. SAFETY AND PRECAUTIONARY MEASURES
- Please read this manual carefully.
- Use the product within the temperature and humidity limits specified in the technical data sheet.
- Do not install the product near heat sources such as radiators, etc.
- Do not allow the device to fall or be subject to mechanical stress.
- Do not use chemically active or abrasive detergents to clean the product. Use a damp flannel cloth instead.
- Do not exceed the specified power rating. This may result in a short circuit and electric shock.
- Do not disassemble the product yourself - diagnostics and repairs of the device should only be carried out at a certified service center.
4. CONNECTION
To connect the Nous device, you need a smartphone based on the Android or iOS mobile operating system with the Nous Smart Home application installed. This mobile application is free and available for download from Play Market and App Store. The QR code for the application is given below:
|
Scan the QR code
Importantly: Make sure that the Wi-Fi network is stable and has a sufficient level in the chosen installation location.
To connect your device to a Wi-Fi network:
| 1 | Connect your smartphone to the access point that will be used to connect the device. Make sure the network frequency range is 2.4 GHz, otherwise the device will not connect as it is not designed to work with 5 GHz Wi-Fi networks. | |
| 2 | Turn on the device. | |
| 3 | Open the Nous Smart Home app and click the add new device button. | |
| 4 |
An auto-scan will appear, prompting you to add a new device. Confirm the connection and start pairing. |
|
| 5 |
If auto-scan doesn't see your device, you can select it manually from the device list. |
|
|
|
|
| 6 | In the "Add manually" tab, select the "Smart sockets" category, and in it the model "A6M socket", as shown in the figure above; | |
| 7 | In the window that opens, select "next step" and click the "Next" button. | |
| 8 | In the next window, make sure that the name of the access point matches the required one, then enter the password for it in the line below and click the "Next" button. | |
|
|
|
| 9 | A window will appear indicating the degree of network connection and adding the current user of the application to the list of devices. | |
| 10 | Once the procedure is complete, a window will appear where you can name the device and select the room it is in. The device name will also be used by Amazon Alexa and Google Home. | |
| 11 | Adding a device to the Nous Smart Home app using a QR code. | |
| 12 | In the "Add Manually" tab, select "Scan" as shown in the figure below. | |
| |
||
| 13 | Next, scan the QR code and wait for the device to appear in the app. | |
| 14 | Ak chcete zo zariadenia odstrániť všetky údaje, musíte v ponuke zariadenia vybrať možnosť „Odstrániť zariadenie“, „Vypnúť a odstrániť všetky údaje“. | |
| Keď je zariadenie odstránené zo zoznamu zariadení používateľa v aplikácii, nastavenia zariadenia sa obnovia na výrobné nastavenia a budete musieť znova prejsť procesom pripojenia k sieti Wi-Fi. Ak bolo heslo pre prístupový bod Wi-Fi zadané nesprávne, aplikácia po uplynutí časovača zobrazí okno „Nepodarilo sa pripojiť k sieti Wi-Fi“ s podrobnými pokynmi na vyriešenie problému. | ||
5. Pripojenie cez protokol Matter (Google Home, Apple HomeKit, Alexa)
1. Domovská stránka Google
-
Otvorte Domovskú stránku Google → „+“ → „Pridať zariadenie“ .
-
Vyberte možnosť „Zariadenia s protokolom hmoty“ .
-
Naskenujte QR kód na žiarovke alebo zadajte kód manuálne.
-
Prideliť miestnosť → hotovo!
2. Apple HomeKit
-
Otvorte aplikáciu Domácnosť → „+“ → „Pridať zariadenie“ .
-
Namierte fotoaparát na QR kód na žiarovke.
-
Potvrdiť pridanie → priradiť miestnosť.
3. Amazon Alexa (prostredníctvom spoločnosti Matter)
-
Otvorte aplikáciu Alexa → „Zariadenia“ → „+“ → „Pridať zariadenie“ .
-
Vyberte „Hmotnosť“ → „Vyhľadať zariadenia“ .
-
Alexa nájde žiarovku → potvrdí pridanie.
-
Priraďte názov a skupinu (napríklad „Obývačka“).
Dôležité!
-
Aby váš hub fungoval cez Matter, musí byť v rovnakej lokálnej sieti ako zariadenie.
-
Niektoré funkcie (napr. pokročilé scenáre) môžu byť dostupné iba prostredníctvom natívnej aplikácie Nous Smart Home.
-
Ak máte problémy s pripojením, skúste:
-
Reštartujte rozbočovač
-
Aktualizácia firmvéru hubu
-
Resetovať zariadenie
-
Pre ďalšiu pomoc kontaktujte podporu NOUS.
NÁVOD K POUŽITÍ
1. POPIS
|
| Žádný. | Jméno | Popis |
| 1 | Tlačítko | Krátkým stisknutím tlačítka se zařízení „ZAPNUTÍ“ a „VYPNUTÍ“. Dlouhým stisknutím tlačítka (5-7 °C) se resetují nastavení zařízení a parametry síťového připojení. |
| 2 | Indikátor | Zobrazuje aktuální stav zařízení |
VAROVÁNÍ!
Požadované uzly pro připojení přes Matter
1. For Google Home/Google Nest.
You need one of these devices: Google Nest Hub (2nd generation or later), Google Nest Hub Max, Google Nest Mini/Google Home Mini (with updated firmware), Google Nest Audio, Google Nest Wifi Pro (Matter-enabled router)
2. For Apple HomeKit
You need one of these devices: Apple HomePod (any generation), Apple HomePod mini, Apple TV 4K (2022 or later with Thread support),
3. For Amazon Alexa
You need one of these devices: Amazon Echo (4th generation), Amazon Echo Dot (5th generation), Amazon Echo Show 10 (3rd generation), Amazon Echo Studio, eero Pro 6 (Matter-enabled router)
4. For Samsung SmartThings
Need: SmartThings Hub (v3), SmartThings Station
2. TECHNICAL CHARACTERISTICS
WiFi Frequency: 2.4 GHz
Network Protocol: IEEE802.11 b/g/n
Output Power: 3680W
Rated Voltage: 100-240VAC
Rated Current: 16A
Working Temperature: -5°C ~ 40°C
Water resistance: IP44
Frequency range: 2.400 - 2.4835 GHz
Max.Transmit Power: 17 dBm
Dimensions: 56*50*84mm
3. SAFETY AND PRECAUTIONARY MEASURES
- Please read this manual carefully.
- Use the product within the temperature and humidity limits specified in the technical data sheet.
- Do not install the product near heat sources such as radiators, etc.
- Do not allow the device to fall or be subject to mechanical stress.
- Do not use chemically active or abrasive detergents to clean the product. Use a damp flannel cloth instead.
- Do not exceed the specified power rating. This may result in a short circuit and electric shock.
- Do not disassemble the product yourself - diagnostics and repairs of the device should only be carried out at a certified service center.
4. CONNECTION
To connect the Nous device, you need a smartphone based on the Android or iOS mobile operating system with the Nous Smart Home application installed. This mobile application is free and available for download from Play Market and App Store. The QR code for the application is given below:
|
Scan the QR code
Importantly: Make sure that the Wi-Fi network is stable and has a sufficient level in the chosen installation location.
To connect your device to a Wi-Fi network:
| 1 | Connect your smartphone to the access point that will be used to connect the device. Make sure the network frequency range is 2.4 GHz, otherwise the device will not connect as it is not designed to work with 5 GHz Wi-Fi networks. | |
| 2 | Turn on the device. | |
| 3 | Open the Nous Smart Home app and click the add new device button. | |
| 4 |
An auto-scan will appear, prompting you to add a new device. Confirm the connection and start pairing. |
|
| 5 |
If auto-scan doesn't see your device, you can select it manually from the device list. |
|
|
|
|
| 6 | In the "Add manually" tab, select the "Smart sockets" category, and in it the model "A6M socket", as shown in the figure above; | |
| 7 | V otevřeném okně vyberte „další krok“ a klikněte na tlačítko „Další“. | |
| 8 | V dalším okně se ujistěte, že název přístupového bodu odpovídá požadovanému, poté do řádku níže zadejte heslo a klikněte na tlačítko „Další“. | |
|
|
|
| 9 | Zobrazí se okno s uvedením stupně síťového připojení a přidáním aktuálního uživatele aplikace do seznamu zařízení. | |
| 10 | Po dokončení postupu se zobrazí okno, kde můžete zařízení pojmenovat a vybrat místnost, ve které se nachází. Název zařízení bude také používán službami Amazon Alexa a Google Home. | |
| 11 | Přidání zařízení do aplikace Nous Smart Home pomocí QR kódu. | |
| 12 | Na kartě „Přidat ručně“ vyberte možnost „Skenovat“, jak je znázorněno na obrázku níže. | |
| |
||
| 13 | Dále naskenujte QR kód a počkejte, až se zařízení zobrazí v aplikaci. | |
| 14 | Chcete-li ze zařízení smazat všechna data, musíte v nabídce zařízení vybrat „Smazat zařízení“, „Vypnout a smazat všechna data“. | |
| Když je zařízení v aplikaci odebráno ze seznamu zařízení uživatele, nastavení zařízení se resetuje na tovární nastavení a budete muset znovu projít postupem připojení k Wi-Fi. Pokud bylo heslo pro přístupový bod Wi-Fi zadáno nesprávně, aplikace po uplynutí časovače zobrazí okno „Připojení k Wi-Fi se nepodařilo“ s podrobnými pokyny k vyřešení problému. | ||
5. Připojení přes protokol Matter (Google Home, Apple HomeKit, Alexa)
1. Domovská stránka Google
-
Otevřete Google Home → „+“ → „Přidat zařízení“ .
-
Vyberte „Zařízení protokolu hmoty“ .
-
Naskenujte QR kód na žárovce nebo zadejte kód ručně.
-
Přiřadit místnost → hotovo!
2. Apple HomeKit
-
Otevřete aplikaci Domácnost → „+“ → „Přidat zařízení“ .
-
Namiřte fotoaparát na QR kód na žárovce.
-
Potvrdit přidání → přiřadit místnost.
3. Amazon Alexa (přes Matter)
-
Otevřete aplikaci Alexa → „Zařízení“ → „+“ → „Přidat zařízení“ .
-
Vyberte „Hmotnost“ → „Vyhledat zařízení“ .
-
Alexa najde žárovku → potvrdí přidání.
-
Přiřaďte název a skupinu (například „Obývací pokoj“).
Důležité!
-
Aby váš hub fungoval přes Matter, musí být ve stejné místní síti jako zařízení.
-
Některé funkce (např. pokročilé scénáře) mohou být dostupné pouze prostřednictvím nativní aplikace Nous Smart Home.
-
Pokud máte problémy s připojením, zkuste:
-
Restartujte rozbočovač
-
Aktualizace firmwaru hubu
-
Resetovat zařízení
-
Pro další pomoc se prosím obraťte na podporu NOUS.