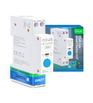
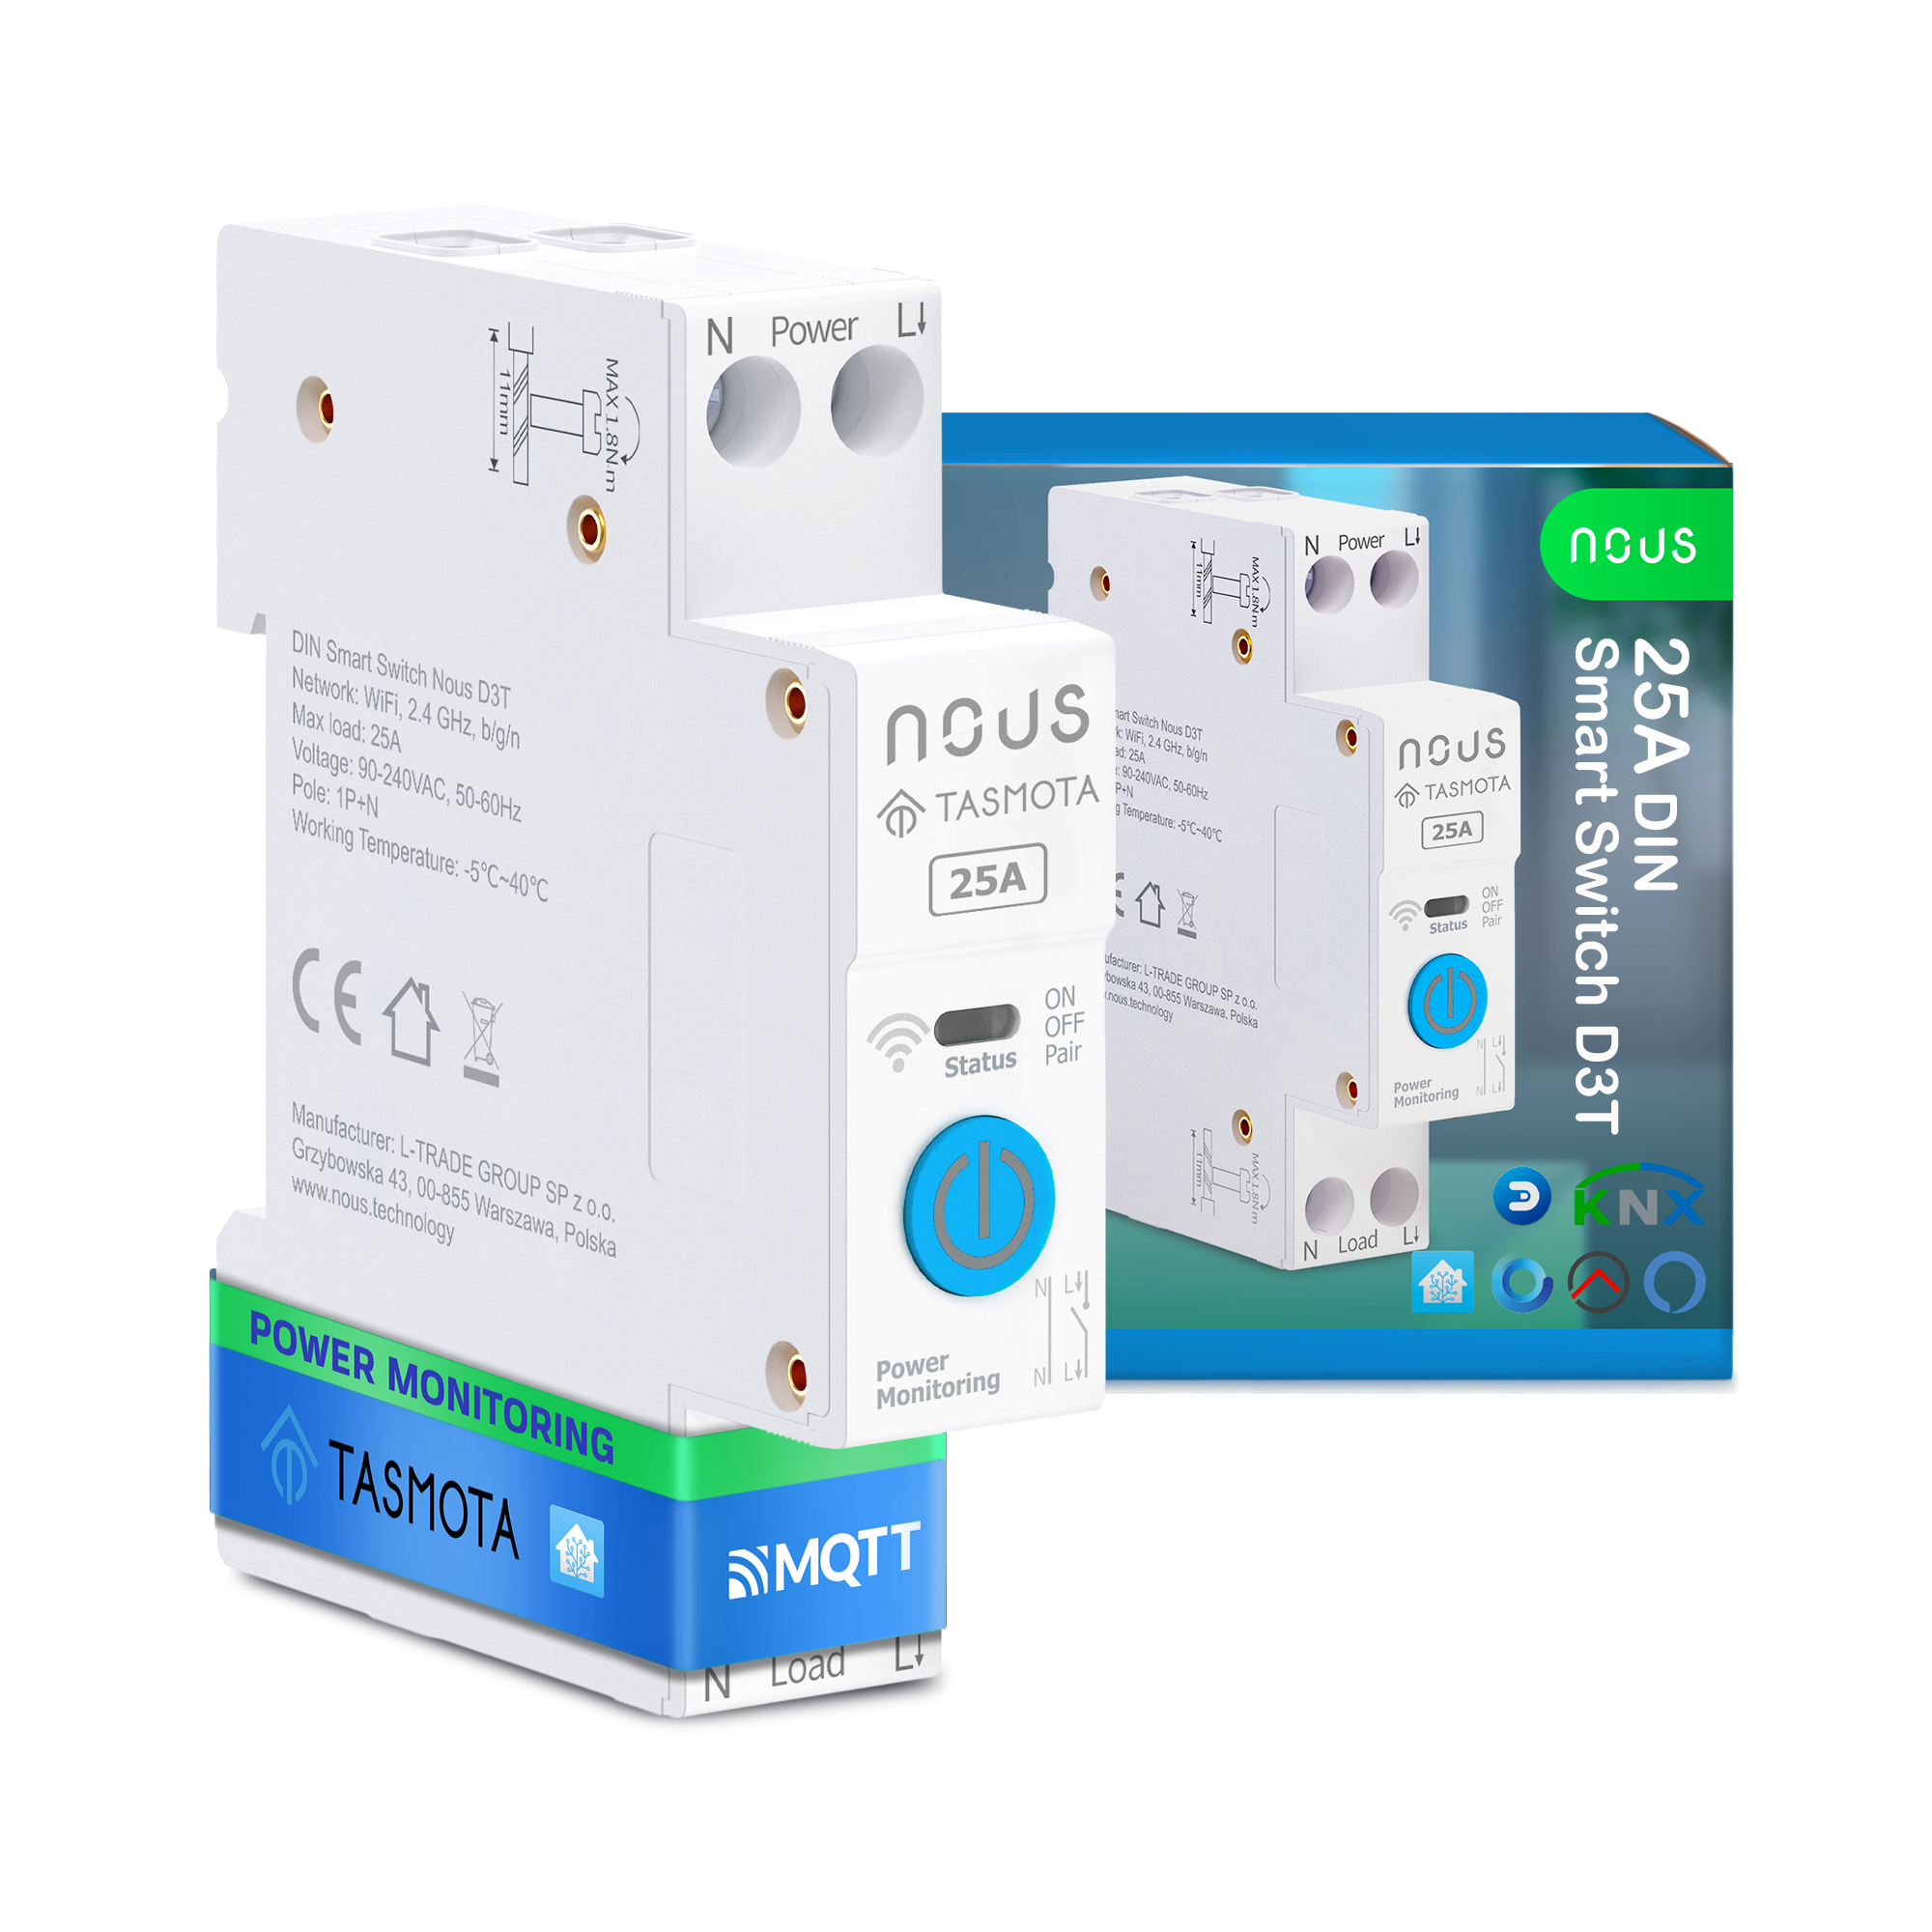
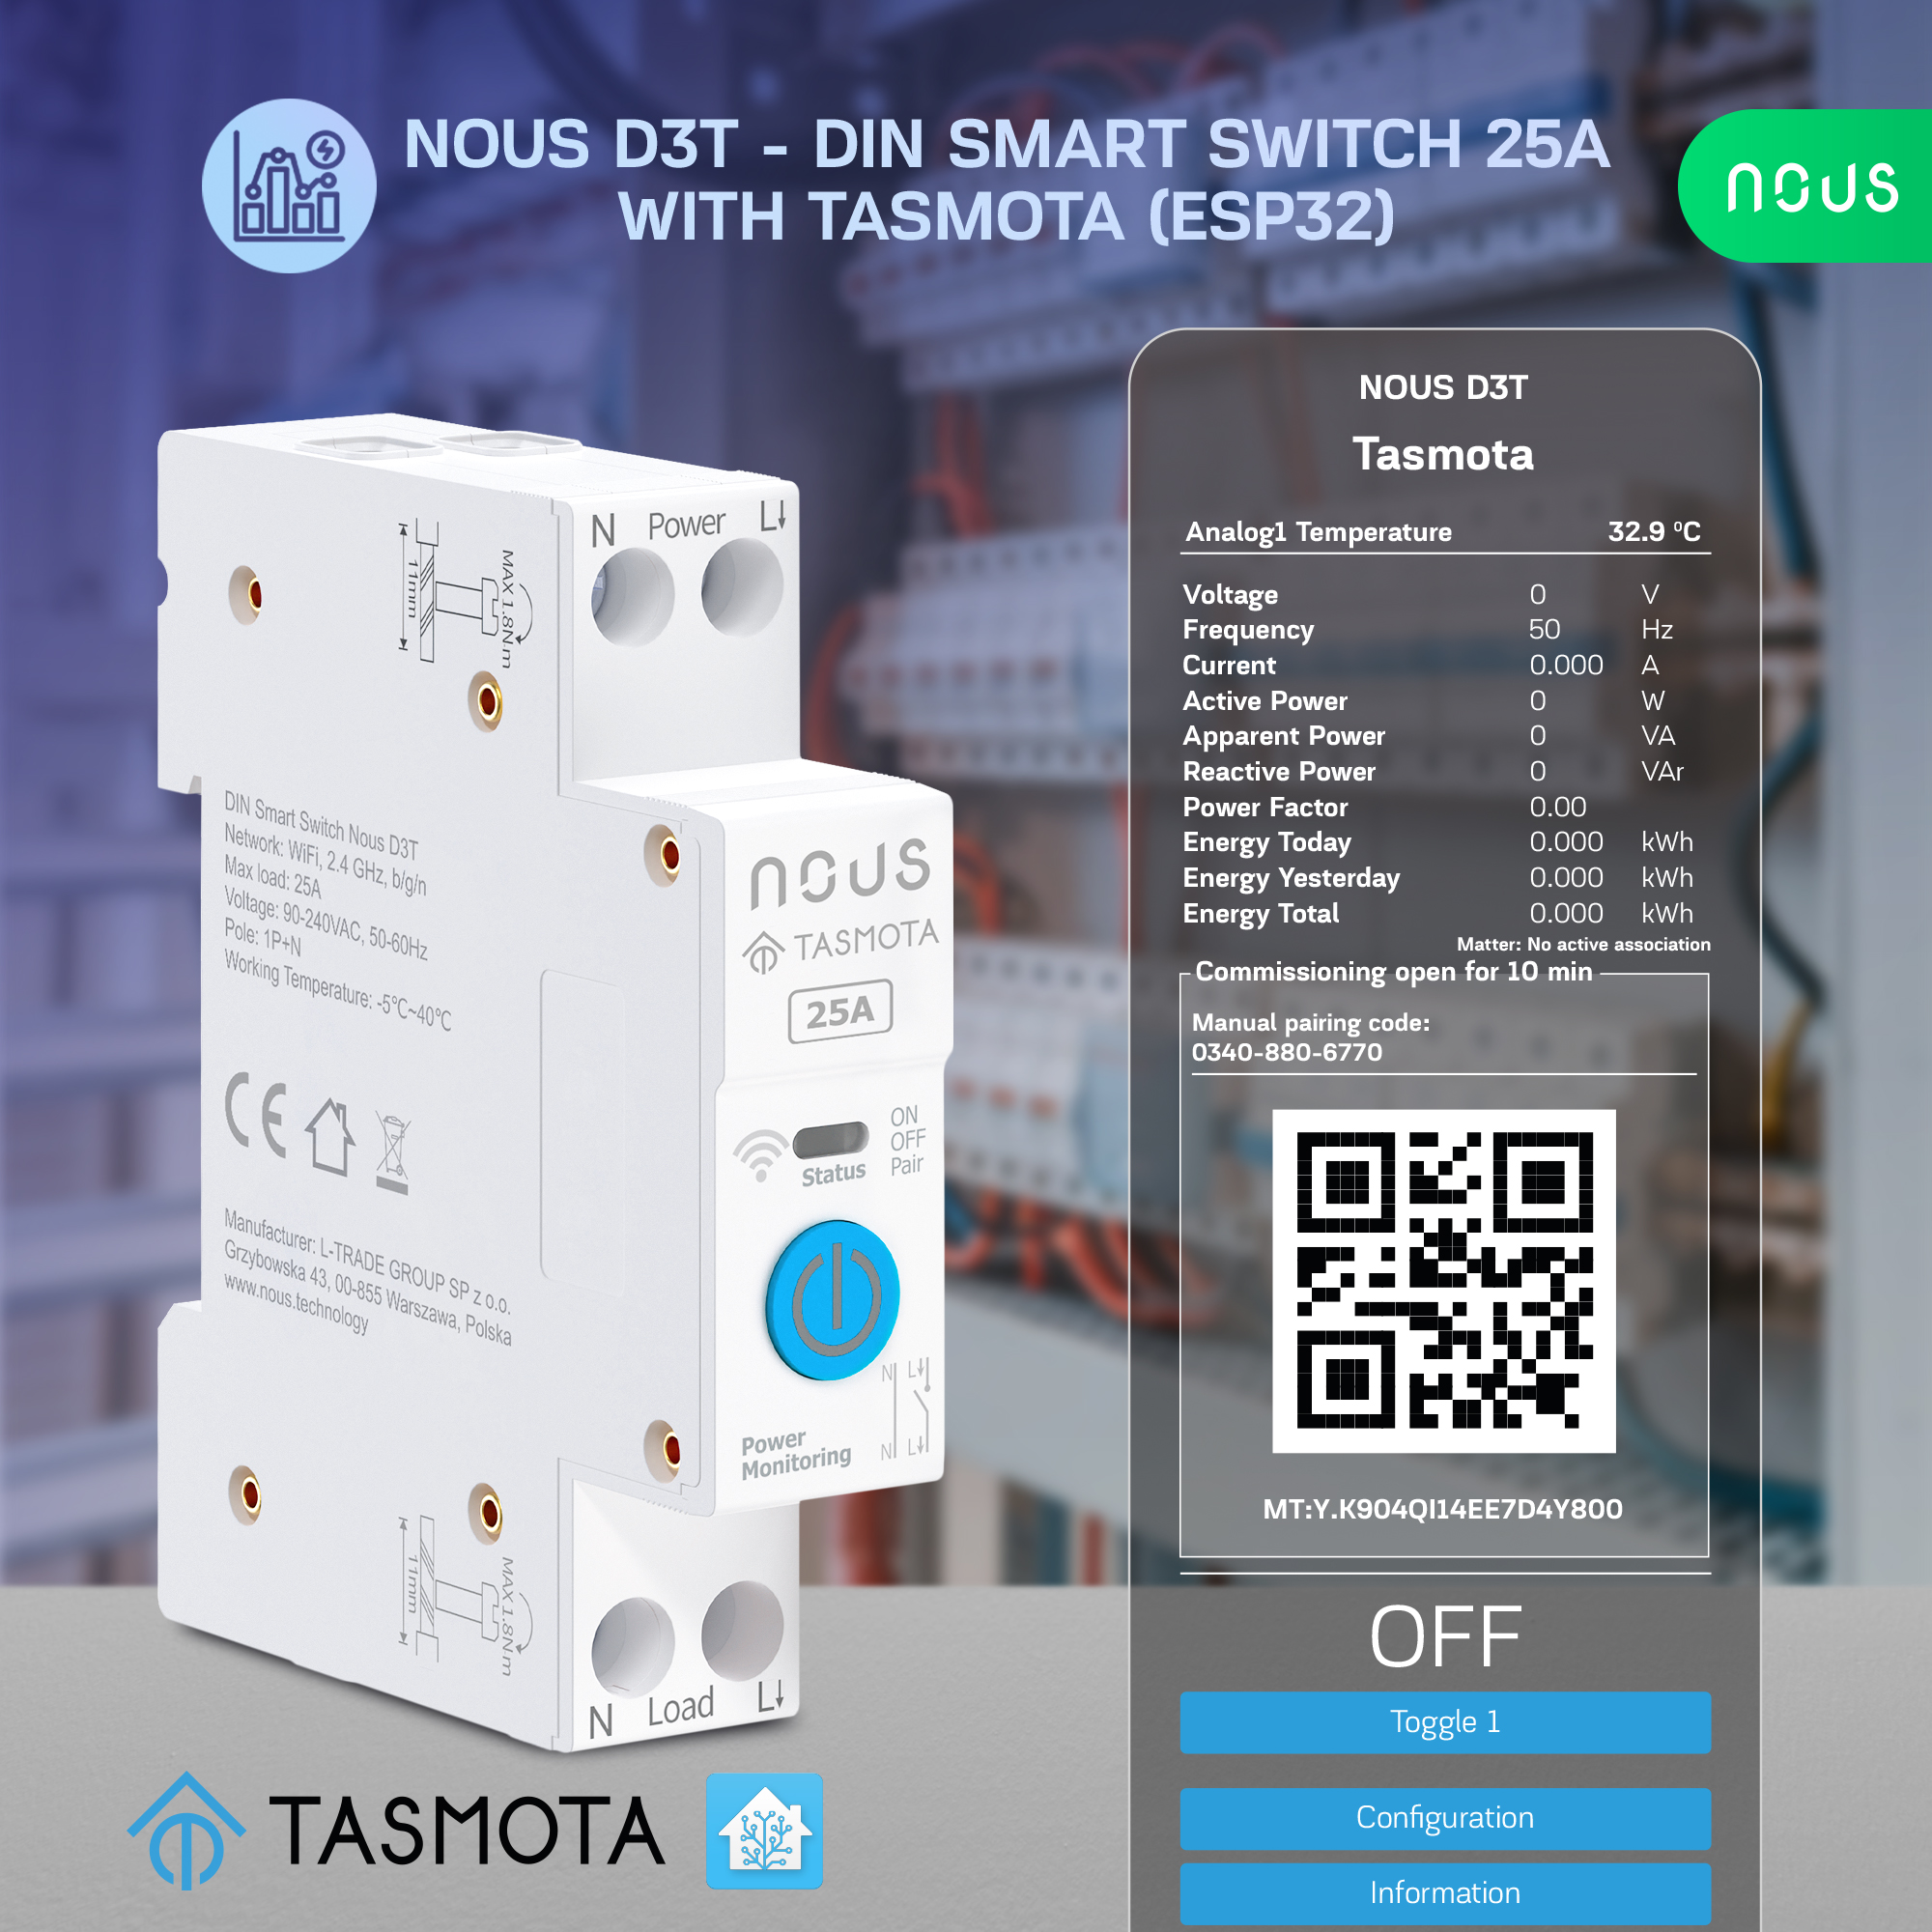
Nous D3T - DIN Smart Switch 25A with Tasmota (ESP32)

| Main settings | |
|---|---|
| Compatibility | Locking Clip for DIN rail mounting |
| Brand | NOUS |
| Colour | White |
| Material | PC/ABS (V0) |
| Special features | Energy monitoring |
| Certificate | CE, RoHS |
| Specifications | |
| Device dimensions | 82x50x15 mm |
| Maximum load | 25 A |
| Operating temperature | -25~70 ℃ |
| Operating voltage range | 90-240V |
| Level of moisture protection | IP20 |
| Network | |
| Communication standard | WiFi IEEE 802.11b/g/n |
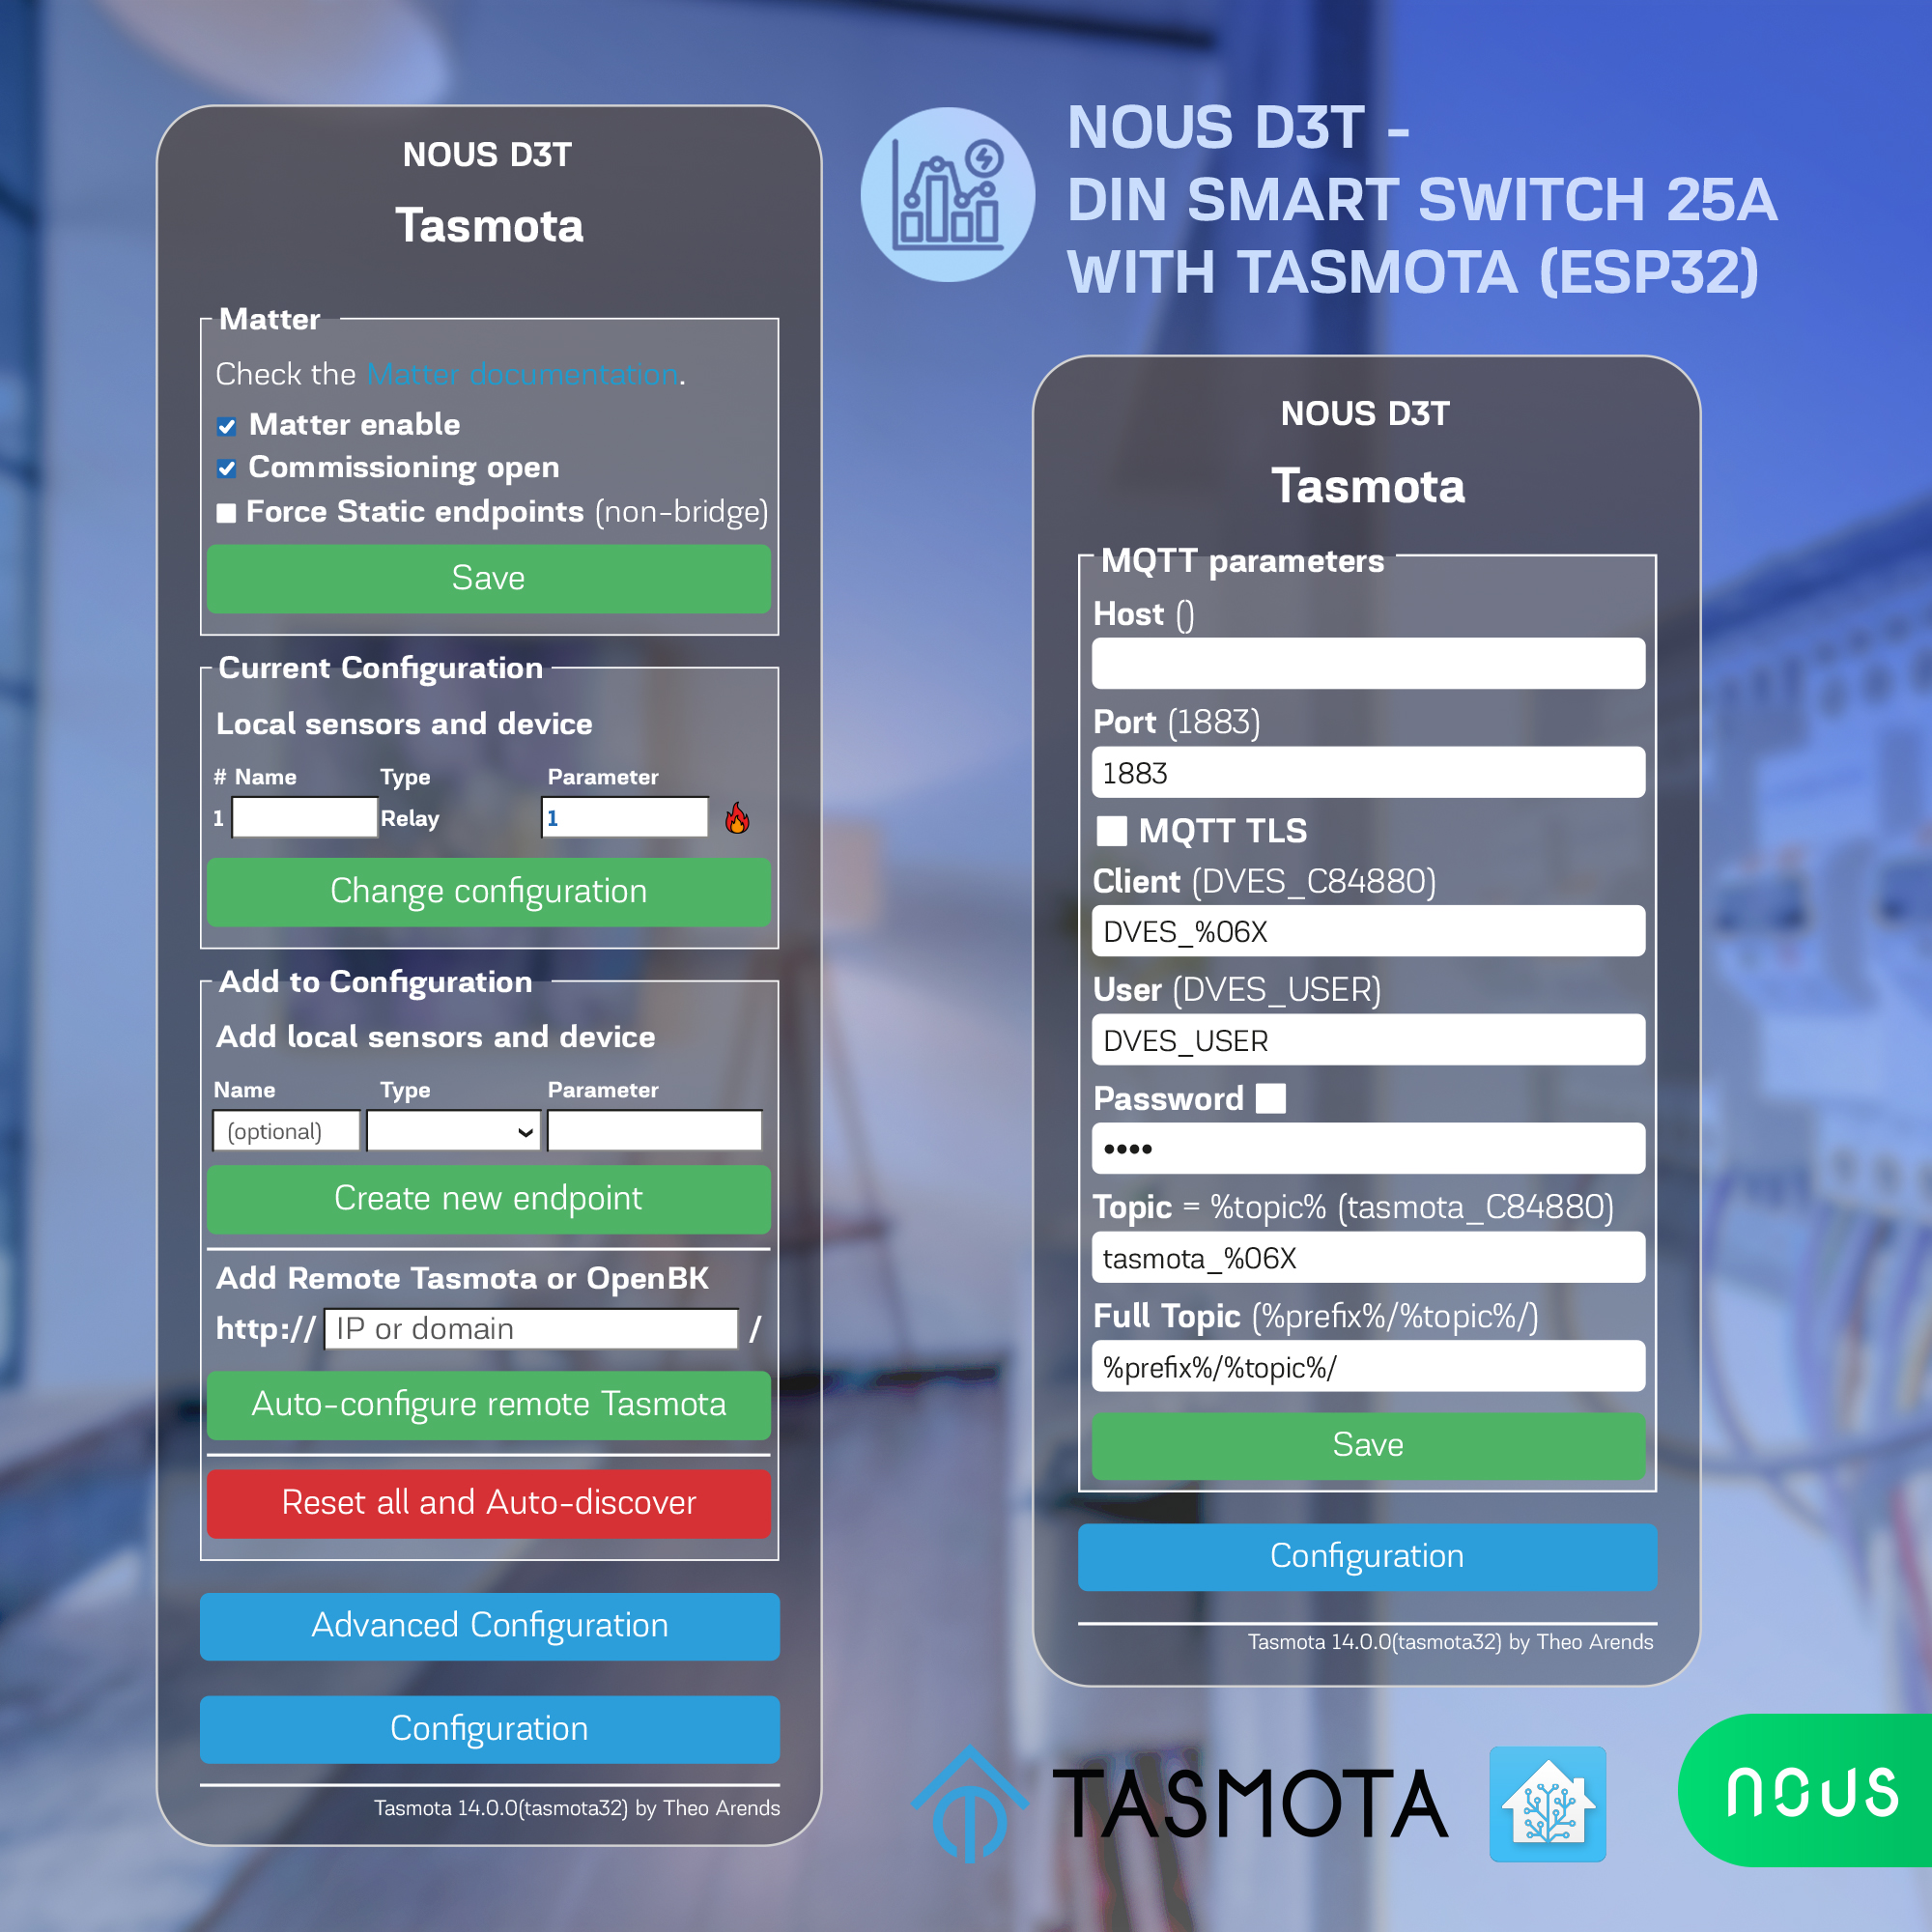
| Protocol | MQTT, Matter |
| Type of wireless transmission | 2.4GHz |
| Control from a smartphone | Web Interface, Home Assistant, with Matter connection: Google Home, Alexa, Apple Home kit, etc |
| Compatibility with voice assistants | Alexa, Google Assistant, Siri after connection to Home Assistant or with Matter connection |
| Frequency range: | 2412 - 2484 MHz |
OPERATING MANUAL
 NOTE: Tasmota is not a commercial product and support is limited. You should be prepared to research and resolve potential issues on your own.
Detailed information about connecting, changing settings and modifications is presented on the website " https://tasmota.github.io/docs/ "
description
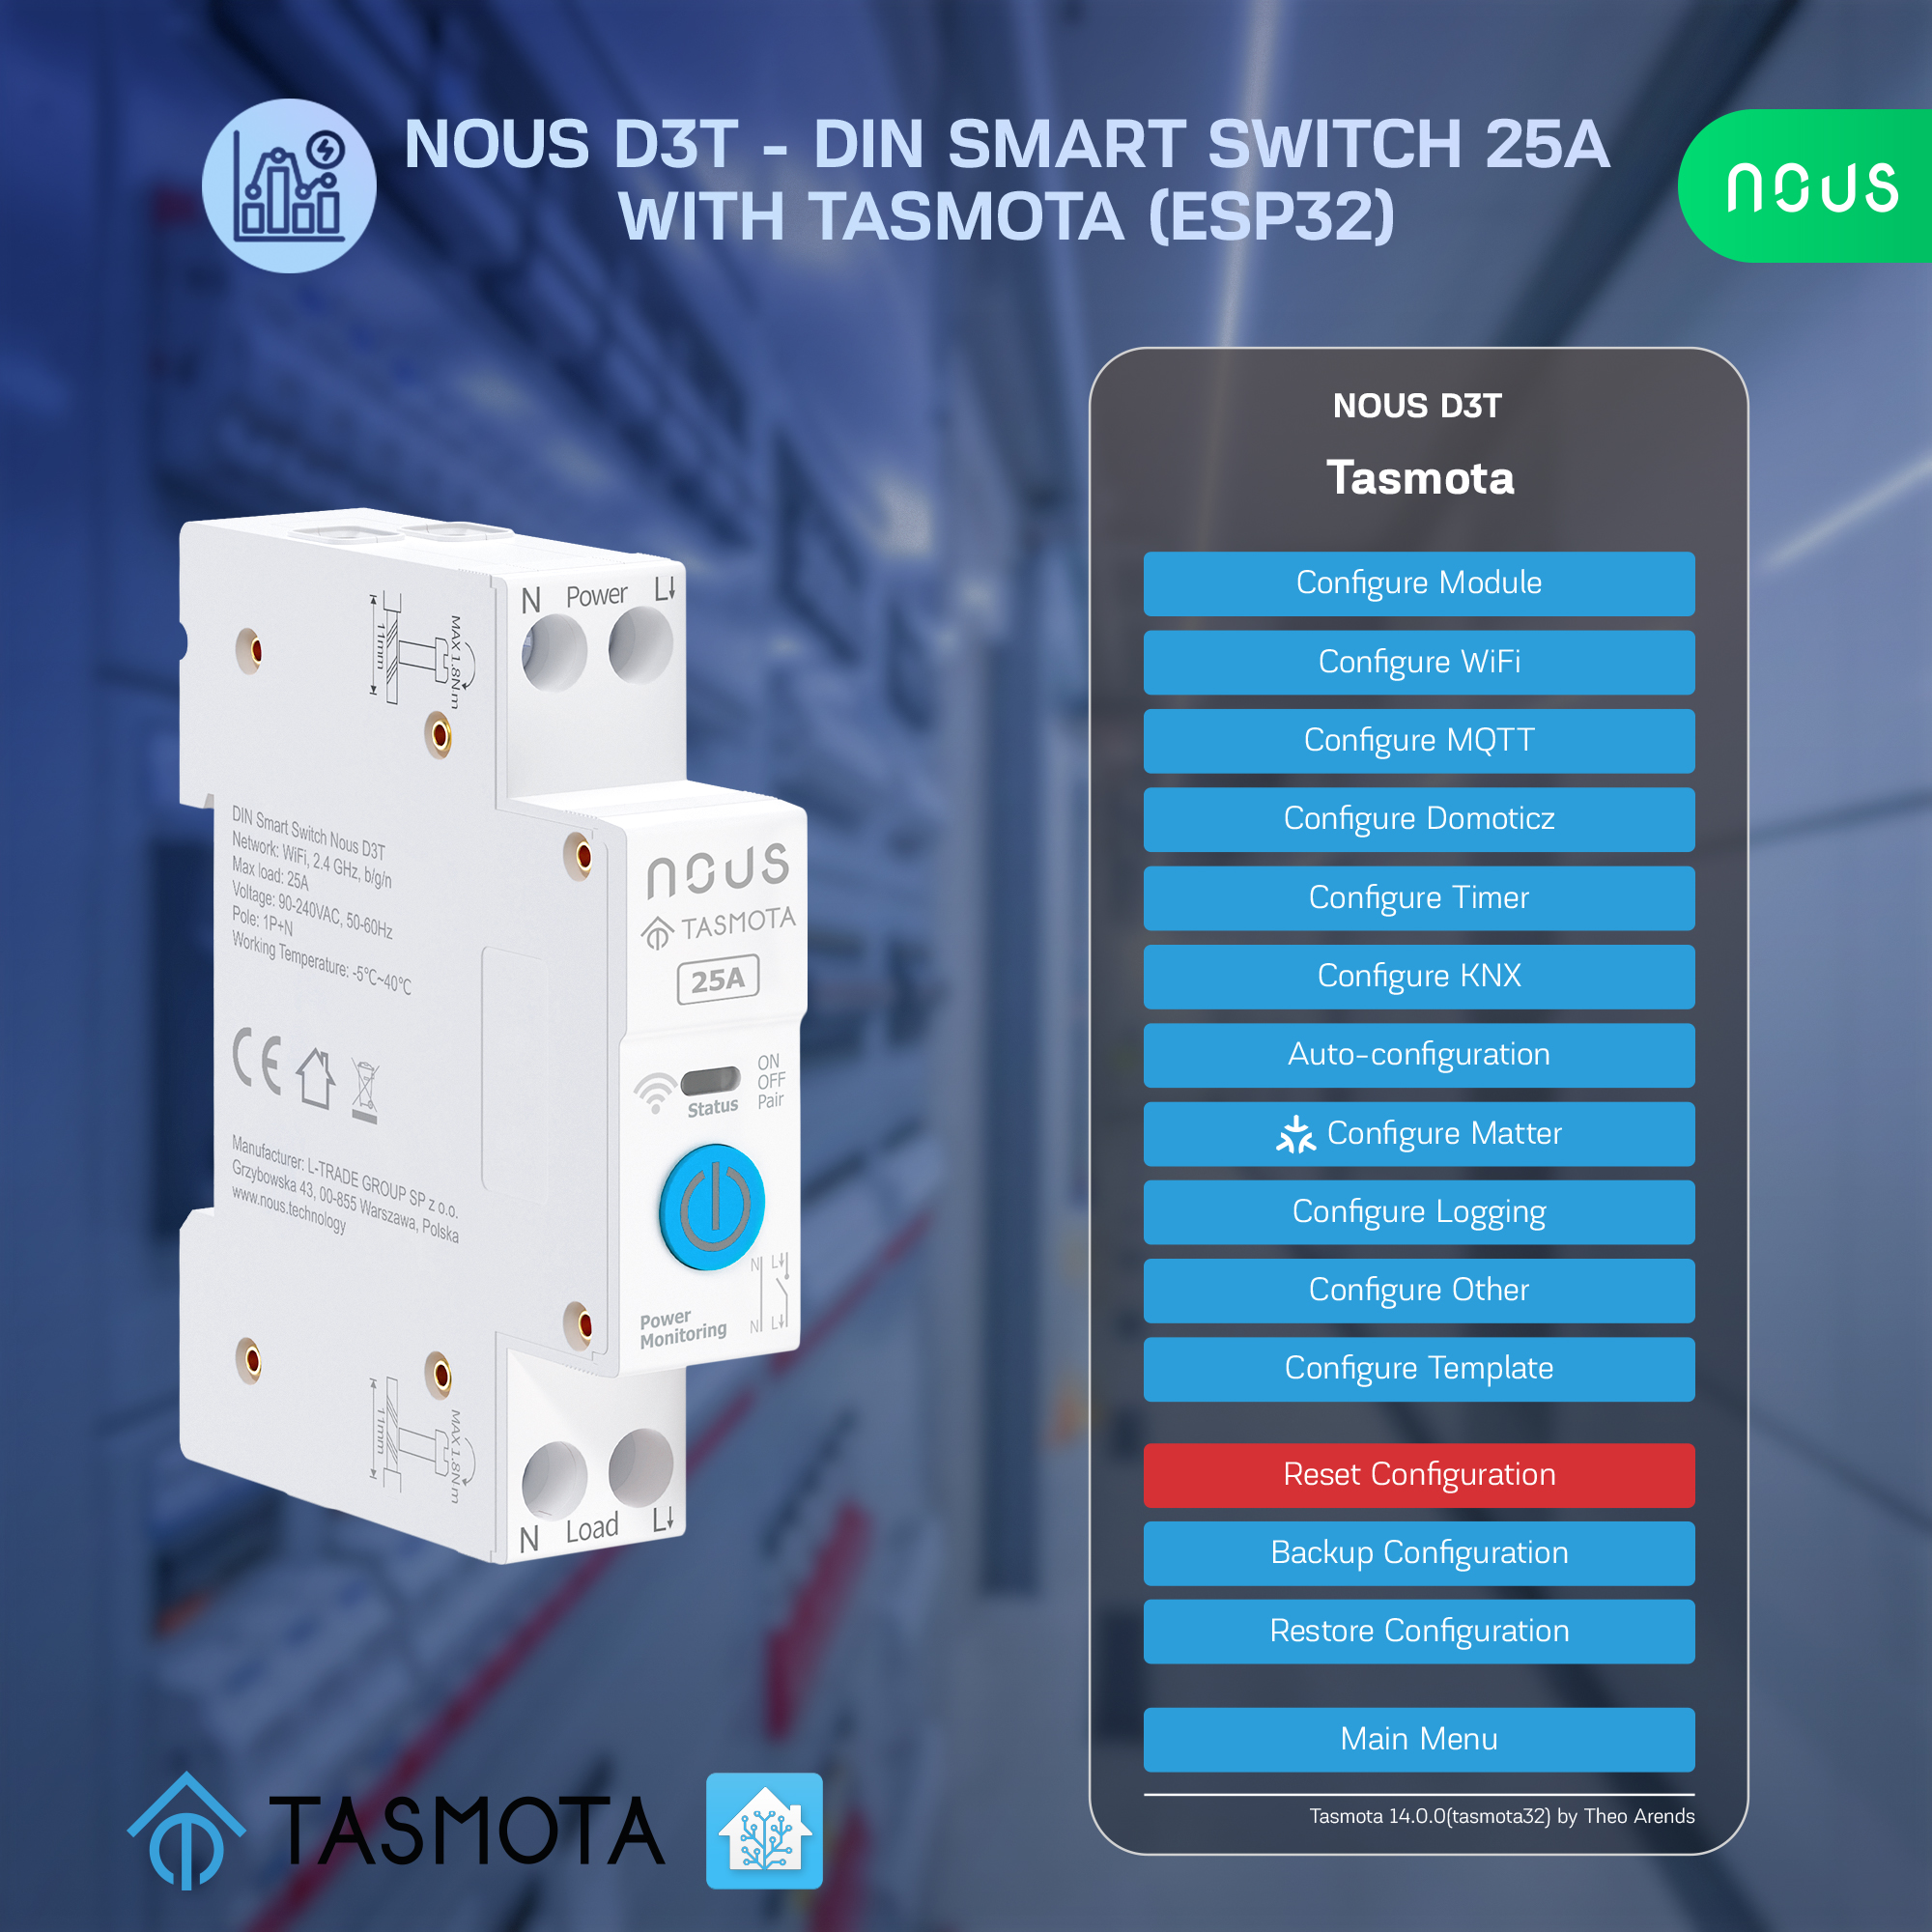
The NOUS D2T smart switch with Tasmota open source software installed (hereinafter referred to as the switch) is designed to organize automatic and manual switching off of electrical appliances in the room, by remote access via a Wi-Fi network, using a smartphone or from a personal computer via the Web interface. Communication with the switch is configured via a Wi-Fi network, for which a wireless Wi-Fi adapter is used. The switch is equipped with a mechanical button and a light indicator of the device status. The device is equipped with an electromechanical relay and supports the Matter protocol .
ATTENTION: The connection of the smart socket to the Wi-Fi network cannot be guaranteed in all cases, as it depends on many conditions: the quality of the communication channel and intermediate network equipment, the make and model of the mobile device, the version of the operating system, etc.
PREVENTIVE MEASURES
- Read these instructions carefully.
- Use the product within the temperature and humidity limits specified in the technical data sheet.
- Do not install the product near heat sources, such as radiators, etc.
- Do not allow the device to fall or be subjected to mechanical stress.
- Do not use chemically active or abrasive cleaning agents to clean the product. Use a damp flannel cloth.
- Do not overload the specified capacity. This may cause a short circuit and electric shock.
- Do not disassemble the product yourself - diagnostics and repair of the device should only be carried out at a certified service center.
- Please contact the seller for a replacement if there is damage caused by transportation.
- Please insert the plug into the socket in proper condition and keep it away from children.
- For safety reasons, fully insert the plug into the socket during use.
Design and controls
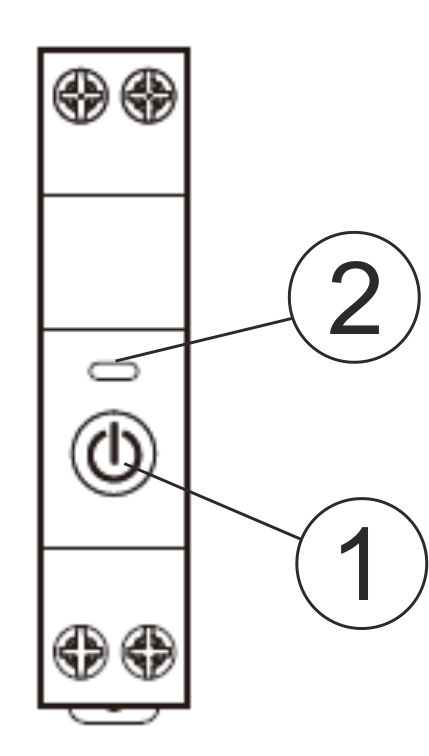
| № | Name | description |
| 1 | Button | A short press of the button switches the device "ON" "OFF". |
| 2 | Indicator | Shows the current status of the device |
Installation
| Installation procedure: | ||
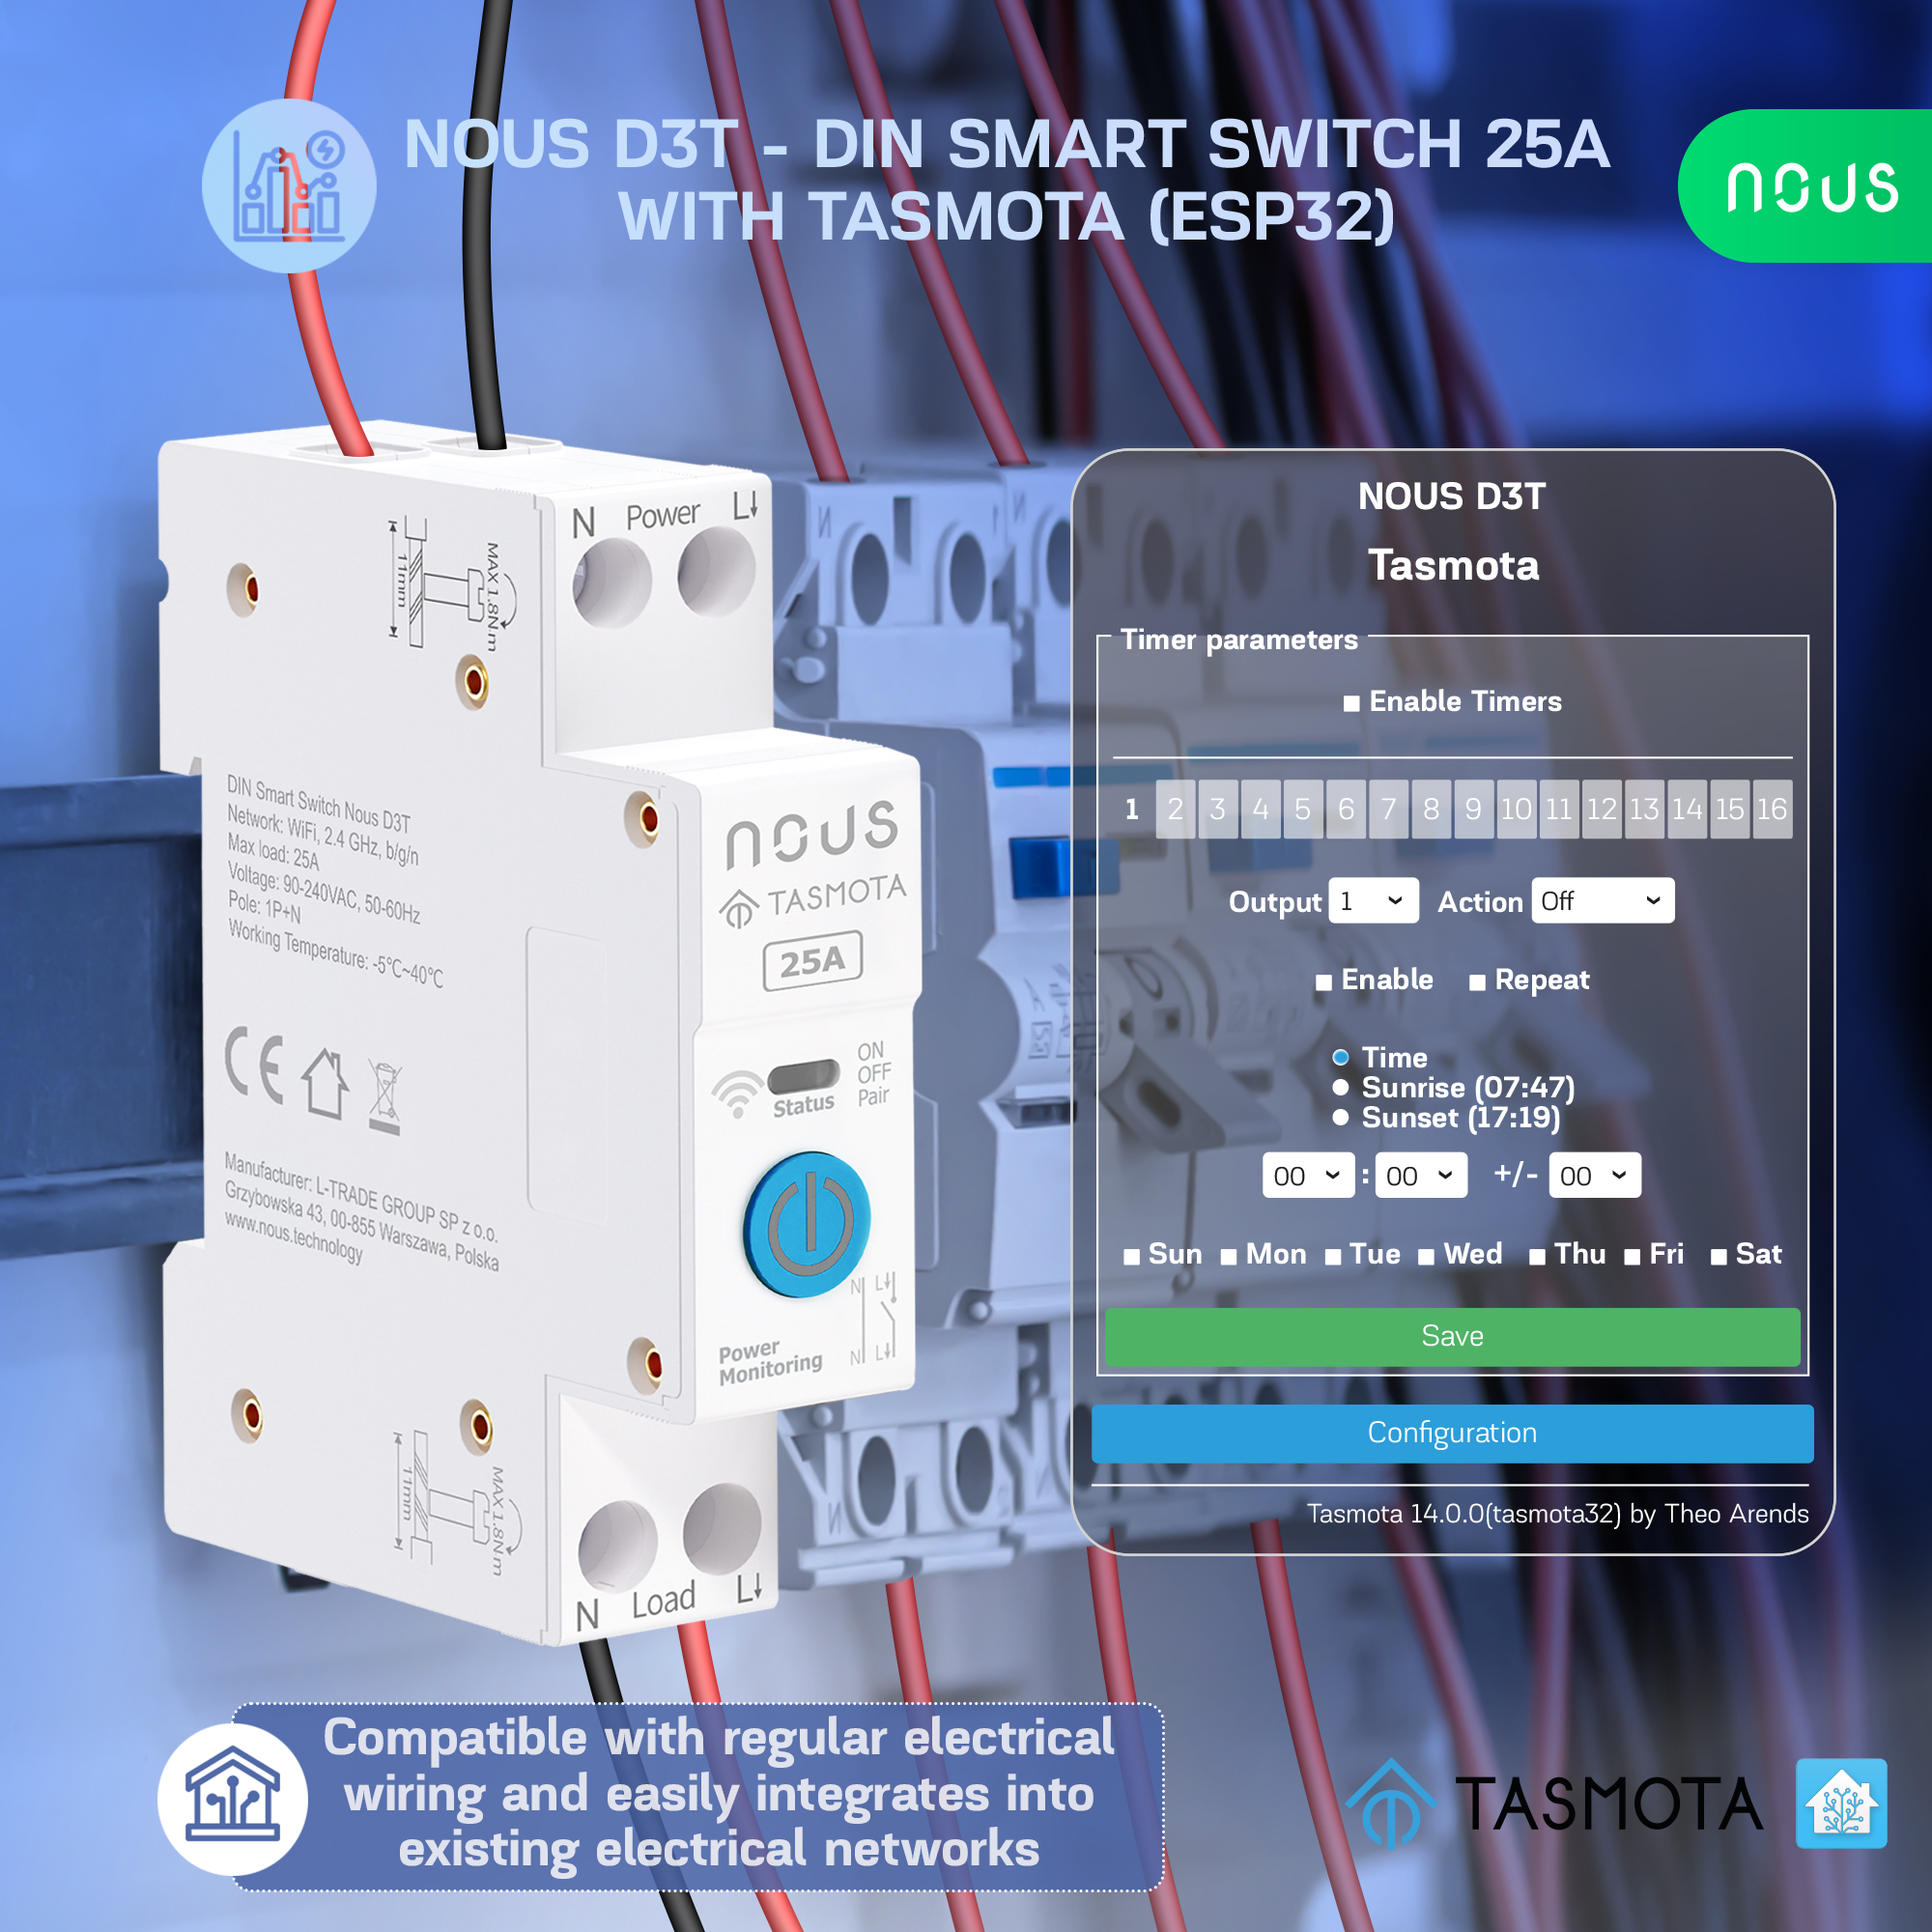
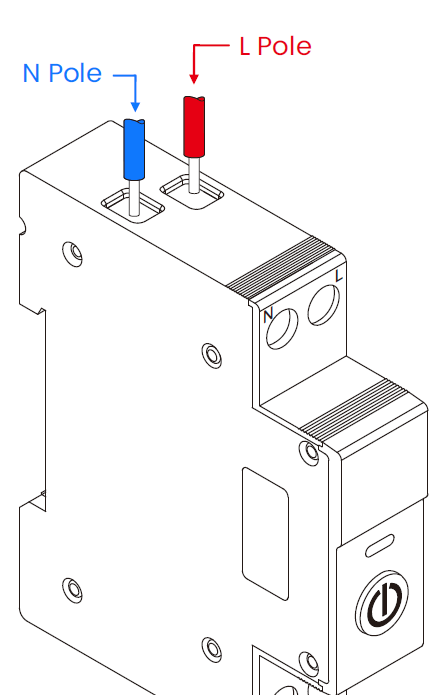
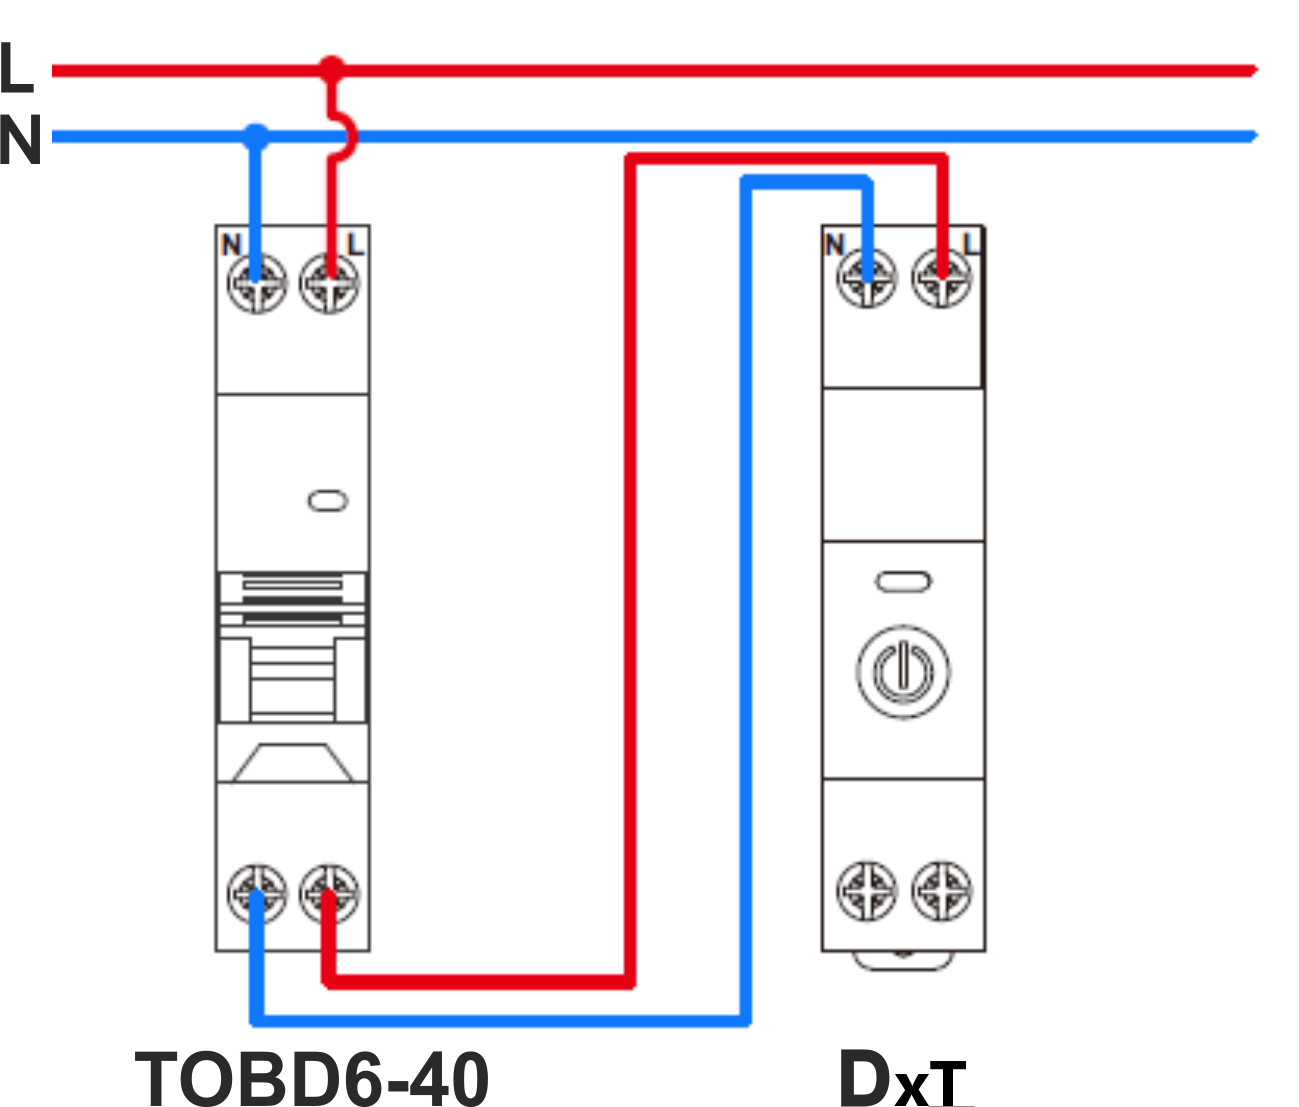
| 1 | Connect the switch as shown in one of the electrical diagrams. |
|
| 2 |
Marking:
|
|
| 3 | When the installation is complete, the device is ready for use. | |
| Importantly: | Make sure that the Wi-Fi network in the selected installation location is stable and has a sufficient level. | |
Connection
To connect the Nous D2T switch, you need a smartphone or personal PC.
How to connect the switch to a Wi-Fi network:
| 1 | Make sure that the frequency range of the network to which the device will be connected is 2.4 GHz, otherwise the switch will not connect, since the device is not designed to work with 5 GHz Wi-Fi networks; | |
| 2 | Connect the device to the network. On the PC, the access point "tasmota-xxxxxxx" should appear in the list of networks, if the access point is not detected, you need to do a "RESET" according to point 11 | |
| 3 | Connect to access point "tasmota-xxxxxxx" | |
| 4 |
After connecting to the access point, the browser will automatically open and go to the link 192.168.4.1, if this operation did not follow, then you need to open the browser and enter 192.168.4.1 in the address input field |
|
| 5 |
On the opened page, you need to select your access point and enter its password in the field below and click "Save" |
|
 |
|
|
| 6 | When the connection is complete, an inscription will appear stating "Successful connection to Wi-Fi" and the address of your device on the network. | |
| 7 | Connect to your Wi-Fi network and go to the address that was specified in point 6. | |
| 8 | You will need to calibrate the device for the power source. You can find how to do this here: https://tasmota.github.io/docs/Power-Monitoring-Calibration/ | |
| 9 |
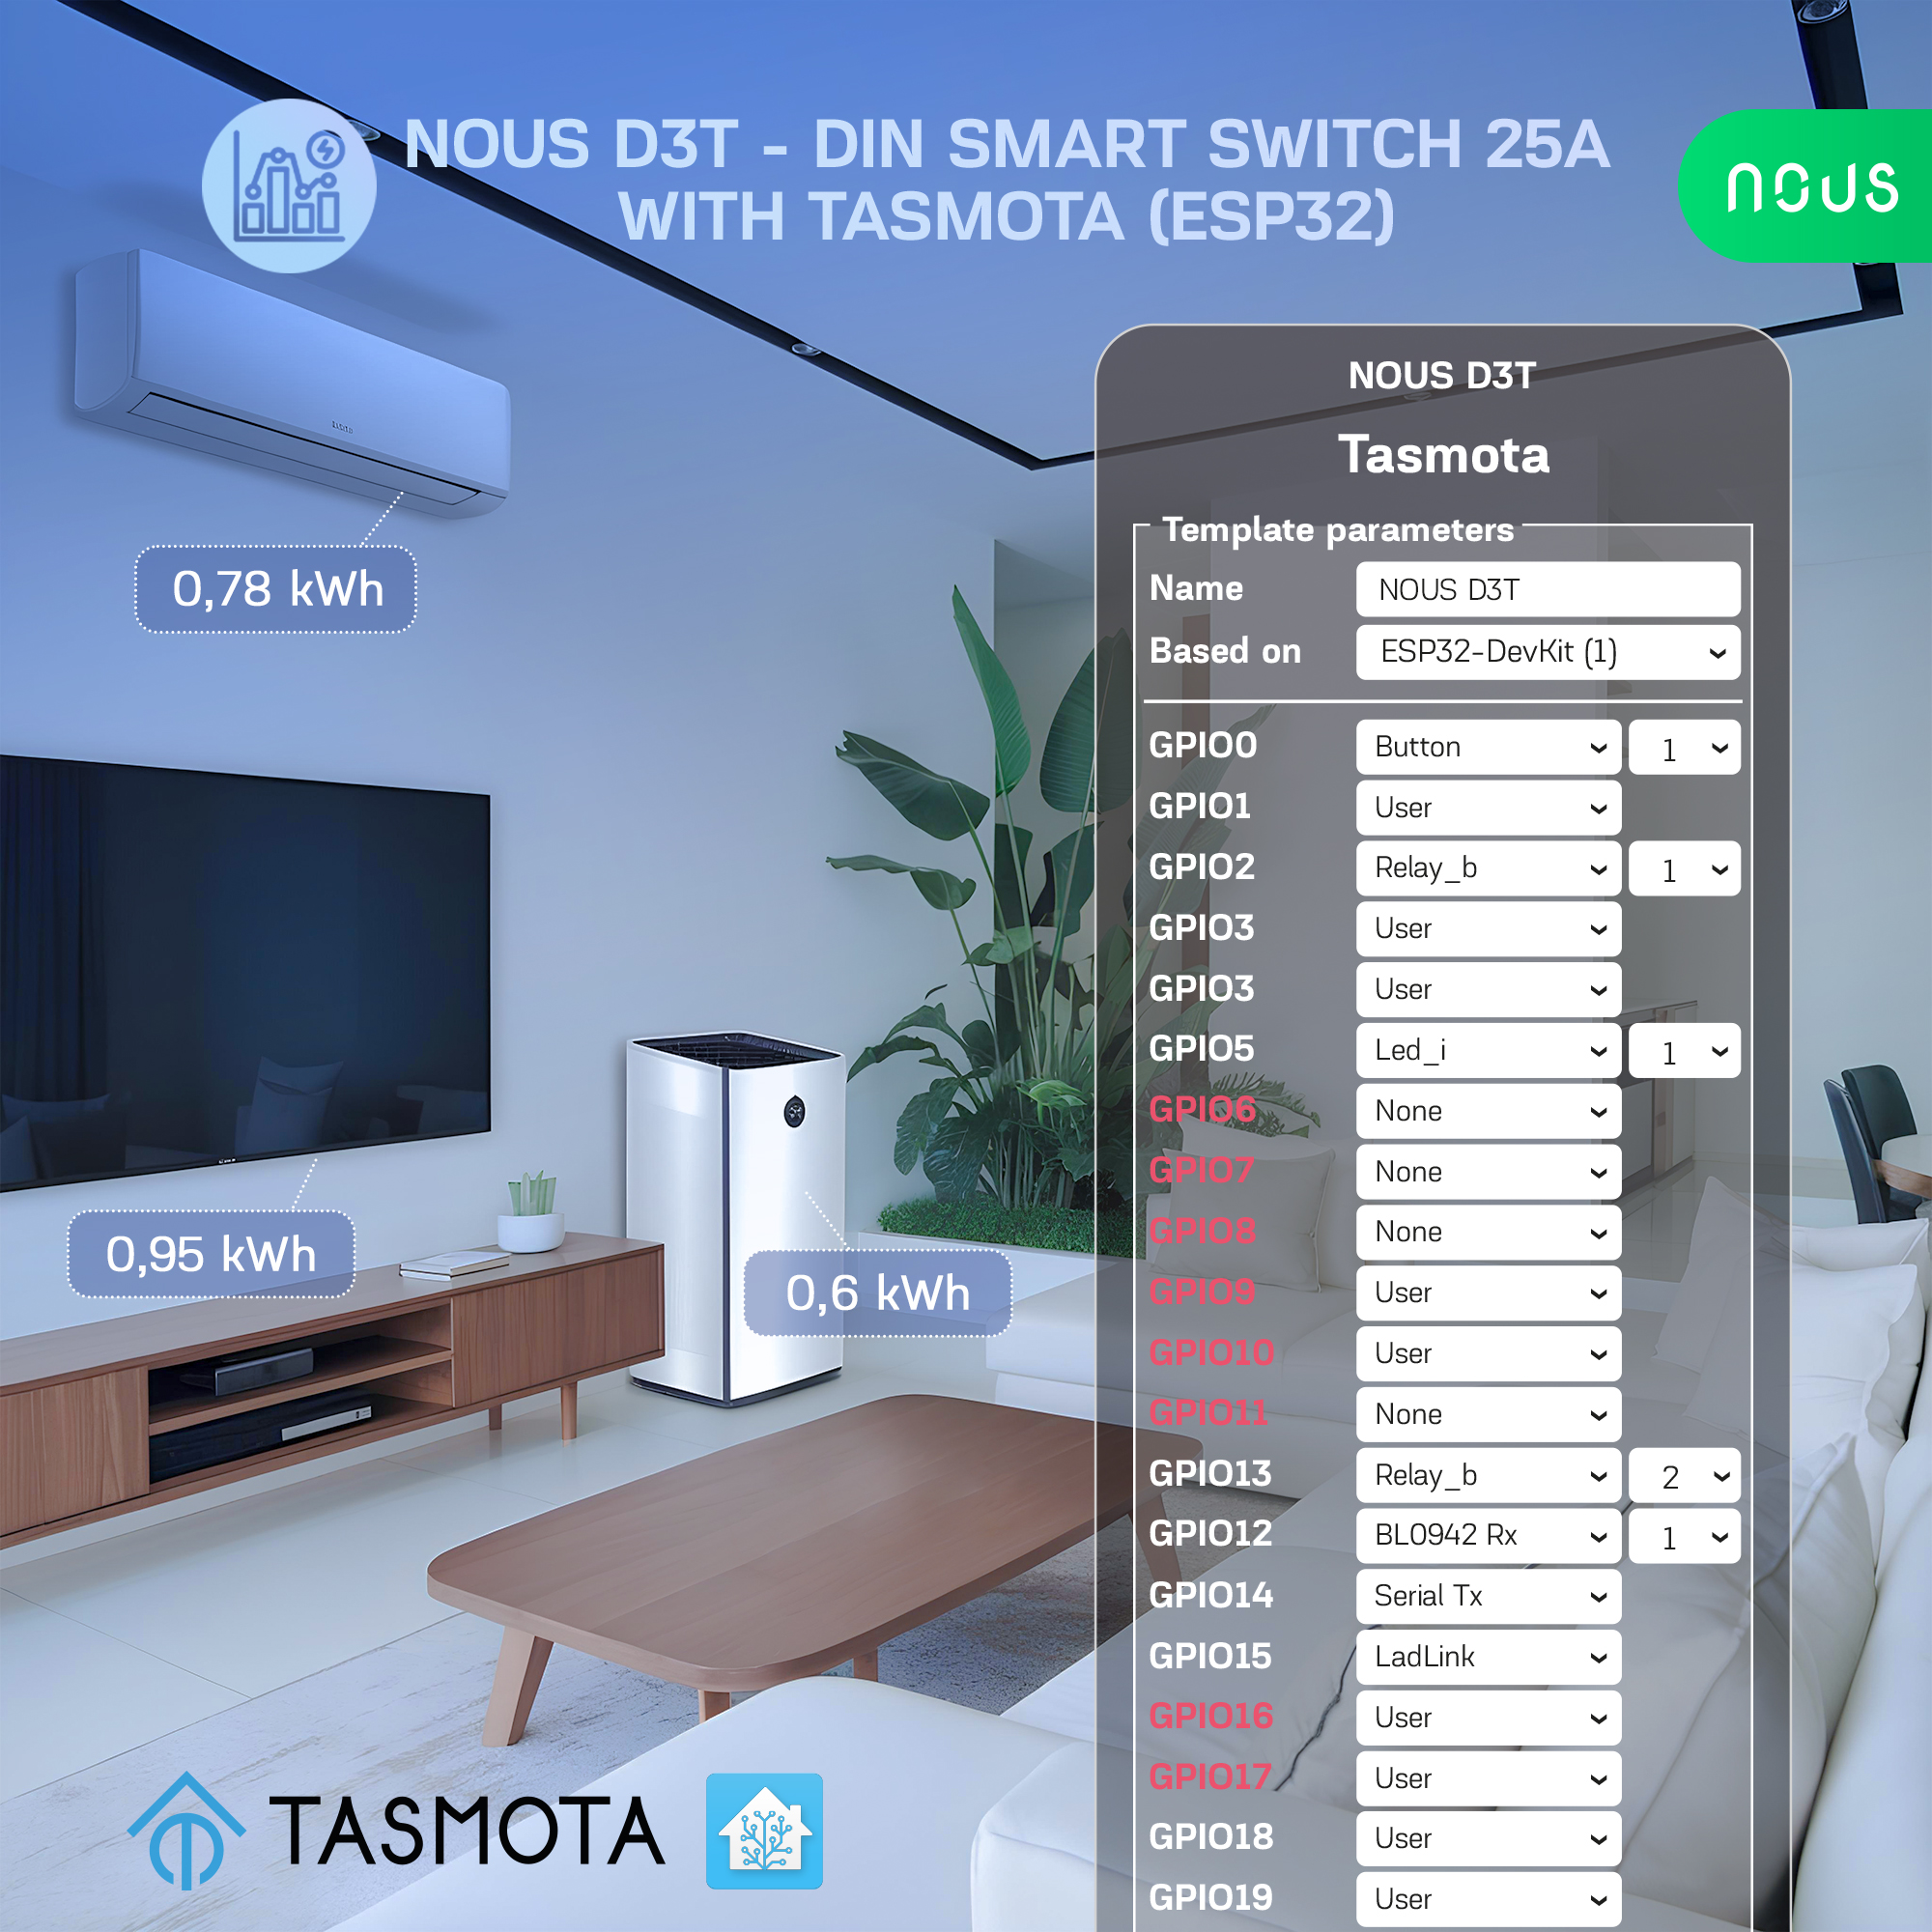
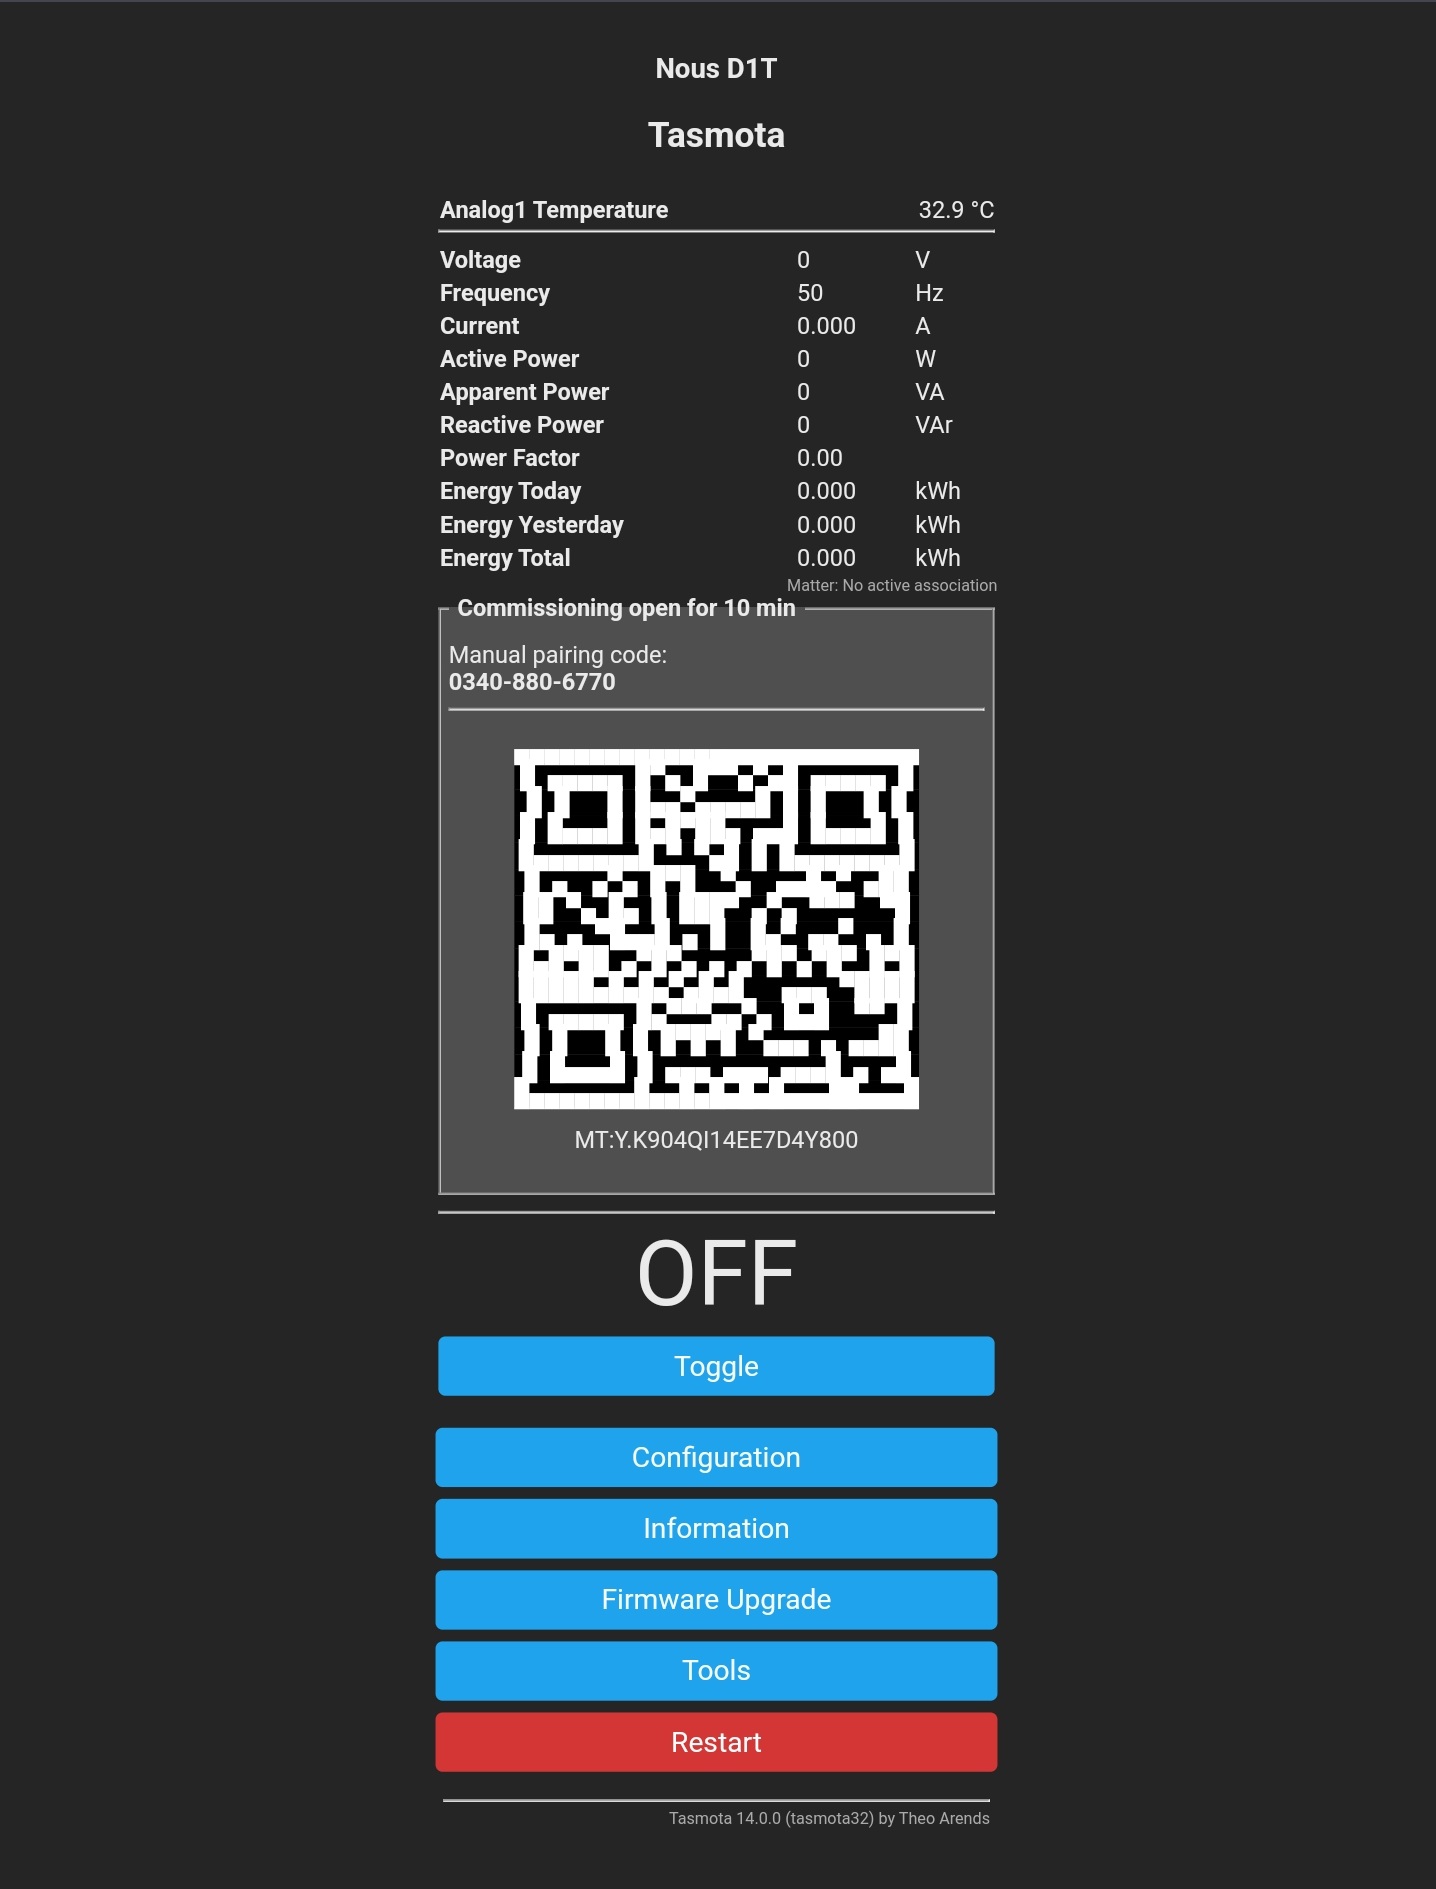
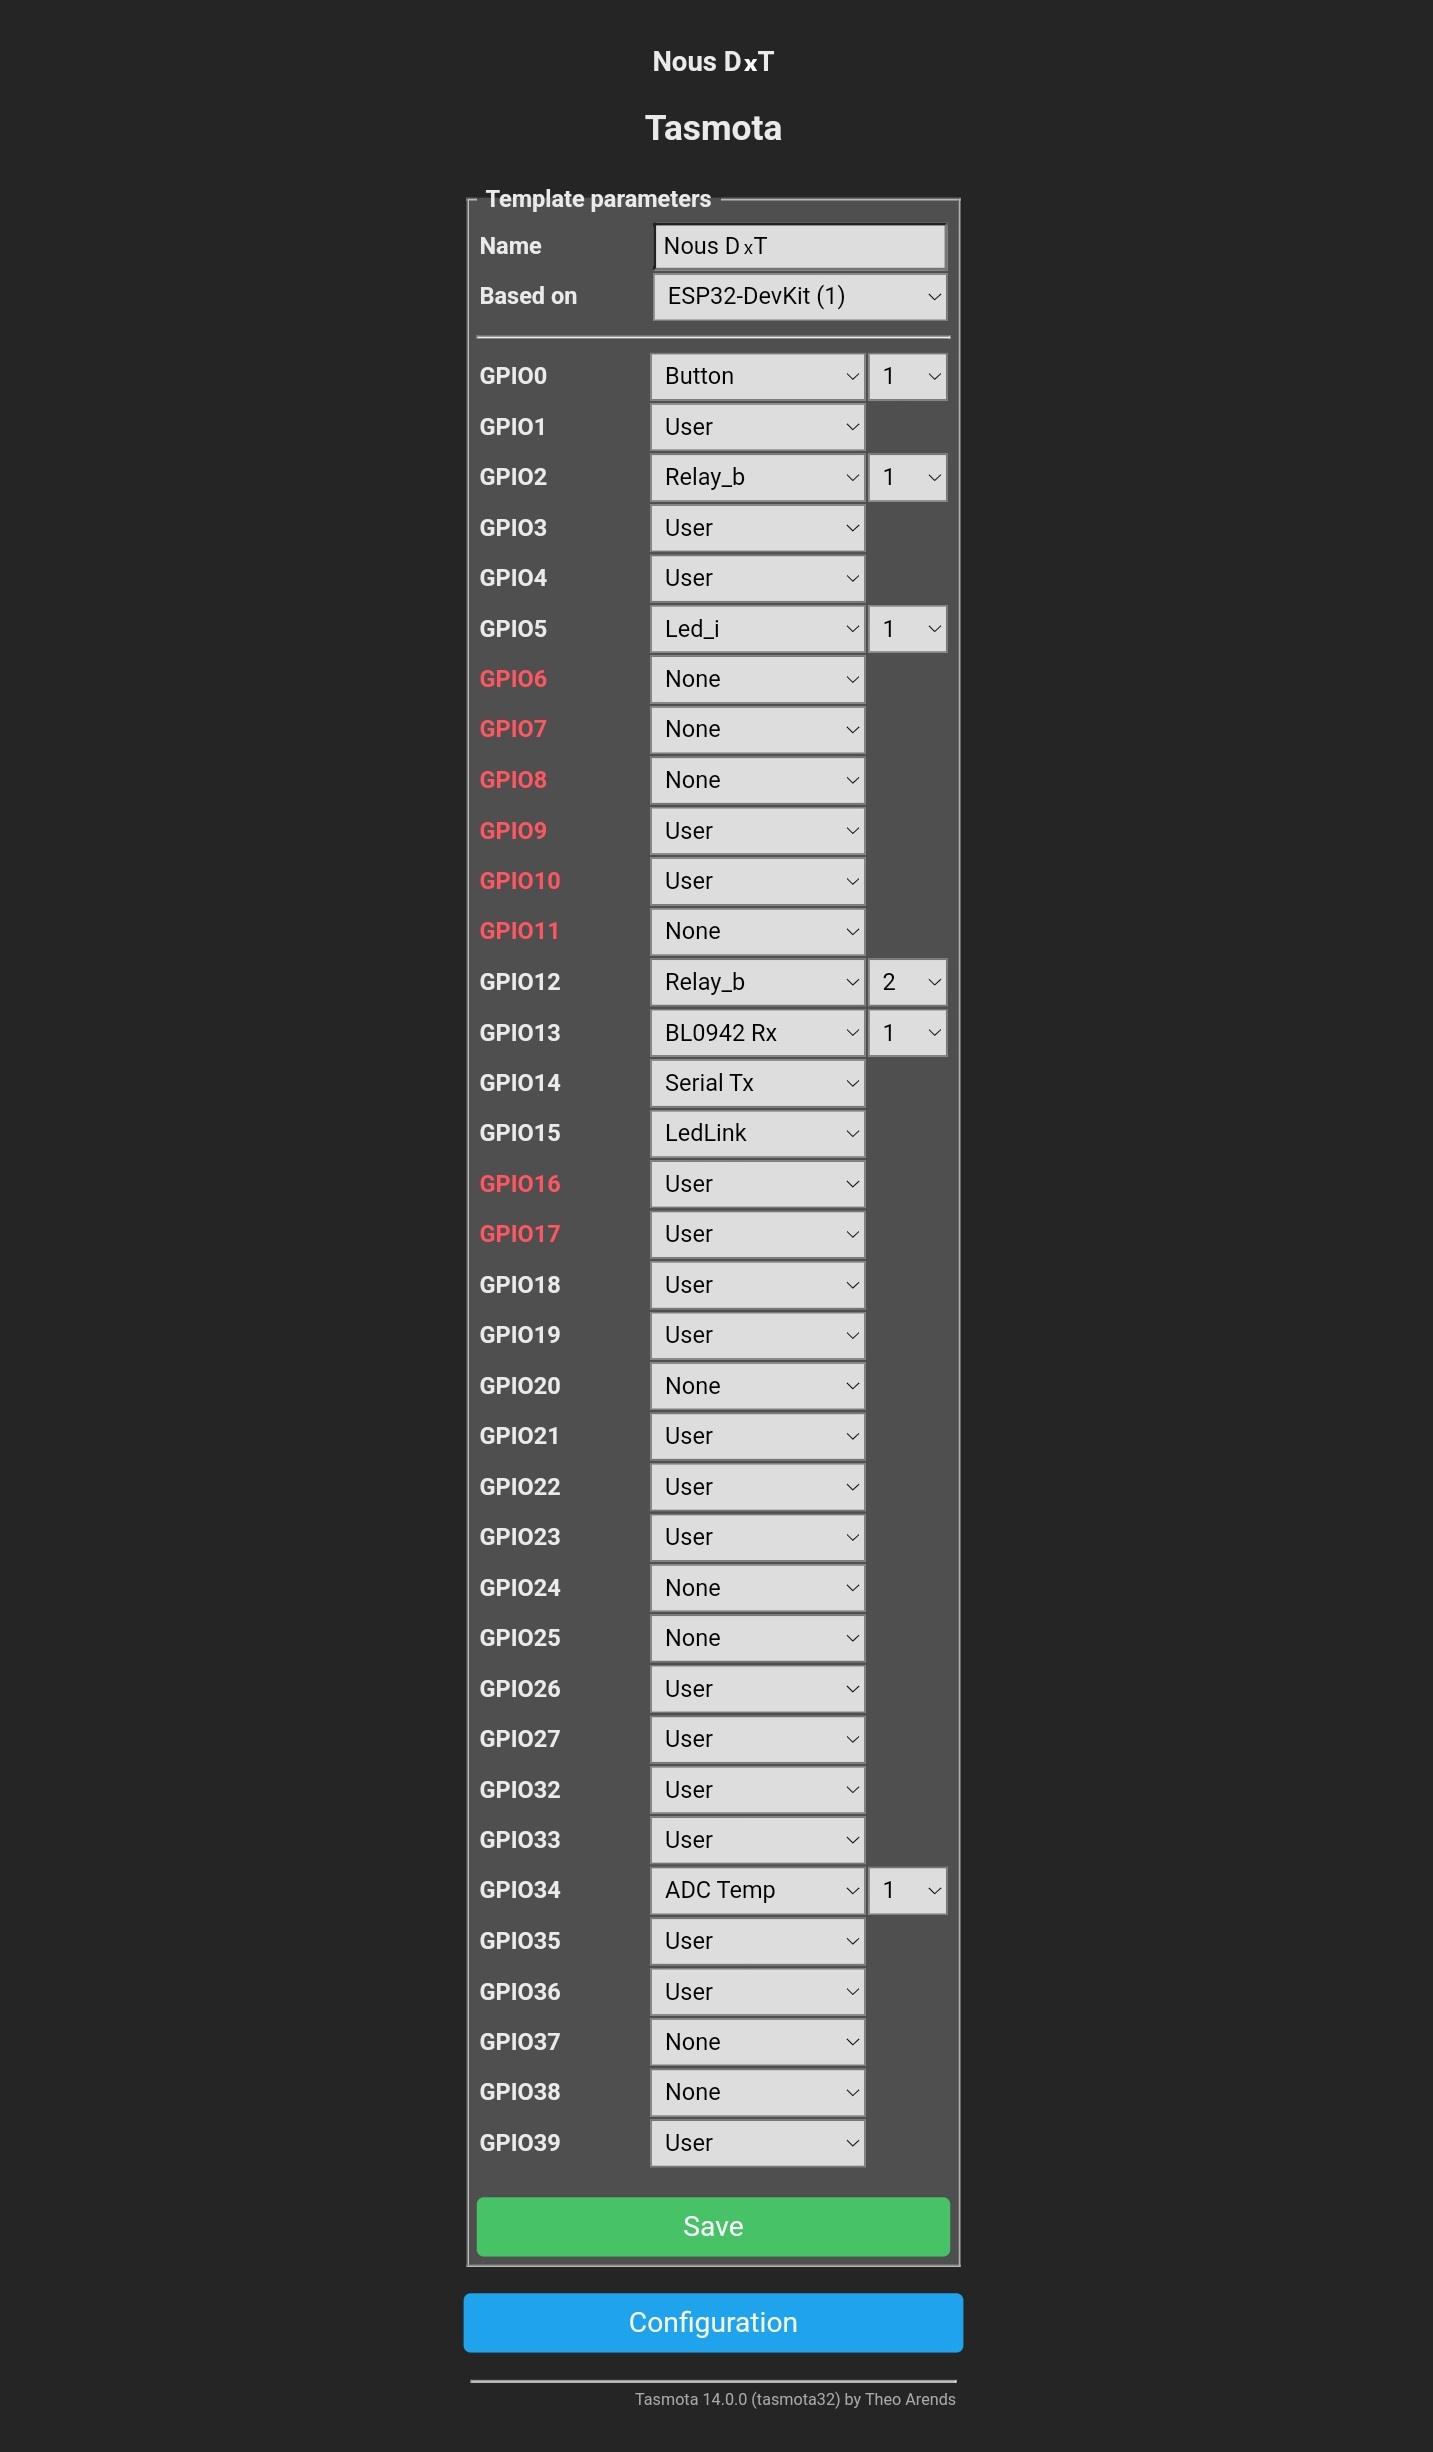
The device is ready to use. The template and rules are already activated, but if you need it later - you can find it below |
|
 |
 |
|
| 10 |
{"NAME":"Nous D1T","GPIO":[32,1,9312,1,1,320,1,1,9313,8160,3200,544,1,1,1,1,0,1,1,1,0,0,1,1,0,0,0,0,1,1,4736,1,1,0,0,1],"FLAG":0,"BASE":1}The template must be entered in the "Template" field, check the "Activate" box and save the changes:
|
|
| 11 |
To reset the device to factory settings you need to: Plug and unplug the device 6 times and leave it on for the 7th time - the LED should start flashing, meaning it is ready to be plugged in again; if you have access to the web interface, type " reset 1" in the console and press "enter" |
|
| 12 |
To connect the device to smart home systems using the Matter protocol, please read the following information: |
|
|
Tasmota is a highly extensible and flexible program that can be integrated with: Alexa, AWS IoT, Domoticz, Home Assistant, Homebridge, HomeSeer, IP Symcon, KNX, NodeRed, nymea, OctoPrint, openHAB, Otto, IOBroker, Mozilla WebThings Adapter, SmartThings, Tasmohab, Homematic ip тощо. for more information see here: https://tasmota.github.io/docs/Integrations/ |
||


INSTRUKCJA OBSŁUGI
UWAGA: Tasmota nie jest produktem komercyjnym, a wsparcie jest ograniczone. Powinieneś być przygotowany na samodzielne zbadanie i rozwiązanie potencjalnych problemów.
Szczegółowe informacje dotyczące podłączania, zmiany ustawień i modyfikacji znajdują się na stronie internetowej „ https://tasmota.github.io/docs/ ”
opis
Inteligentny przełącznik NOUS D2T z zainstalowanym oprogramowaniem open source Tasmota (zwany dalej przełącznikiem) jest przeznaczony do organizowania automatycznego i ręcznego wyłączania urządzeń elektrycznych w pomieszczeniu, poprzez zdalny dostęp za pośrednictwem sieci Wi-Fi, przy użyciu smartfona lub z komputera osobistego za pośrednictwem interfejsu internetowego. Komunikacja z przełącznikiem jest konfigurowana za pośrednictwem sieci Wi-Fi, do której używany jest bezprzewodowy adapter Wi-Fi. Przełącznik jest wyposażony w przycisk mechaniczny i wskaźnik świetlny stanu urządzenia. Urządzenie jest wyposażone w przekaźnik elektromechaniczny i obsługuje protokół Matter .
UWAGA: Nie możemy zagwarantować prawidłowego połączenia inteligentnego gniazdka z siecią Wi-Fi w każdym przypadku, ponieważ zależy to od wielu warunków: jakości kanału komunikacyjnego i pośredniczącego sprzętu sieciowego, marki i modelu urządzenia mobilnego, wersji systemu operacyjnego itp.
ŚRODKI ZAPOBIEGAWCZE
- Przeczytaj uważnie niniejszą instrukcję.
- Produkt należy stosować w zakresie temperatury i wilgotności określonym w karcie technicznej.
- Nie należy instalować produktu w pobliżu źródeł ciepła, np. grzejników itp.
- Nie dopuść do upadku urządzenia lub narażenia go na naprężenia mechaniczne.
- Nie używaj chemicznie aktywnych lub ściernych środków czyszczących do czyszczenia produktu. Użyj wilgotnej flanelowej ściereczki.
- Nie przeciążaj określonej pojemności. Może to spowodować zwarcie i porażenie prądem.
- Nie rozbieraj produktu samodzielnie – diagnostykę i naprawę urządzenia należy wykonywać wyłącznie w autoryzowanym serwisie.
- Jeśli podczas transportu doszło do uszkodzeń, skontaktuj się ze sprzedawcą w celu wymiany towaru.
- Proszę upewnić się, że wtyczka jest prawidłowo podłączona do gniazdka i że jest przechowywana w miejscu niedostępnym dla dzieci.
- Ze względów bezpieczeństwa podczas użytkowania należy włożyć wtyczkę do gniazdka całkowicie.
Projekt i sterowanie
| Numer | Nazwa | opis |
| 1 | Przycisk | Krótkie naciśnięcie przycisku powoduje włączenie lub wyłączenie urządzenia. |
| 2 | Wskaźnik | Pokazuje aktualny stan urządzenia |
Instalacja
| Procedura instalacji: | ||
| 1 | Podłącz przełącznik tak, jak pokazano na jednym ze schematów elektrycznych. |
|
| 2 |
Cechowanie:
|
|
| 3 | Po zakończeniu instalacji urządzenie jest gotowe do użycia. | |
| Ważne: | Upewnij się, że sieć Wi-Fi w wybranym miejscu instalacji jest stabilna i ma odpowiedni poziom sygnału. | |
Połączenie
Aby podłączyć przełącznik Nous D2T, potrzebny jest smartfon lub komputer osobisty.
Jak podłączyć przełącznik do sieci Wi-Fi:
| 1 | Upewnij się, że zakres częstotliwości sieci, do której będzie podłączone urządzenie, wynosi 2,4 GHz, w przeciwnym razie przełącznik nie nawiąże połączenia, ponieważ urządzenie nie jest przeznaczone do pracy z sieciami Wi-Fi 5 GHz; | |
| 2 | Podłącz urządzenie do sieci. Na komputerze punkt dostępu „tasmota-xxxxxxx” powinien pojawić się na liście sieci, jeśli punkt dostępu nie zostanie wykryty, należy wykonać „RESET” zgodnie z punktem 11 | |
| 3 | Połącz się z punktem dostępowym „tasmota-xxxxxxx” | |
| 4 |
Po połączeniu z punktem dostępowym przeglądarka automatycznie otworzy się i przejdzie do łącza 192.168.4.1. Jeśli ta operacja nie powiodła się, należy otworzyć przeglądarkę i wpisać 192.168.4.1 w polu wprowadzania adresu. |
|
| 5 |
Na otwartej stronie musisz wybrać swój punkt dostępowy i wpisać jego hasło w polu poniżej, a następnie kliknąć „Zapisz” |
|
|
|
|
| 6 | Po nawiązaniu połączenia wyświetli się napis „Pomyślne połączenie z siecią Wi-Fi” wraz z adresem Twojego urządzenia w sieci. | |
| 7 | Połącz się z siecią Wi-Fi i przejdź do adresu podanego w punkcie 6. | |
| 8 | Będziesz musiał skalibrować urządzenie dla źródła zasilania. Możesz dowiedzieć się, jak to zrobić tutaj: https://tasmota.github.io/docs/Power-Monitoring-Calibration/ | |
| 9 |
Urządzenie jest gotowe do użycia. Szablon i reguły są już aktywowane, ale jeśli będziesz ich potrzebować później - znajdziesz je poniżej |
|
|
|
|
| 10 |
{"NAME":"Nous D1T","GPIO":[32,1,9312,1,1,320,1,1,9313,8160,3200,544,1,1,1,1,0,1,1,1,0,0,1,1,0,0,0,0,1,1,4736,1,1,0,0,1],"FLAG":0,"BASE":1}Szablon należy wpisać w pole „Szablon”, zaznaczyć pole „Aktywuj” i zapisać zmiany:
|
|
| 11 |
Aby przywrócić ustawienia fabryczne urządzenia należy: Podłącz i odłącz urządzenie 6 razy i pozostaw je włączone po raz siódmy - dioda LED powinna zacząć migać, co oznacza, że można je ponownie podłączyć; jeśli masz dostęp do interfejsu internetowego, wpisz „ reset 1” w konsoli i naciśnij „enter” |
|
| 12 |
Aby podłączyć urządzenie do systemów inteligentnego domu za pomocą protokołu Matter , należy zapoznać się z poniższymi informacjami: |
|
|
Tasmota to niezwykle rozszerzalny i elastyczny program, który można zintegrować z: Alexa, AWS IoT, Domoticz, Home Assistant, Homebridge, HomeSeer, IP Symcon, KNX, NodeRed, nymea, OctoPrint, openHAB, Otto, IOBroker, Mozilla WebThings Adapter, SmartThings, Tasmohab, Homematic ip i tak dalej. Więcej informacji znajdziesz tutaj: https://tasmota.github.io/docs/Integrations/ |
||
BEDIENUNGSANLEITUNG
HINWEIS: Tasmota ist kein kommerzielles Produkt und der Support ist begrenzt. Sie sollten bereit sein, potenzielle Probleme selbst zu untersuchen und zu lösen.
Detaillierte Informationen zum Verbinden, Ändern von Einstellungen und Modifikationen finden Sie auf der Website " https://tasmota.github.io/docs/ "
Beschreibung
Der NOUS D2T Smart Switch mit installierter Open-Source-Software Tasmota (im Folgenden als Switch bezeichnet) dient zum automatischen und manuellen Ausschalten von Elektrogeräten im Raum per Fernzugriff über ein Wi-Fi-Netzwerk, mithilfe eines Smartphones oder von einem PC über die Weboberfläche. Die Kommunikation mit dem Switch wird über ein Wi-Fi-Netzwerk konfiguriert, wofür ein drahtloser Wi-Fi-Adapter verwendet wird. Der Switch ist mit einem mechanischen Knopf und einer Lichtanzeige für den Gerätestatus ausgestattet. Das Gerät ist mit einem elektromechanischen Relais ausgestattet und unterstützt das Matter -Protokoll .
ACHTUNG: Die Verbindung der Smart-Steckdose mit dem WLAN-Netzwerk kann nicht in allen Fällen garantiert werden, da sie von vielen Bedingungen abhängt: der Qualität des Kommunikationskanals und der zwischengeschalteten Netzwerkgeräte, der Marke und dem Modell des Mobilgeräts, der Version des Betriebssystems usw.
VORBEUGENDE MASSNAHMEN
- Lesen Sie diese Anweisungen sorgfältig durch.
- Verwenden Sie das Produkt innerhalb der im technischen Datenblatt angegebenen Temperatur- und Feuchtigkeitsgrenzen.
- Installieren Sie das Produkt nicht in der Nähe von Wärmequellen wie Heizkörpern usw.
- Lassen Sie das Gerät nicht fallen und setzen Sie es keiner mechanischen Belastung aus.
- Verwenden Sie zum Reinigen des Produkts keine chemisch aktiven oder scheuernden Reinigungsmittel. Verwenden Sie ein feuchtes Flanelltuch.
- Überlasten Sie die angegebene Kapazität nicht. Dies kann zu Kurzschlüssen und Stromschlägen führen.
- Zerlegen Sie das Produkt nicht selbst – Diagnose und Reparatur des Geräts sollten nur in einem zertifizierten Servicecenter durchgeführt werden.
- Bei Transportschäden wenden Sie sich bitte für Ersatz an den Verkäufer.
- Bitte stecken Sie den Stecker ordnungsgemäß in die Steckdose und bewahren Sie ihn außerhalb der Reichweite von Kindern auf.
- Aus Sicherheitsgründen muss der Stecker während des Gebrauchs vollständig in die Steckdose eingesteckt werden.
Design und Steuerung
| Nr. | Name | Beschreibung |
| 1 | Taste | Durch kurzes Drücken der Taste wird das Gerät EIN bzw. AUS geschaltet. |
| 2 | Indikator | Zeigt den aktuellen Status des Gerätes an |
Installation
| Installationsverfahren: | ||
| 1 | Schließen Sie den Schalter wie in einem der Schaltpläne gezeigt an. |
|
| 2 |
Markierung:
|
|
| 3 | Wenn die Installation abgeschlossen ist, ist das Gerät einsatzbereit. | |
| Wichtig: | Stellen Sie sicher, dass das WLAN-Netzwerk am gewählten Installationsort stabil ist und über ein ausreichendes Niveau verfügt. | |
Verbindung
Zum Anschließen des Nous D2T-Switches benötigen Sie ein Smartphone oder einen PC.
So verbinden Sie den Switch mit einem WLAN-Netzwerk:
| 1 | Stellen Sie sicher, dass der Frequenzbereich des Netzwerks, an das das Gerät angeschlossen wird, 2,4 GHz beträgt. Andernfalls stellt der Switch keine Verbindung her, da das Gerät nicht für die Verwendung mit 5-GHz-WLAN-Netzwerken ausgelegt ist. | |
| 2 | Verbinden Sie das Gerät mit dem Netzwerk. Auf dem PC sollte in der Liste der Netzwerke der Access Point „tasmota-xxxxxxx“ erscheinen, wird der Access Point nicht erkannt, müssen Sie einen „RESET“ gemäß Punkt 11 durchführen | |
| 3 | Mit dem Zugangspunkt „tasmota-xxxxxxx“ verbinden | |
| 4 |
Nach dem Herstellen einer Verbindung zum Zugangspunkt öffnet sich der Browser automatisch und geht zum Link 192.168.4.1. Wenn dieser Vorgang nicht durchgeführt wurde, müssen Sie den Browser öffnen und 192.168.4.1 in das Adresseingabefeld eingeben |
|
| 5 |
Auf der geöffneten Seite müssen Sie Ihren Zugangspunkt auswählen, sein Passwort in das Feld unten eingeben und auf "Speichern" klicken. |
|
|
|
|
| 6 | Wenn die Verbindung hergestellt ist, erscheint die Meldung „Verbindung zum WLAN erfolgreich hergestellt“ und die Adresse Ihres Geräts im Netzwerk. | |
| 7 | Verbinden Sie sich mit Ihrem WLAN-Netzwerk und gehen Sie zu der Adresse, die unter Punkt 6 angegeben wurde. | |
| 8 | Sie müssen das Gerät für die Stromquelle kalibrieren. Wie das geht, erfahren Sie hier: https://tasmota.github.io/docs/Power-Monitoring-Calibration/ | |
| 9 |
Das Gerät ist einsatzbereit. Die Vorlage und die Regeln sind bereits aktiviert, aber wenn Sie sie später benötigen, finden Sie sie unten |
|
|
|
|
| 10 |
{"NAME":"Unser D1T","GPIO":[32,1,9312,1,1,320,1,1,9313,8160,3200,544,1,1,1,1,0,1,1,1,0,0,1,1,0,0,0,0,1,1,4736,1,1,0,0,1],"FLAG":0,"BASE":1}Im Feld „Vorlage“ muss die Vorlage eingetragen werden, das Kontrollkästchen „Aktivieren“ aktiviert und die Änderungen gespeichert werden:
|
|
| 11 |
Um das Gerät auf die Werkseinstellungen zurückzusetzen, müssen Sie: Stecken Sie das Gerät sechsmal ein und aus und lassen Sie es beim siebten Mal eingeschaltet. Die LED sollte nun blinken, was bedeutet, dass das Gerät zum erneuten Einstecken bereit ist. Wenn Sie Zugriff auf die Weboberfläche haben, geben Sie " reset 1" in die Konsole ein und drücken Sie "Enter". |
|
| 12 |
Um das Gerät über das Matter -Protokoll mit Smart-Home-Systemen zu verbinden, lesen Sie bitte die folgenden Informationen: |
|
|
Tasmota ist ein äußerst erweiterbares und flexibles Programm, das in folgende Programme integriert werden kann: Alexa, AWS IoT, Domoticz, Home Assistant, Homebridge, HomeSeer, IP Symcon, KNX, NodeRed, nymea, OctoPrint, openHAB, Otto, IOBroker, Mozilla WebThings Adapter, SmartThings, Tasmohab, Homematic ip und mehr. Weitere Informationen finden Sie hier: https://tasmota.github.io/docs/Integrations/ |
||
MANUEL D'UTILISATION
REMARQUE : Tasmota n'est pas un produit commercial et l'assistance est limitée. Vous devez être prêt à rechercher et à résoudre les problèmes potentiels par vous-même.
Des informations détaillées sur la connexion, la modification des paramètres et les modifications sont présentées sur le site Web « https://tasmota.github.io/docs/ »
description
L'interrupteur intelligent NOUS D2T avec logiciel open source Tasmota installé (ci-après dénommé l'interrupteur) est conçu pour organiser l'arrêt automatique et manuel des appareils électriques de la pièce, par accès à distance via un réseau Wi-Fi, à l'aide d'un smartphone ou depuis un ordinateur personnel via l'interface Web. La communication avec l'interrupteur est configurée via un réseau Wi-Fi, pour lequel un adaptateur Wi-Fi sans fil est utilisé. L'interrupteur est équipé d'un bouton mécanique et d'un indicateur lumineux de l'état de l'appareil. L'appareil est équipé d'un relais électromécanique et prend en charge le protocole Matter .
ATTENTION : La connexion de la prise intelligente au réseau Wi-Fi ne peut pas être garantie dans tous les cas, car elle dépend de nombreuses conditions : la qualité du canal de communication et des équipements réseau intermédiaires, la marque et le modèle de l'appareil mobile, la version du système d'exploitation, etc.
MESURES PRÉVENTIVES
- Lisez attentivement ces instructions.
- Utiliser le produit dans les limites de température et d’humidité spécifiées dans la fiche technique.
- N'installez pas le produit à proximité de sources de chaleur, telles que des radiateurs, etc.
- Ne laissez pas l'appareil tomber ou être soumis à des contraintes mécaniques.
- N'utilisez pas de produits de nettoyage chimiquement actifs ou abrasifs pour nettoyer le produit. Utilisez un chiffon en flanelle humide.
- Ne pas surcharger la capacité spécifiée. Cela pourrait provoquer un court-circuit et une décharge électrique.
- Ne démontez pas le produit vous-même - le diagnostic et la réparation de l'appareil ne doivent être effectués que dans un centre de service agréé.
- Veuillez contacter le vendeur pour un remplacement en cas de dommage causé par le transport.
- Veuillez insérer la fiche dans la prise en bon état et la garder hors de portée des enfants.
- Pour des raisons de sécurité, insérez complètement la fiche dans la prise pendant l'utilisation.
Conception et contrôles
| N° | Nom | description |
| 1 | Bouton | Une courte pression sur le bouton permet d'allumer et d'éteindre l'appareil. |
| 2 | Indicateur | Affiche l'état actuel de l'appareil |
Installation
| Procédure d'installation : | ||
| 1 | Connectez l’interrupteur comme indiqué sur l’un des schémas électriques. |
|
| 2 |
Marquage:
|
|
| 3 | Une fois l'installation terminée, l'appareil est prêt à être utilisé. | |
| Ce qui est important : | Assurez-vous que le réseau Wi-Fi dans l'emplacement d'installation sélectionné est stable et a un niveau suffisant. | |
Connexion
Pour connecter le switch Nous D2T, vous avez besoin d'un smartphone ou d'un PC personnel.
Comment connecter le commutateur à un réseau Wi-Fi :
| 1 | Assurez-vous que la plage de fréquence du réseau auquel l'appareil sera connecté est de 2,4 GHz, sinon le commutateur ne se connectera pas, car l'appareil n'est pas conçu pour fonctionner avec les réseaux Wi-Fi 5 GHz ; | |
| 2 | Connectez l'appareil au réseau. Sur le PC, le point d'accès « tasmota-xxxxxxx » doit apparaître dans la liste des réseaux, si le point d'accès n'est pas détecté, vous devez effectuer un « RESET » selon le point 11 | |
| 3 | Connectez-vous au point d'accès « tasmota-xxxxxxx » | |
| 4 |
Après la connexion au point d'accès, le navigateur s'ouvrira automatiquement et accédera au lien 192.168.4.1, si cette opération n'a pas suivi, vous devez alors ouvrir le navigateur et saisir 192.168.4.1 dans le champ de saisie d'adresse |
|
| 5 |
Sur la page ouverte, vous devez sélectionner votre point d'accès et saisir son mot de passe dans le champ ci-dessous et cliquer sur « Enregistrer » |
|
|
|
|
| 6 | Une fois la connexion établie, une inscription apparaîtra indiquant « Connexion réussie au Wi-Fi » et l'adresse de votre appareil sur le réseau. | |
| 7 | Connectez-vous à votre réseau Wi-Fi et accédez à l'adresse qui a été spécifiée au point 6. | |
| 8 | Vous devrez calibrer l'appareil en fonction de la source d'alimentation. Vous trouverez la procédure à suivre ici : https://tasmota.github.io/docs/Power-Monitoring-Calibration/ | |
| 9 |
L'appareil est prêt à l'emploi. Le modèle et les règles sont déjà activés, mais si vous en avez besoin plus tard, vous pouvez les trouver ci-dessous |
|
|
|
|
| 10 |
{"NAME": "Nous D1T", "GPIO":[32,1,9312,1,1,320,1,1,9313,8160,3200,544,1,1,1,1,0,1,1,1,0,0,1,1,0,0,0,0,1,1,4736,1,1,0,0,1], "FLAG":0, "BASE":1}Le modèle doit être renseigné dans le champ « Modèle », cochez la case « Activer » et enregistrez les modifications :
|
|
| 11 |
Pour réinitialiser l'appareil aux paramètres d'usine, vous devez : Branchez et débranchez l'appareil 6 fois et laissez-le allumé une 7ème fois - la LED doit commencer à clignoter, ce qui signifie qu'il est prêt à être rebranché ; si vous avez accès à l'interface web, tapez " reset 1 " dans la console et appuyez sur " entrée " |
|
| 12 |
Pour connecter l'appareil aux systèmes de maison intelligente à l'aide du protocole Matter , veuillez lire les informations suivantes : |
|
|
Tasmota est un programme hautement extensible et flexible qui peut être intégré à : Alexa, AWS IoT, Domoticz, Home Assistant, Homebridge, HomeSeer, IP Symcon, KNX, NodeRed, nymea, OctoPrint, openHAB, Otto, IOBroker, Mozilla WebThings Adapter, SmartThings, Tasmohab, Homematic ip également. pour plus d'informations, voir ici : https://tasmota.github.io/docs/Integrations/ |
||