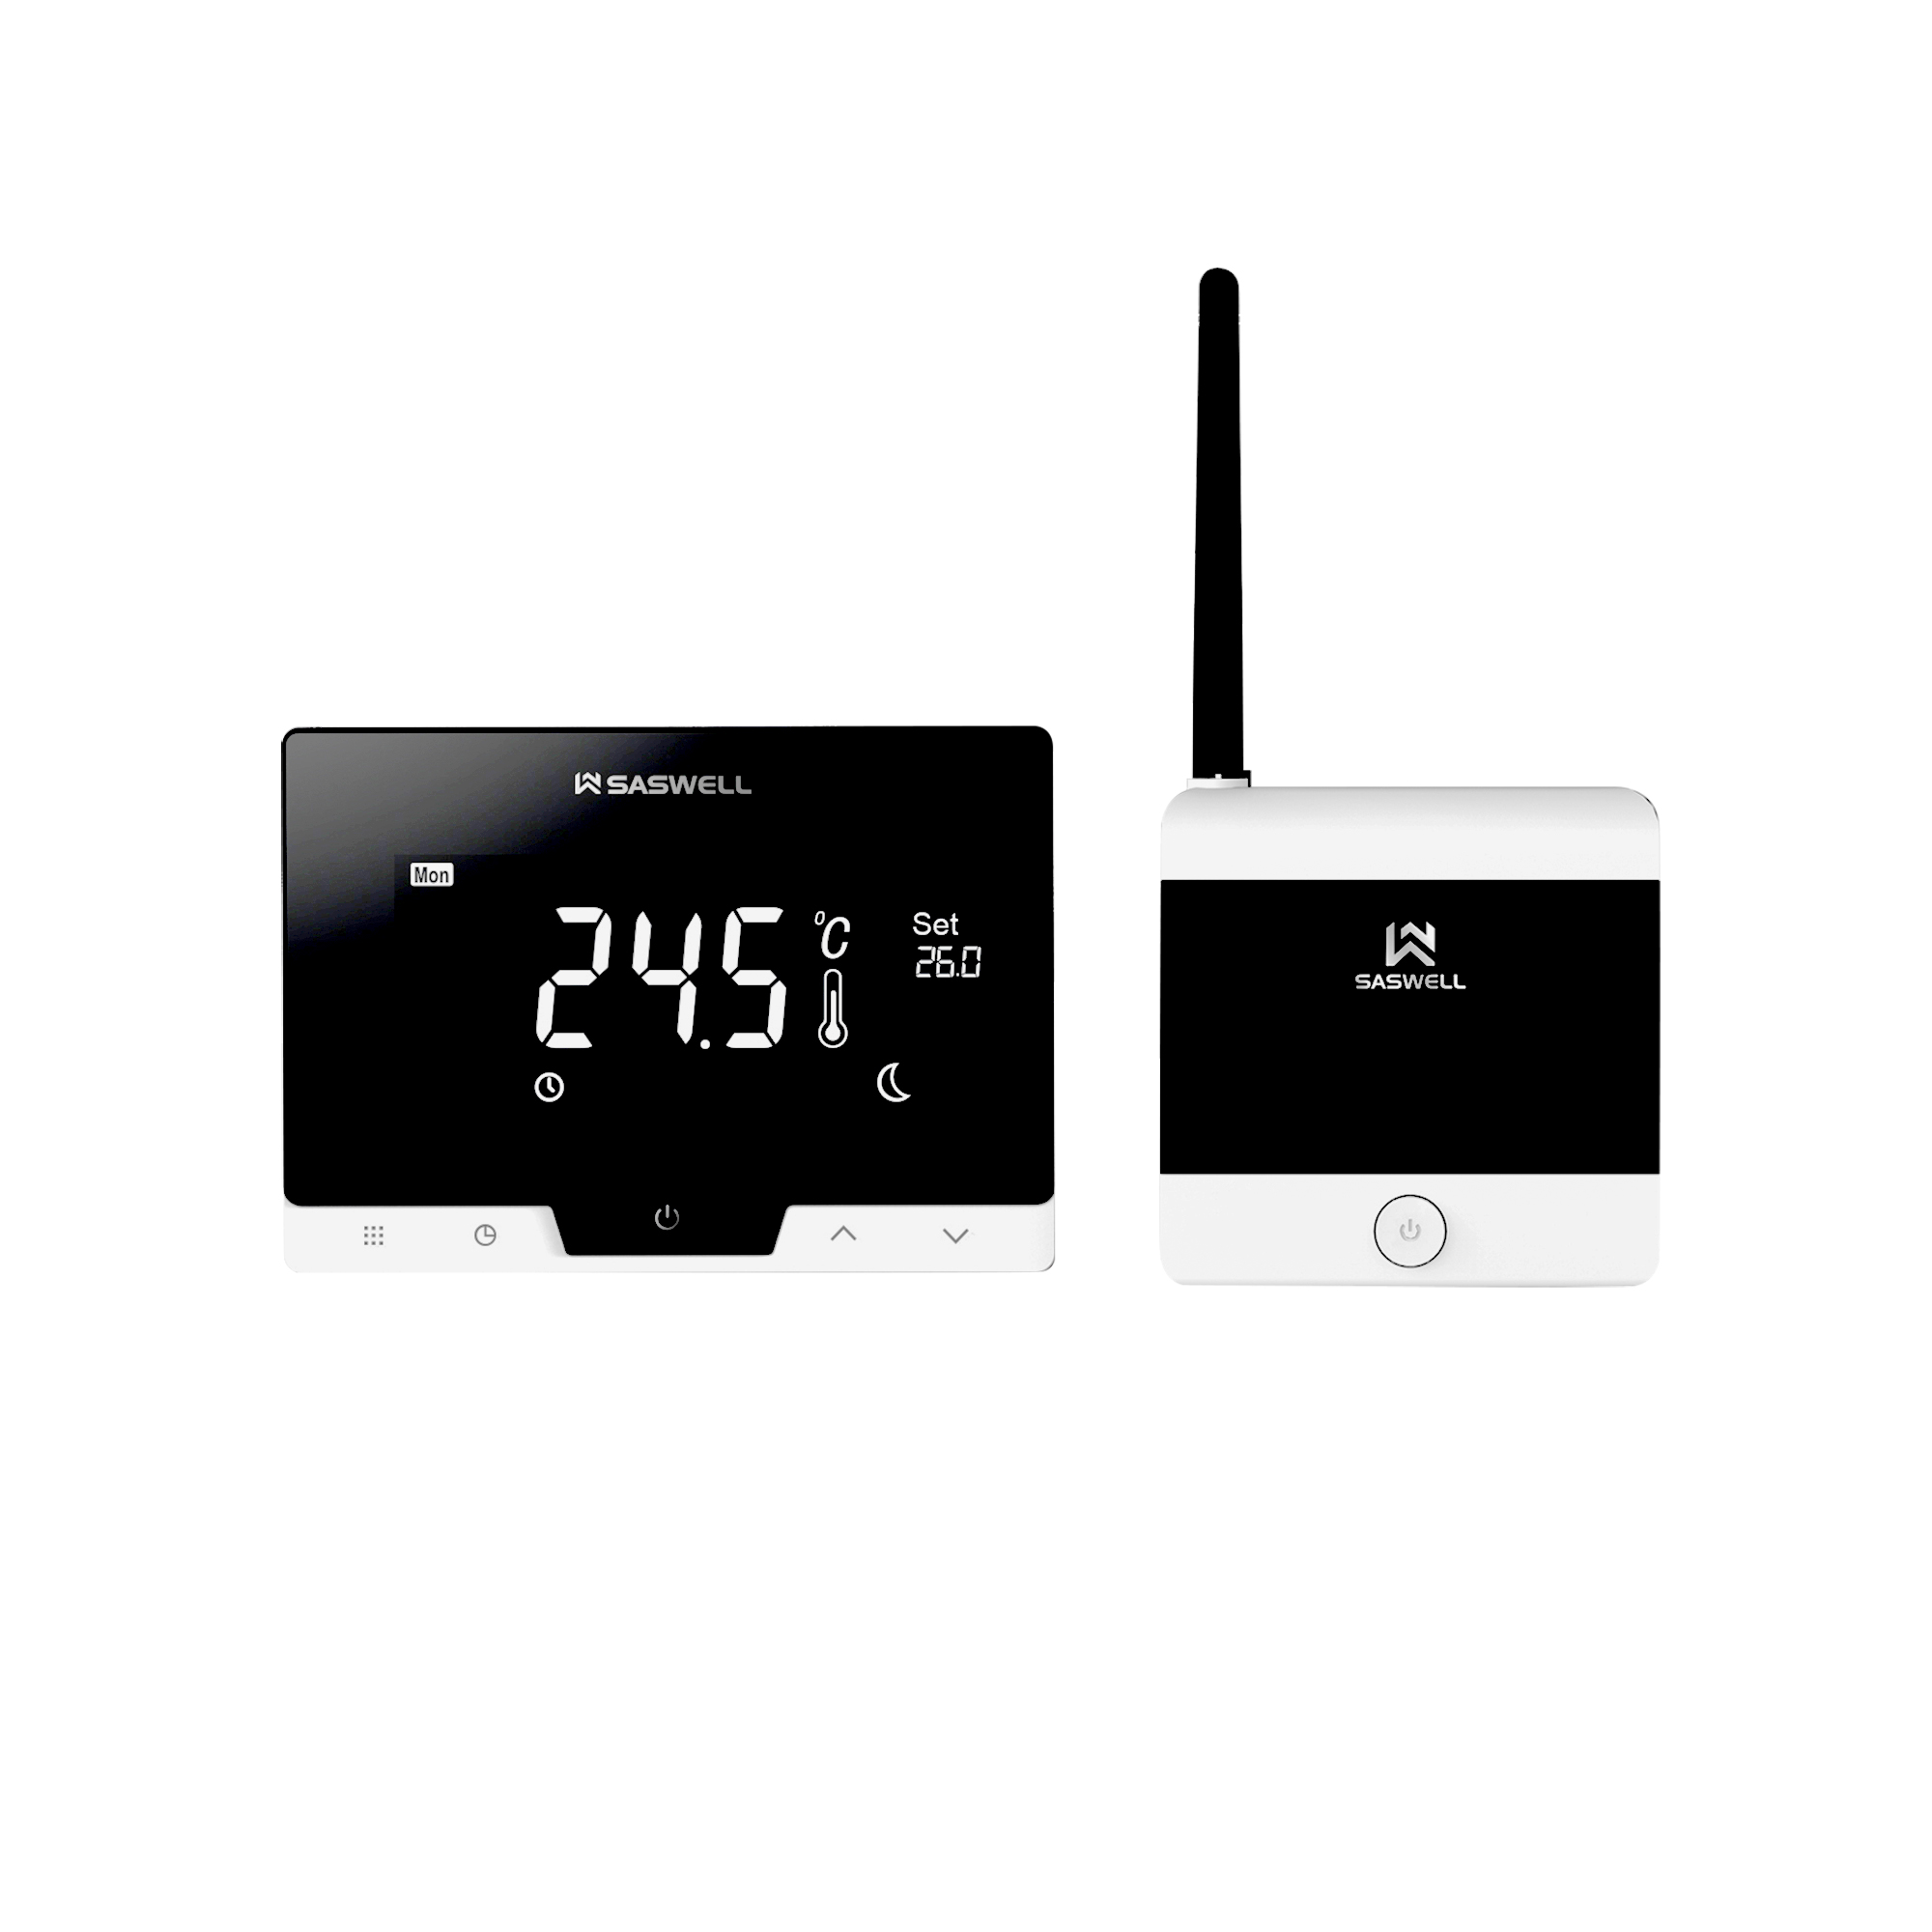
NOUS H6 WiFi Smart Wireless Boiler Thermostat Kit
| Main settings | |
|---|---|
| Brand | NOUS |
| Special features | Temperature setting accuracy: 0.5℃ |
| EAN | 5903206938380 |
| Certificate | CE, RoSH |
| Specifications | |
| Operation range | 100 m |
| Operating temperature | 5°C~35°C |
| IP rating | IP21 |
| Operating voltage range | 100-240 V (AC), 50/60 Hz |
| Battery type | 4 AAA batteries / USB-A (5V, 1A) |
| Output: | 1 channel passive linkage output (10A) |
| Network | |
| Protocol | IEEE802.11 b/g/n |
| Communication standard | WiFi |
| Frequency range: | 2.412- 2.484 GHz |
| System requirements | iOS 8 or Android 4.4 or higher |
| Control from a smartphone | APP: NOUS Smart |
OPERATING MANUAL
1. DESCRIPTION
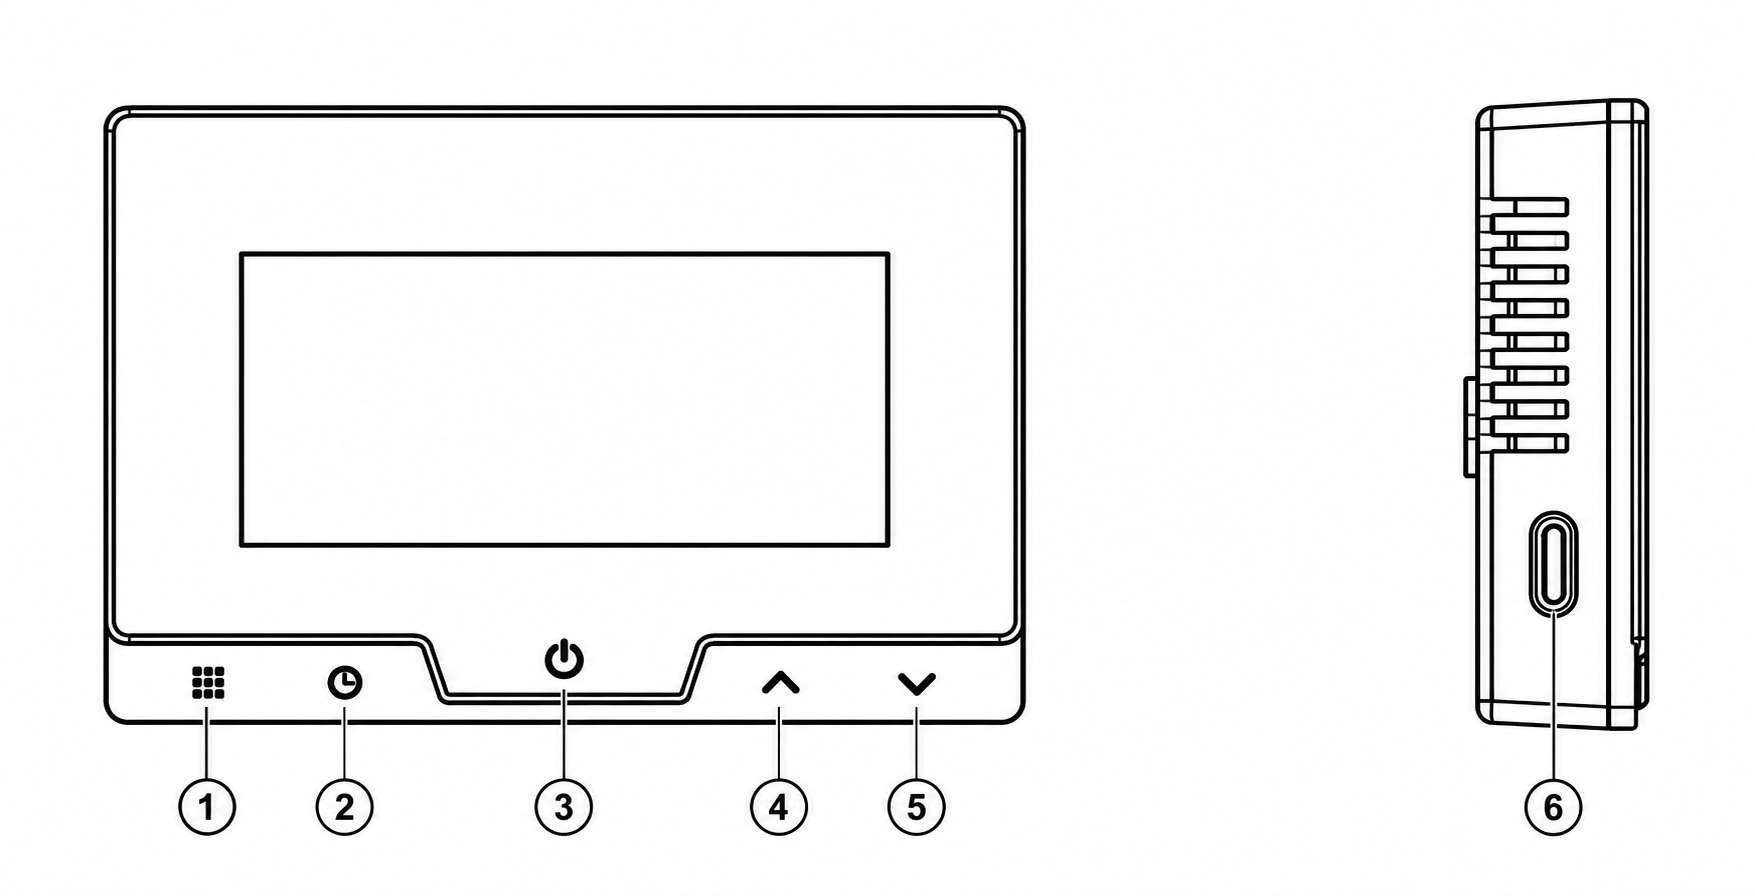 |
| № | Name | Description |
| 1 | Menu | Switches between programmed operation and manual/temporary hold mode. Press and hold for more than 3 seconds to enter the heating program settings. |
| 2 | Time | Displays and adjusts date and time settings. Press and hold for about 3 seconds to enter time setting mode. |
| 3 | Power / Confirm | Turns the thermostat on/off and confirms settings. Also used to exit setting menus. |
| 4 | Up ▲ | Increases the set temperature or selected parameter value. |
| 5 | Down ▼ | Decreases the set temperature or selected parameter value. |
| 6 | Wake-up | Activates the display/backlight when the thermostat is in power-saving or standby mode. |
| Name | Description |
1. Menu |
Short press: switches the thermostat between programmed operation and manual/temporary temperature control. Press and hold for more than 3 seconds: enters the heating program settings. Values within the settings are adjusted using 4 ▲ and 5 ▼. |
2. Time Setting |
Short press: switches the display between time/temperature information. Press and hold for about 3 seconds: enters the date and time settings. Use 4 ▲ and 5 ▼ to change values and 3 to confirm. |
3. Power / Confirm |
Used as the main power and confirmation button. In setting modes, a short press means Confirm / Exit. In normal operation, the button is used to turn the thermostat on and off. It can also be used to wake the thermostat from power-saving mode. |
4. Up ▲ |
Increases the set temperature or the selected parameter value. It is also used when setting the time, heating schedule, and system parameters. |
5. Down ▼ |
Decreases the set temperature or the selected parameter value. |
6. Wake-up |
The side button is used to activate the display after the thermostat enters power-saving mode. In the manual, it is specifically identified as the Wake-up button. |
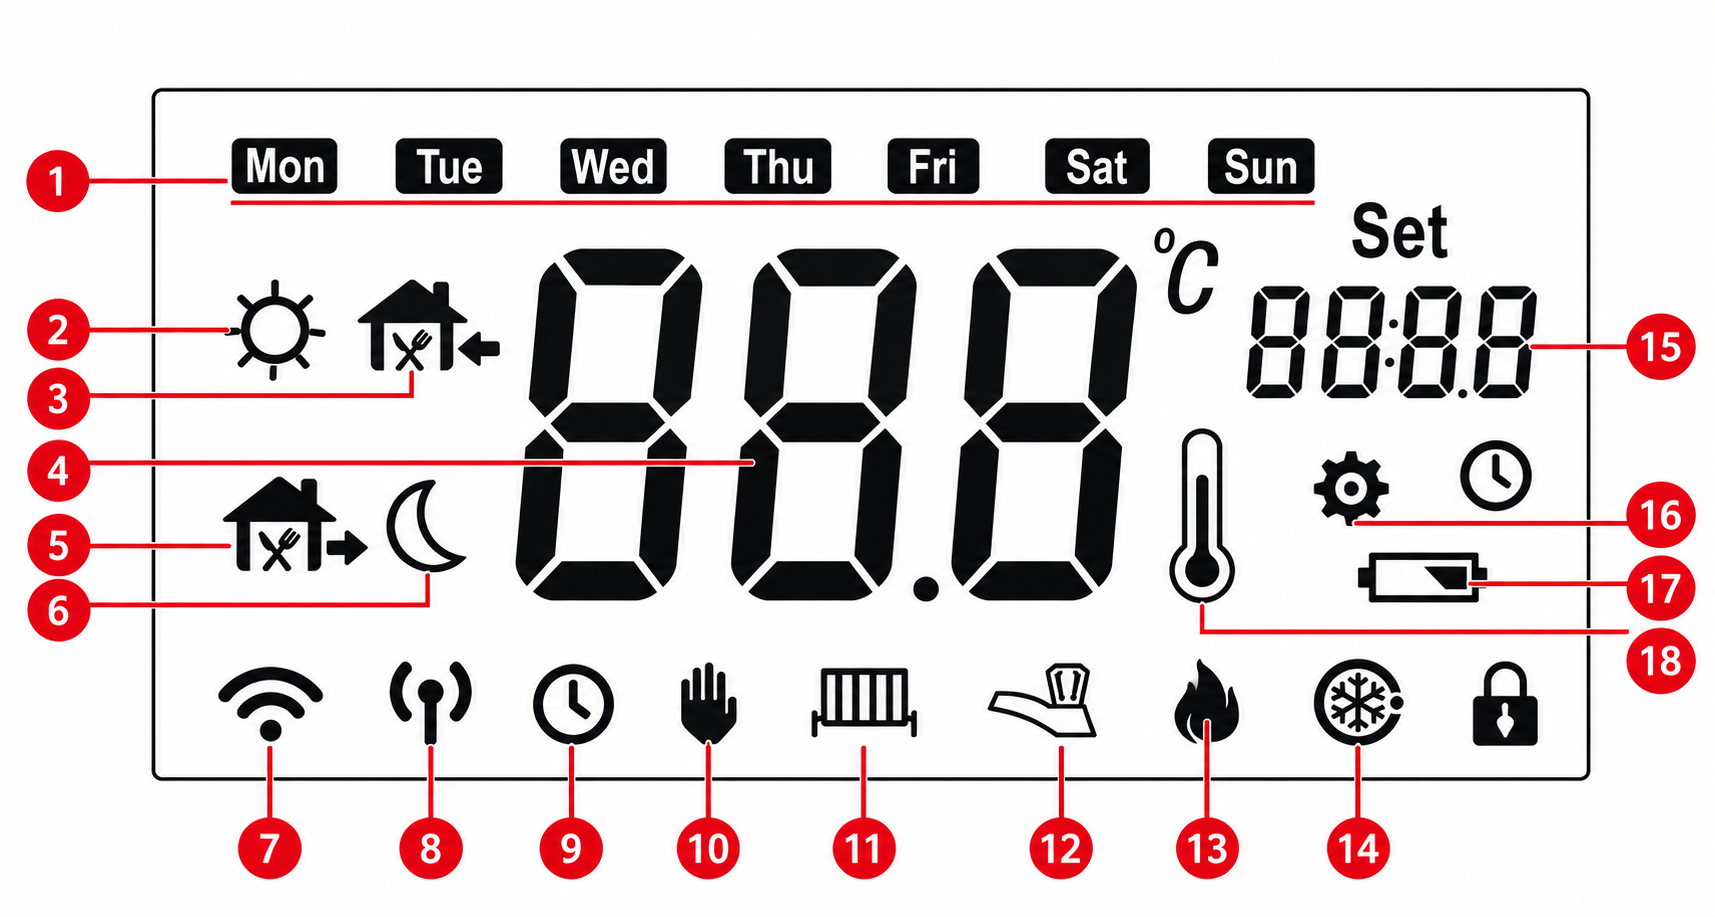 |
1. Week shows |
| 2. Time Bucket flag-Wake up | |
| 3. Time Bucket flag-Back home | |
| 4. OFF\ Temperature shows | |
| 5. Time Bucket flag-Out home | |
| 6. Time Bucket flag-Sleep | |
| 7. Communication show (blinking indicates communication error alarm) | |
| 8. Alternate button | |
| 9. Time shows, Running mode shows | |
| 10. Forever keeping mode shows | |
| 11. Alternate button | |
| 12. Alternate button | |
| 13. Output shows | |
| 14. Anti-freezing mode shows | |
| 15. Setting Time\ Temperature shows | |
| 16. Setting shows (Parameters, programming, time) | |
| 17. Low battery indicator shows | |
| 18. Meterage shows |
Brief Operating Instructions
Power On
If the thermostat is switched off, press 3 – Power.
After switching on, the display shows the current room temperature, set temperature, time, operating mode, and additional indicators. The manual provides indicators for programming, heating output, communication, anti-freeze protection, and low battery status.
Temperature Setting
Use:
4 ▲ – increase the temperature;
5 ▼ – decrease the temperature.
The thermostat temperature setting range is 5–35°C, with a setting accuracy of 0.5°C.
Manual and Programmed Mode
Short press 1 – Menu to switch between manual control and programmed operation. In programmed mode, the thermostat automatically changes the set temperature during the day. The factory program includes six periods:
|
Period |
Time |
Temperature |
|
Wake up |
06:00 |
20°C |
|
Out |
08:00 |
16°C |
|
Back home |
11:00 |
20°C |
|
Out |
14:00 |
16°C |
|
Back home |
18:00 |
20°C |
|
Sleep |
22:00 |
16°C |
Editing the Heating Schedule
Press and hold 1 – Menu for more than 3 seconds.
Then use:
4 ▲ / 5 ▼ – select and change time/temperature;
1 Menu – move to the next parameter/period;
3 Power/Confirm – save settings and exit.
The thermostat allows common or separate programming for different days of the week. The settings allow you to select 4 or 6 temperature periods per day.
Date and Time Setting
Press and hold 2 – Time for approximately 3 seconds.
Use 4 ▲ / 5 ▼ to change the date and time. Button 2 is used to move between parameters, and 3 – Power/Confirm is used to confirm and exit.
Advanced Settings
In standby mode, press and hold 1 – Menu for more than 3 seconds to open the configuration menu. Values are changed using ▲/▼. Press Menu again to move to the next item, and press Power to confirm the settings. If no button is pressed for approximately 10 seconds, the thermostat automatically exits the menu.
|
Parameter |
Function |
Range / Options |
|
CL |
Temperature display calibration |
-4…+4°C |
|
AH |
Maximum allowed temperature |
20-35°C |
|
AL |
Minimum allowed temperature |
5-20°C |
|
bL |
Display-on time |
5 / 10 / 15 sec / --- |
|
db |
Heating differential |
0.5-3°C |
|
Pro |
Weekly program |
ON / OFF |
|
Seg |
Number of periods |
4 / 6 |
|
ES |
Intelligent function |
ON / OFF |
|
PP |
Anti-freeze function |
ON / OFF |
Open Window Detection
The thermostat monitors rapid temperature drops. If the room temperature drops by approximately 1.5°C within 3 minutes, the thermostat detects this as an open window and temporarily stops heating. Normal operation is restored when any button is pressed, when the temperature rises by approximately 1.5°C, or automatically after 30 minutes.
Anti-freeze Protection
Even when the thermostat is switched off, it can still protect the room against freezing: if the temperature falls below 5°C, heating starts, and when the temperature rises above 8°C, heating stops.
Low Battery Indication
When the battery voltage drops below approximately 2.3 V, the low-battery indicator starts flashing on the display.
2. TECHNICAL CHARACTERISTICS
WiFi Frequency: 2.4 GHz
Network Protocol: IEEE802.11 b/g/n
Frequency range: 2.412- 2.484 GHz
Output: 1 channel passive linkage output (10A)
Frequency: 868 MHz (Bidirectional FSK)
Working Range: 100 m
Communicaon protocol: TCP/IP, MQTT
Temperature setting range: 5℃~35℃
Temperature setting accuracy: 0.5℃
Working Temperature: 0°C~50°C
Water resistance: IP21
Power Input: 100-240 V (AC), 50/60 Hz
Power Input (thermostat): 4 AAA batteries / USB-A (5V, 1A)
GATEWAY & RECEIVER:
WiFi Frequency: 2.4 GHz
Network Protocol: IEEE802.11 b/g/n
Frequency range: 2.412GHz- 2.484GHz
Output: 1 channel passive linkage output (10A)
Frequency: 868MHz(Bidirectional FSK)
Working Range: 100m
Communicaon protocol: TCP/IP, MQTT
Working Temperature: 0°C~50°C
Water resistance: IP21
Power Input: 100-240VAC 50/60Hz
Thermostat:
Output: 1 channel passive linkage output (8A)
Frequency: 868MHz (Bidirectional FSK)
Working Range: 100m
Working Temperature: 0°C~50°C
Water resistance: IP21
Power Input: 4 AAA batteries / USB power supply (5V, 1A)
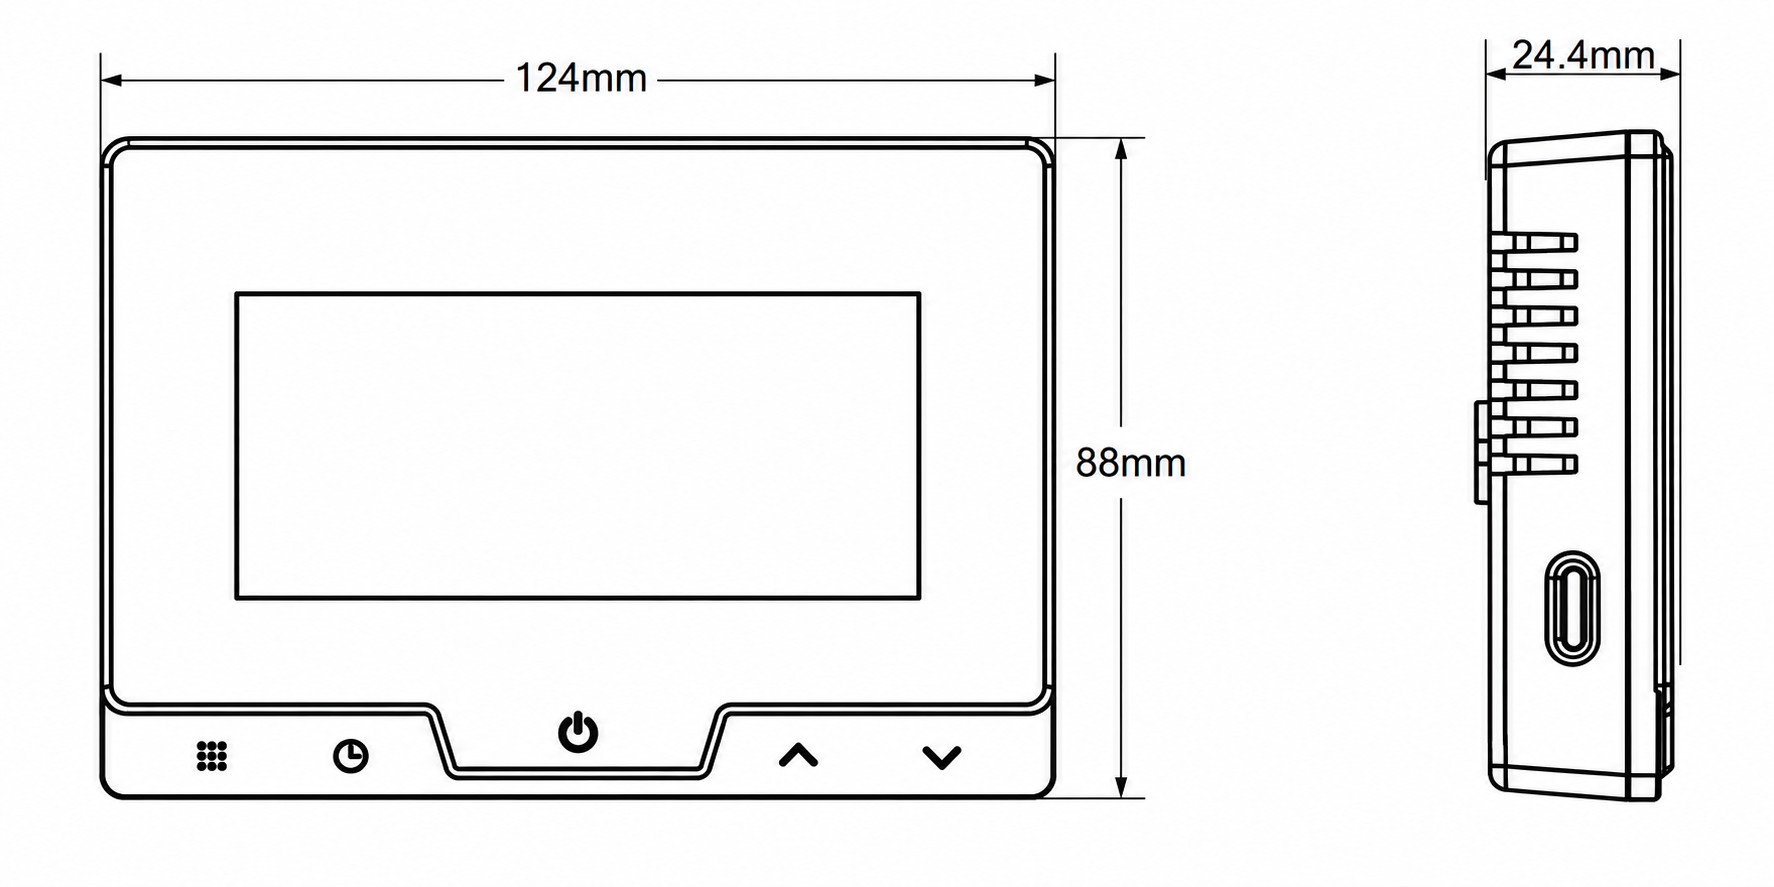 |
3. SAFETY AND PRECAUTIONARY MEASURES
- Please read this manual carefully.
- Use the product within the temperature and humidity limits specified in the technical data sheet.
- Do not install the product near heat sources such as radiators, etc.
- Do not allow the device to fall or be subject to mechanical stress.
- Do not use chemically active or abrasive detergents to clean the product. Use a damp flannel cloth instead.
- Do not exceed the specified power rating. This may result in a short circuit and electric shock.
- Do not disassemble the product yourself - diagnostics and repairs of the device should only be carried out at a certified service center.
4. CONNECTION
To connect the Nous device, you need a smartphone based on the Android or iOS mobile operating system with the Nous Smart Home application installed. This mobile application is free and available for download from Play Market and App Store. The QR code for the application is given below:
 |
Scan the QR code
Importantly: Make sure that the Wi-Fi network is stable and has a sufficient level in the chosen installation location. It will directly interfere the thermostat practically operation by signal strength, so please confirm that the thermostat installation position covered by WIFI and with good signal .
5. INSTALLATION
PLAN A
When WI-FI is covered with boiler signal the receiver need to be installed in the boiler signal area, transmitter can be put
wherever you want.
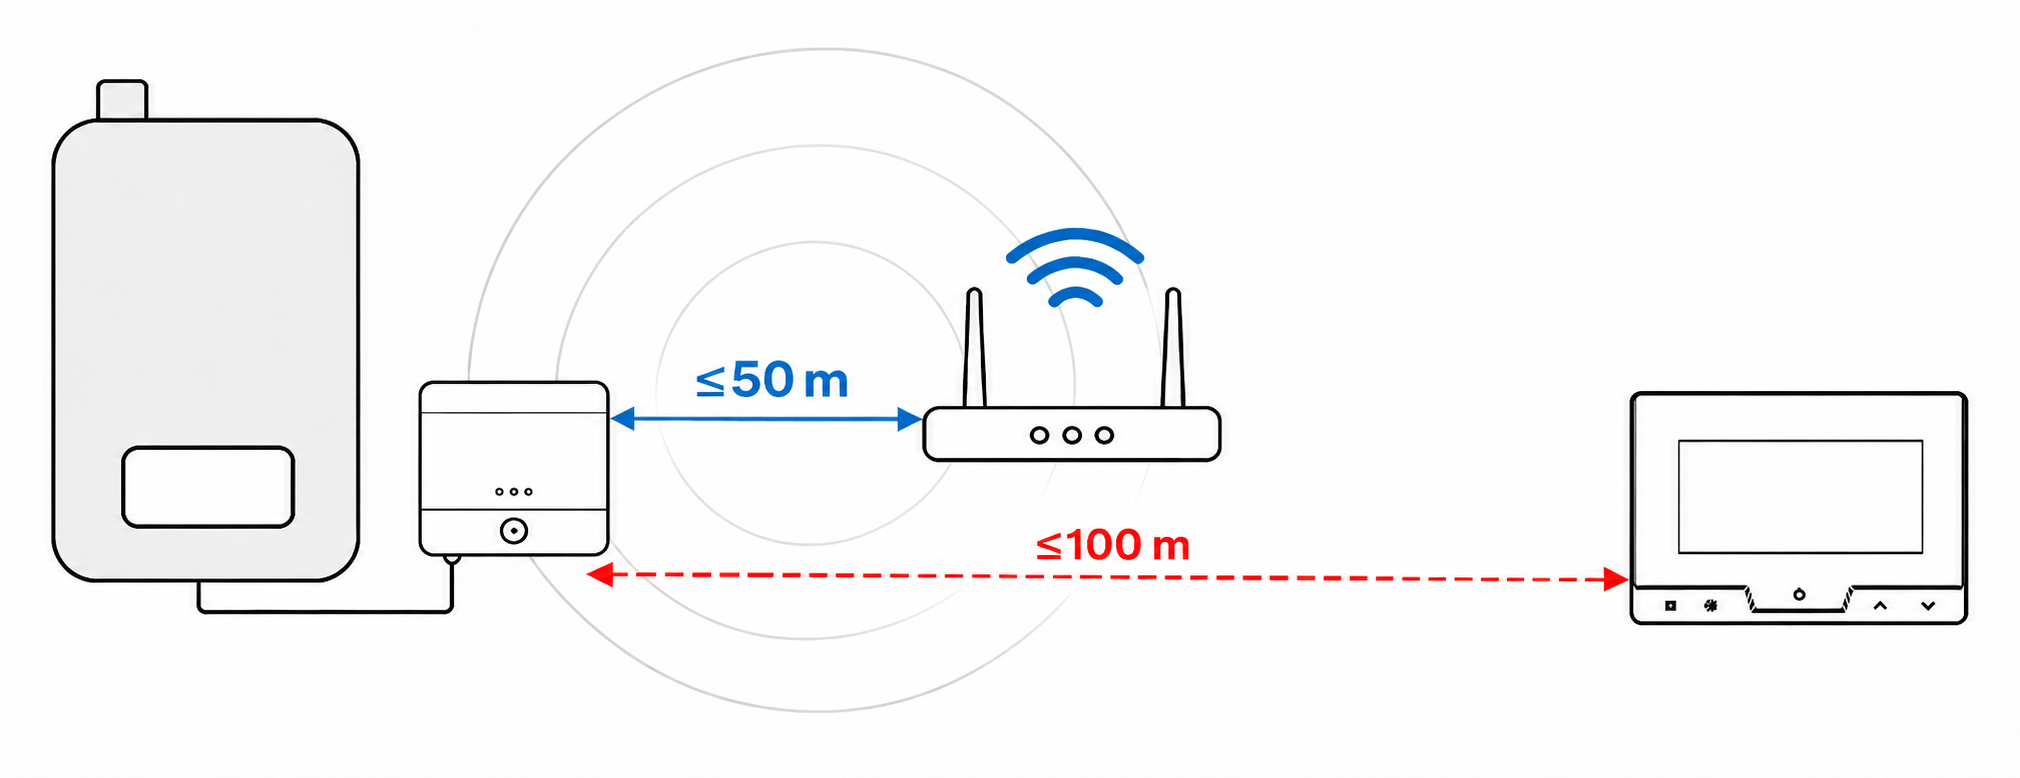 |
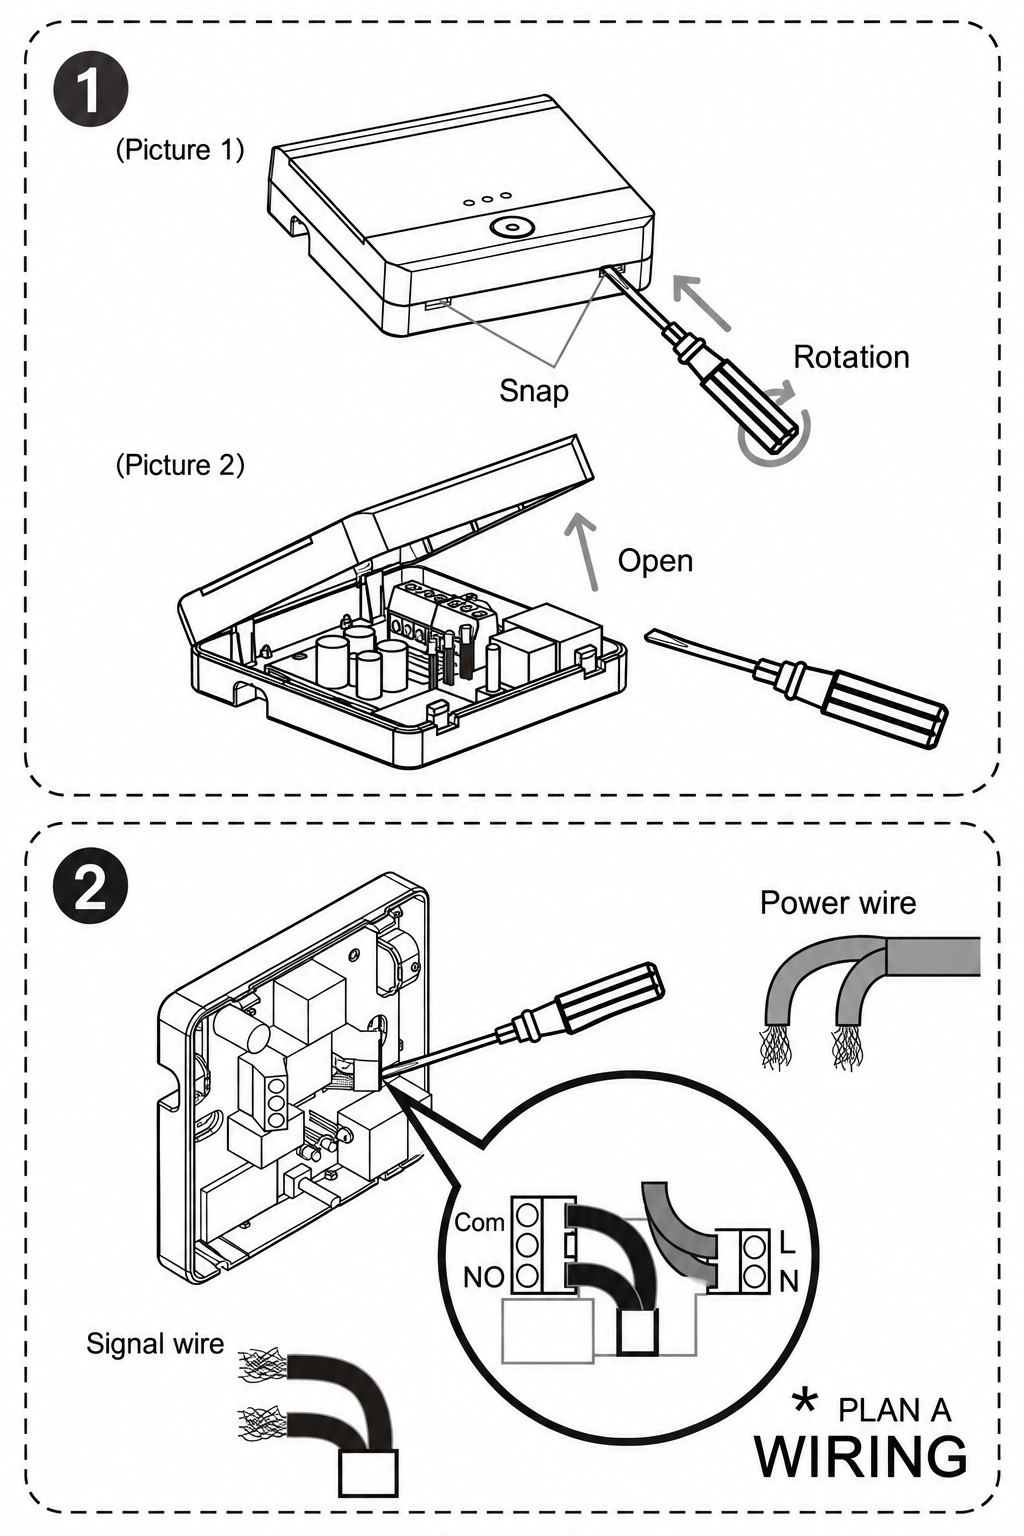 |
|
|
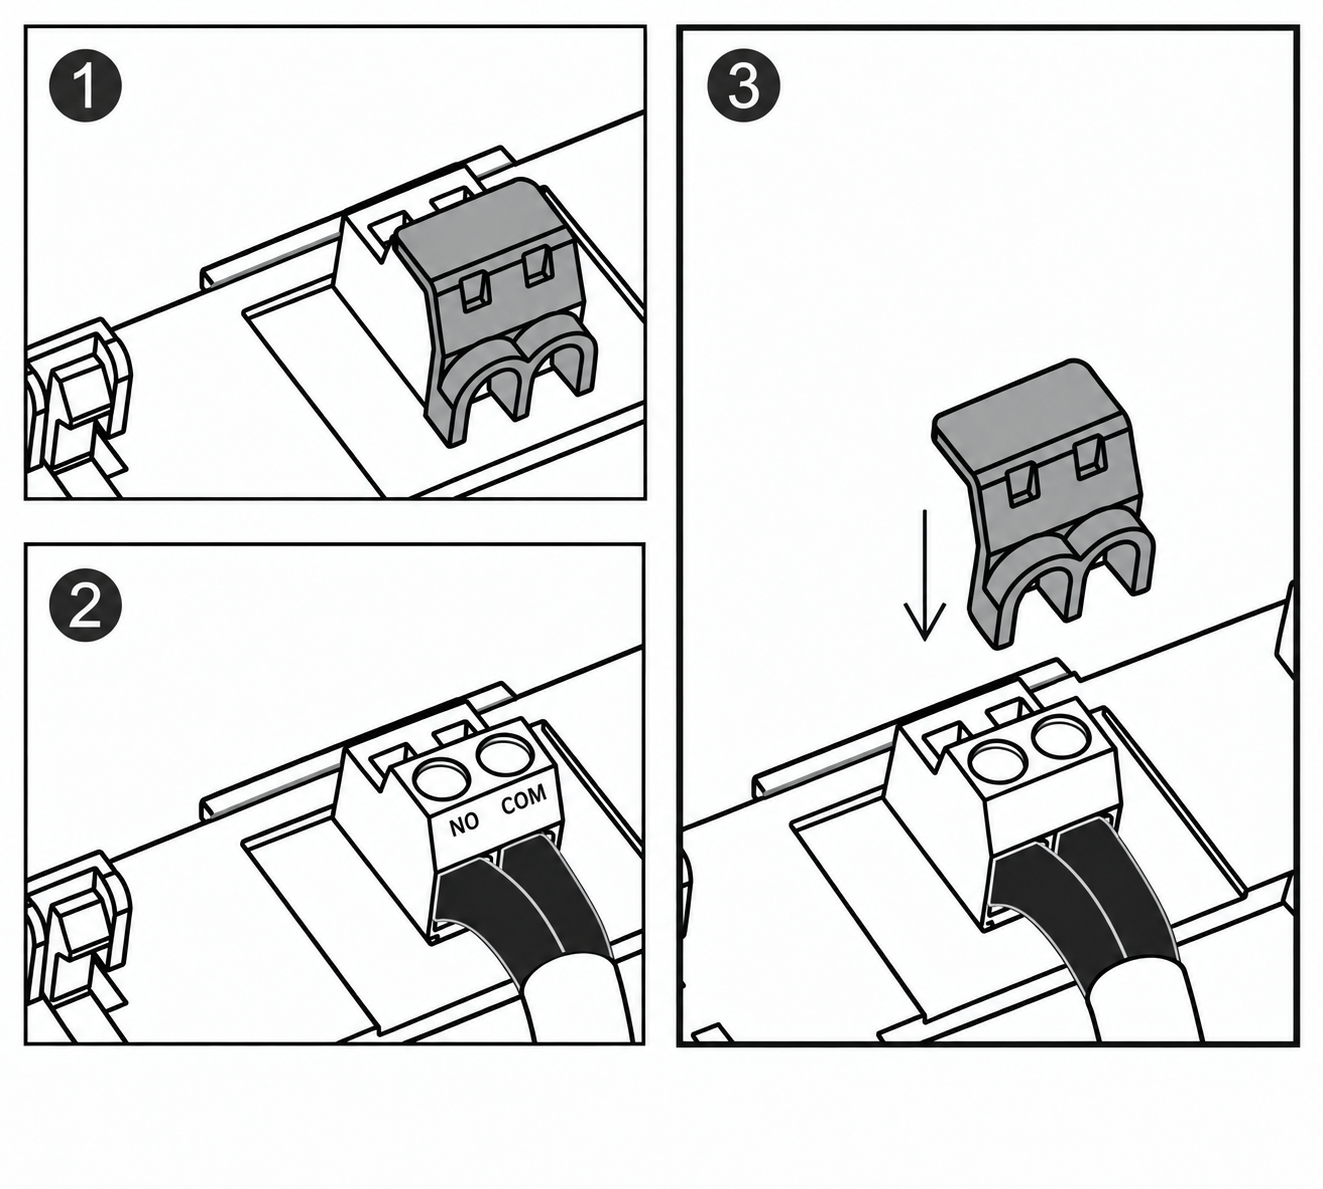
2. Wiring: Put the wire into terminal then |
PLAN В
When WIFI are not cover with boiler signal wire.
The transmitter need to be installed in the boiler signal area, the receiver need to be installed in WIFI coverage area.
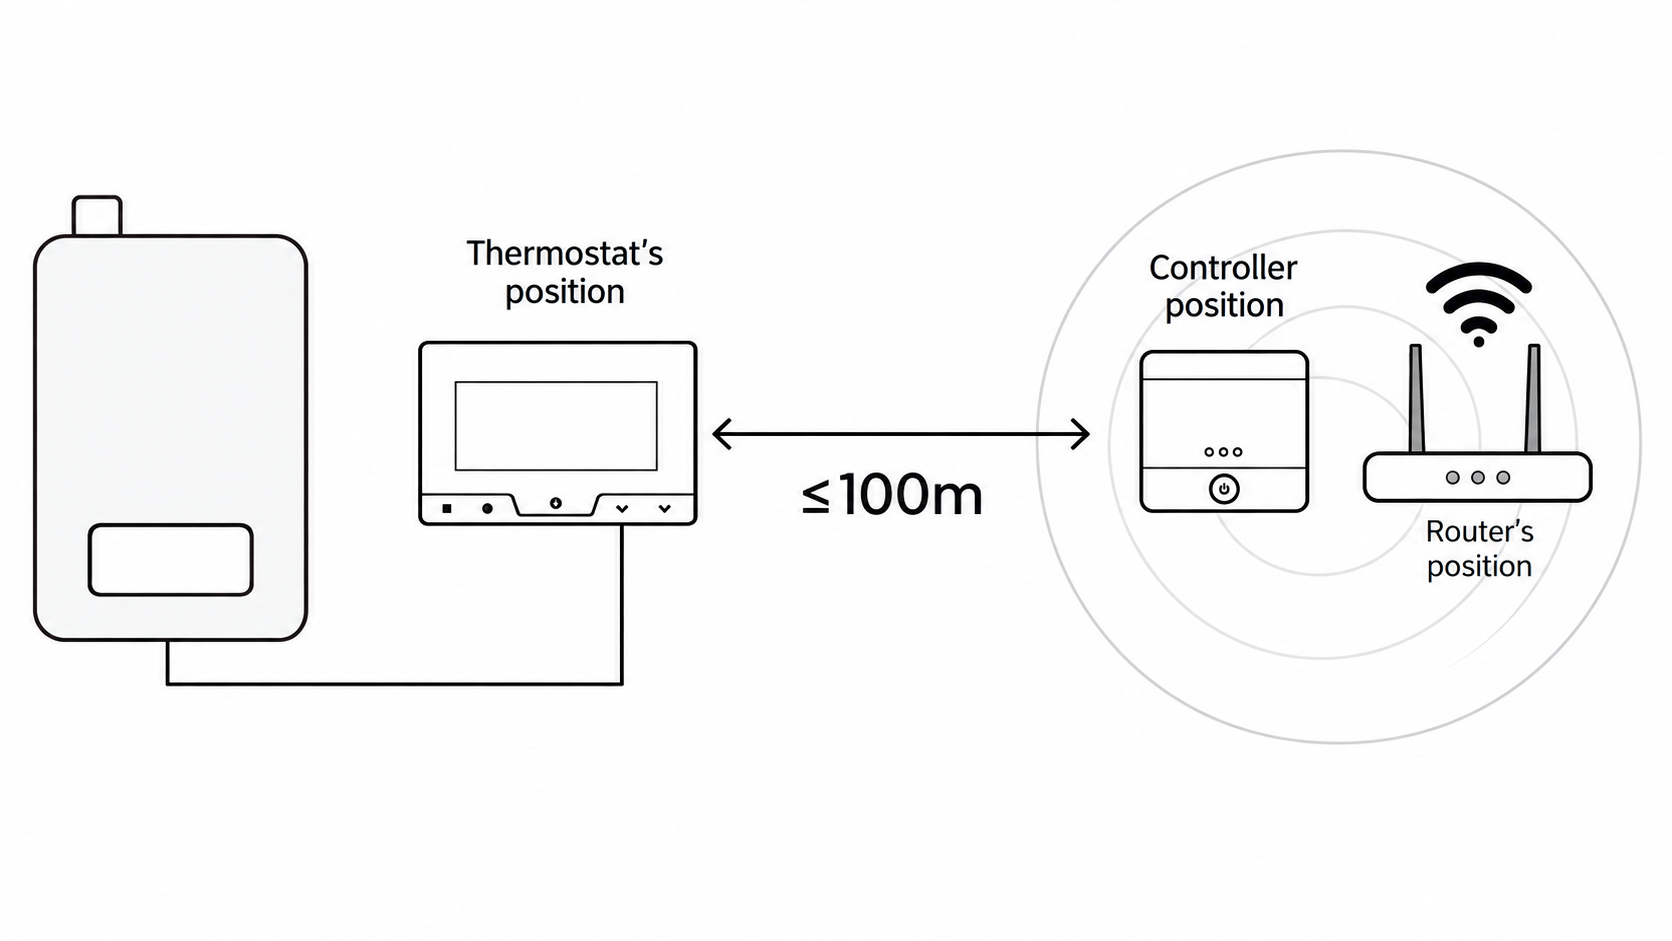 |
|
|
1. Take off the safety cover |
| 2. Wiring connection | |
| 3. Install the safety cover, do the protection |
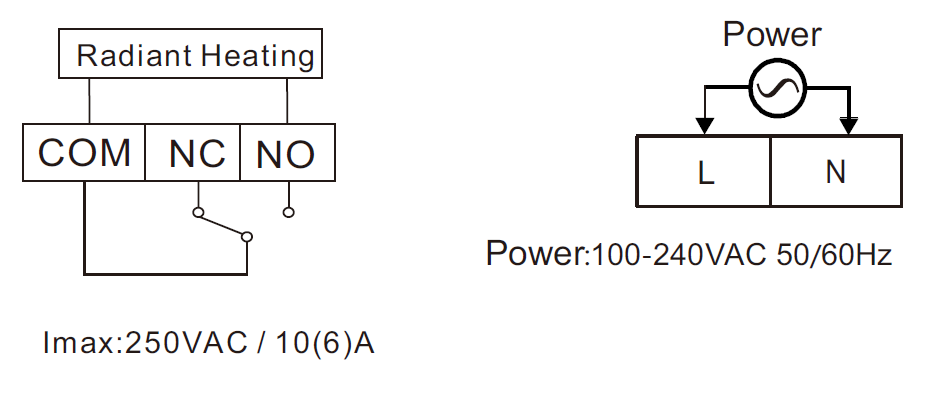
THE WIRING DIAGRAM (А/В - PLAN)
 |
Thermostat install
On the wall
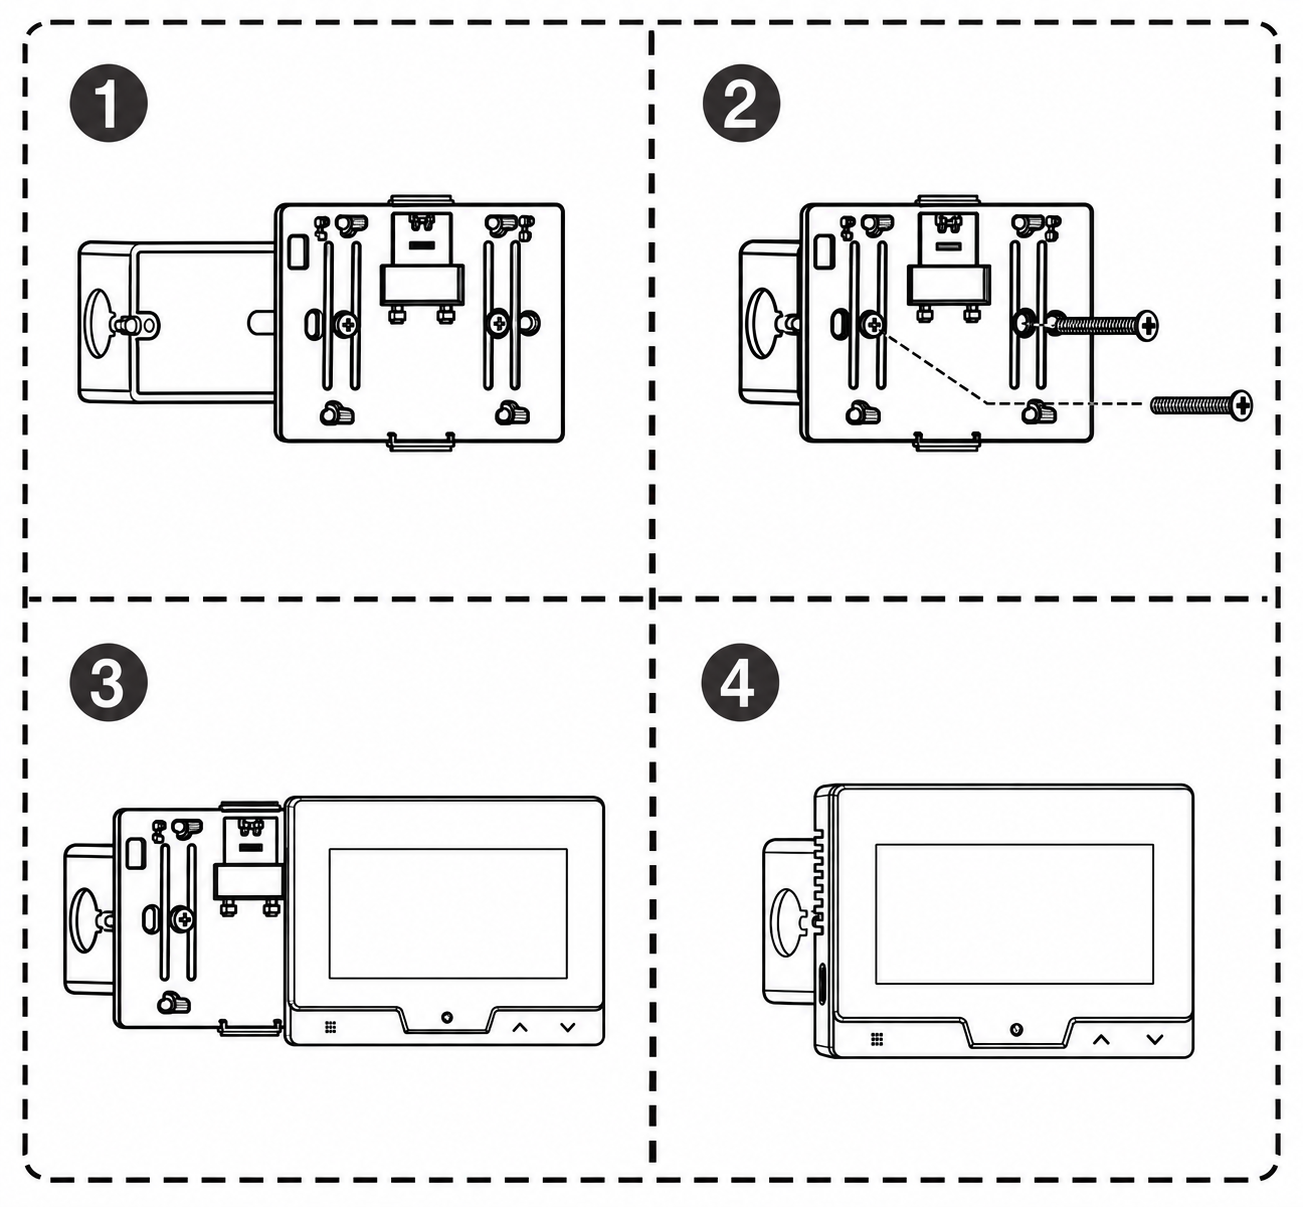 |
1. Put the back board on the installation box |
|
2. Put the screw into the hole and screw down |
|
|
3. Cover the panel |
|
|
4. Completing installation |
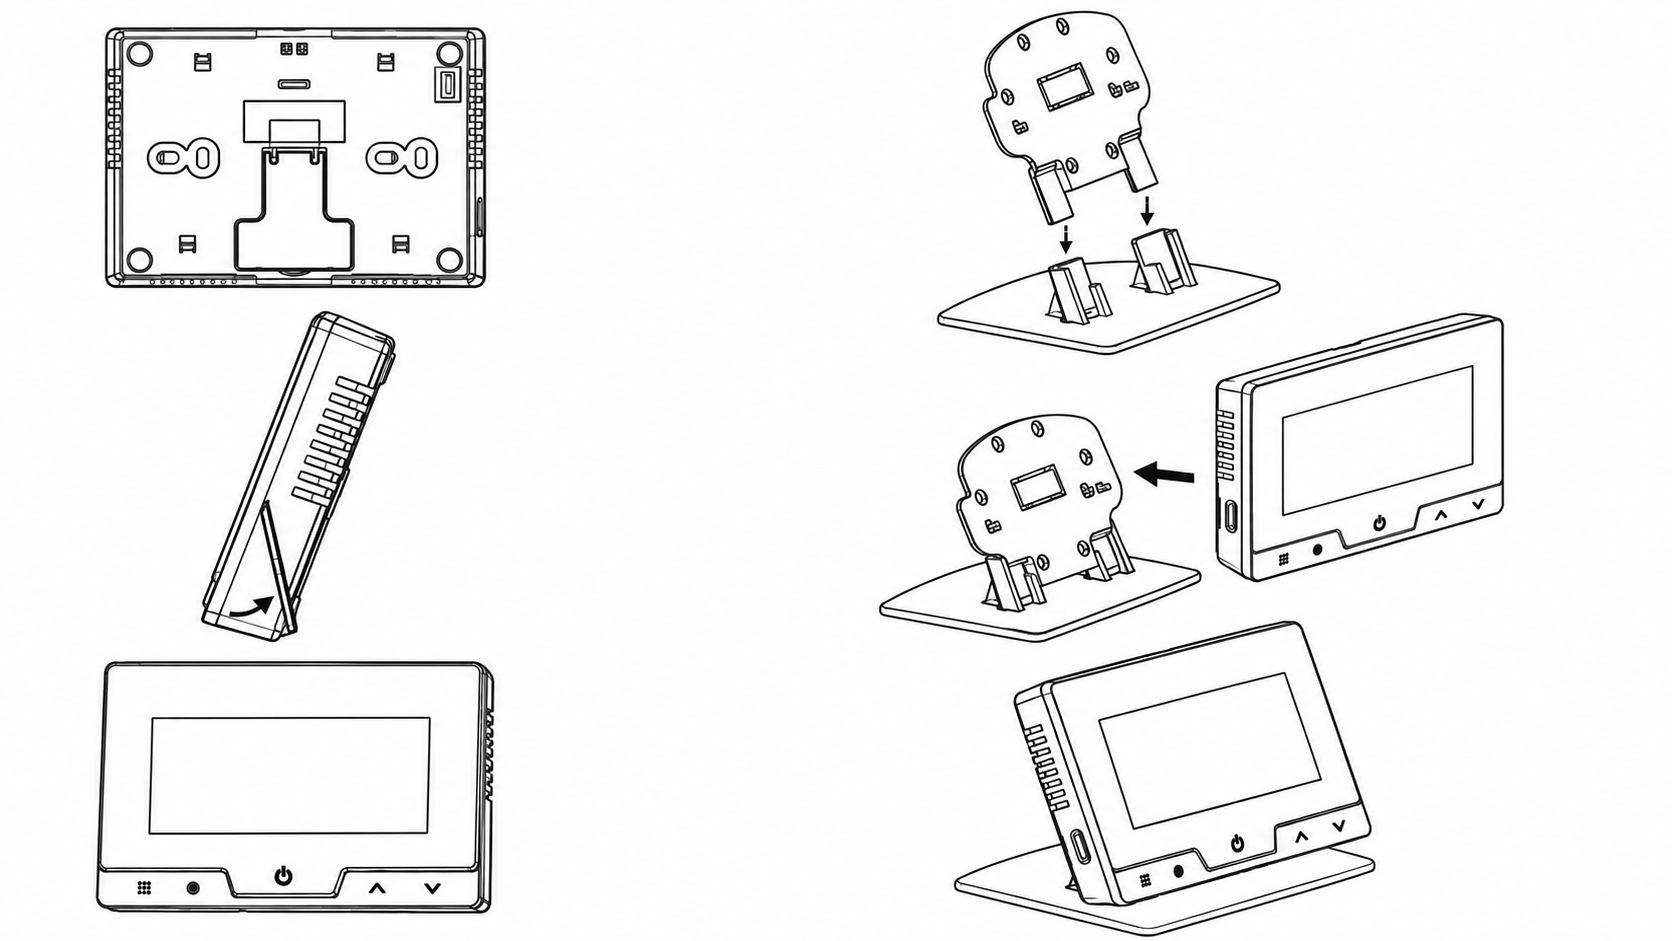
On the desk
 |
BEDIENUNGSANLEITUNG
1. BESCHREIBUNG
|
| NEIN. | Name | Beschreibung |
| 1 | Speisekarte | Schaltet zwischen programmiertem Betrieb und manuellem/vorübergehendem Haltemodus um. Zum Aufrufen der Heizprogrammeinstellungen länger als 3 Sekunden gedrückt halten. |
| 2 | Zeit | Zeigt Datum und Uhrzeit an und ermöglicht deren Einstellung. Zum Aufrufen des Zeiteinstellungsmodus ca. 3 Sekunden lang gedrückt halten. |
| 3 | Stromversorgung / Bestätigung | Schaltet das Thermostat ein/aus und bestätigt die Einstellungen. Wird auch zum Verlassen der Einstellungsmenüs verwendet. |
| 4 | Nach oben ▲ | Erhöht die eingestellte Temperatur oder den ausgewählten Parameterwert. |
| 5 | Unten ▼ | Verringert die eingestellte Temperatur oder den ausgewählten Parameterwert. |
| 6 | Aufwachen | Aktiviert das Display/die Hintergrundbeleuchtung, wenn sich das Thermostat im Energiespar- oder Standby-Modus befindet. |
| Name | Beschreibung |
1. Menü |
Kurzes Drücken: Schaltet den Thermostat zwischen programmiertem Betrieb und manueller/vorübergehender Temperaturregelung um. Länger als 3 Sekunden gedrückt halten: Dadurch werden die Einstellungen des Heizprogramms aufgerufen. Die Werte innerhalb der Einstellungen werden mit den Tasten 4 ▲ und 5 ▼ angepasst . |
2. Zeiteinstellung |
Kurzes Drücken: Schaltet die Anzeige zwischen Zeit- und Temperaturanzeige um. Press and hold for about 3 seconds: enters the date and time settings. Use 4 ▲ and 5 ▼ to change values and 3 to confirm. |
3. Power / Confirm |
Used as the main power and confirmation button. In setting modes, a short press means Confirm / Exit. In normal operation, the button is used to turn the thermostat on and off. It can also be used to wake the thermostat from power-saving mode. |
4. Up ▲ |
Increases the set temperature or the selected parameter value. It is also used when setting the time, heating schedule, and system parameters. |
5. Down ▼ |
Decreases the set temperature or the selected parameter value. |
6. Wake-up |
The side button is used to activate the display after the thermostat enters power-saving mode. In the manual, it is specifically identified as the Wake-up button. |
|
1. Week shows |
| 2. Time Bucket flag-Wake up | |
| 3. Time Bucket flag-Back home | |
| 4. OFF\ Temperature shows | |
| 5. Time Bucket flag-Out home | |
| 6. Time Bucket flag-Sleep | |
| 7. Communication show (blinking indicates communication error alarm) | |
| 8. Alternate button | |
| 9. Time shows, Running mode shows | |
| 10. Forever keeping mode shows | |
| 11. Alternate button | |
| 12. Alternate button | |
| 13. Output shows | |
| 14. Anti-freezing mode shows | |
| 15. Setting Time\ Temperature shows | |
| 16. Setting shows (Parameters, programming, time) | |
| 17. Low battery indicator shows | |
| 18. Meterage shows |
Brief Operating Instructions
Power On
If the thermostat is switched off, press 3 – Power.
After switching on, the display shows the current room temperature, set temperature, time, operating mode, and additional indicators. The manual provides indicators for programming, heating output, communication, anti-freeze protection, and low battery status.
Temperature Setting
Use:
4 ▲ – increase the temperature;
5 ▼ – decrease the temperature.
The thermostat temperature setting range is 5–35°C, with a setting accuracy of 0.5°C.
Manual and Programmed Mode
Short press 1 – Menu to switch between manual control and programmed operation. In programmed mode, the thermostat automatically changes the set temperature during the day. The factory program includes six periods:
|
Period |
Time |
Temperature |
|
Wake up |
06:00 |
20°C |
|
Out |
08:00 |
16°C |
|
Back home |
11:00 |
20°C |
|
Out |
14:00 |
16°C |
|
Back home |
18:00 |
20°C |
|
Sleep |
22:00 |
16°C |
Editing the Heating Schedule
Press and hold 1 – Menu for more than 3 seconds.
Then use:
4 ▲ / 5 ▼ – select and change time/temperature;
1 Menu – move to the next parameter/period;
3 Power/Confirm – save settings and exit.
The thermostat allows common or separate programming for different days of the week. The settings allow you to select 4 or 6 temperature periods per day.
Date and Time Setting
Press and hold 2 – Time for approximately 3 seconds.
Use 4 ▲ / 5 ▼ to change the date and time. Button 2 is used to move between parameters, and 3 – Power/Confirm is used to confirm and exit.
Advanced Settings
In standby mode, press and hold 1 – Menu for more than 3 seconds to open the configuration menu. Values are changed using ▲/▼. Press Menu again to move to the next item, and press Power to confirm the settings. If no button is pressed for approximately 10 seconds, the thermostat automatically exits the menu.
|
Parameter |
Function |
Range / Options |
|
CL |
Temperature display calibration |
-4…+4°C |
|
AH |
Maximum allowed temperature |
20-35°C |
|
AL |
Minimum allowed temperature |
5-20°C |
|
bL |
Display-on time |
5 / 10 / 15 sec / --- |
|
db |
Heating differential |
0.5-3°C |
|
Pro |
Weekly program |
ON / OFF |
|
Seg |
Number of periods |
4 / 6 |
|
ES |
Intelligent function |
ON / OFF |
|
PP |
Anti-freeze function |
ON / OFF |
Open Window Detection
The thermostat monitors rapid temperature drops. If the room temperature drops by approximately 1.5°C within 3 minutes, the thermostat detects this as an open window and temporarily stops heating. Normal operation is restored when any button is pressed, when the temperature rises by approximately 1.5°C, or automatically after 30 minutes.
Anti-freeze Protection
Even when the thermostat is switched off, it can still protect the room against freezing: if the temperature falls below 5°C, heating starts, and when the temperature rises above 8°C, heating stops.
Low Battery Indication
When the battery voltage drops below approximately 2.3 V, the low-battery indicator starts flashing on the display.
2. TECHNICAL CHARACTERISTICS
WiFi Frequency: 2.4 GHz
Network Protocol: IEEE802.11 b/g/n
Frequency range: 2.412- 2.484 GHz
Output: 1 channel passive linkage output (10A)
Frequency: 868 MHz (Bidirectional FSK)
Working Range: 100 m
Communicaon protocol: TCP/IP, MQTT
Temperature setting range: 5℃~35℃
Temperature setting accuracy: 0.5℃
Working Temperature: 0°C~50°C
Water resistance: IP21
Power Input: 100-240 V (AC), 50/60 Hz
Power Input (thermostat): 4 AAA batteries / USB-A (5V, 1A)
GATEWAY & RECEIVER:
WiFi Frequency: 2.4 GHz
Network Protocol: IEEE802.11 b/g/n
Frequency range: 2.412GHz- 2.484GHz
Output: 1 channel passive linkage output (10A)
Frequency: 868MHz(Bidirectional FSK)
Working Range: 100m
Communicaon protocol: TCP/IP, MQTT
Working Temperature: 0°C~50°C
Water resistance: IP21
Power Input: 100-240VAC 50/60Hz
Thermostat:
Output: 1 channel passive linkage output (8A)
Frequency: 868MHz (Bidirectional FSK)
Working Range: 100m
Working Temperature: 0°C~50°C
Water resistance: IP21
Power Input: 4 AAA batteries / USB power supply (5V, 1A)
|
3. SAFETY AND PRECAUTIONARY MEASURES
- Please read this manual carefully.
- Use the product within the temperature and humidity limits specified in the technical data sheet.
- Installieren Sie das Produkt nicht in der Nähe von Wärmequellen wie Heizkörpern usw.
- Das Gerät darf nicht herunterfallen oder mechanischen Belastungen ausgesetzt werden.
- Verwenden Sie zur Reinigung des Produkts keine chemisch aktiven oder scheuernden Reinigungsmittel. Verwenden Sie stattdessen ein feuchtes Flanelltuch.
- Die angegebene Nennleistung darf nicht überschritten werden. Andernfalls kann es zu einem Kurzschluss und einem Stromschlag kommen.
- Zerlegen Sie das Produkt nicht selbst – Diagnose und Reparatur des Geräts sollten nur in einem zertifizierten Servicecenter durchgeführt werden.
4. VERBINDUNG
Um das Nous-Gerät zu verbinden, benötigen Sie ein Smartphone mit Android- oder iOS-Betriebssystem und der installierten Nous Smart Home-App. Diese App ist kostenlos und kann im Play Store bzw. App Store heruntergeladen werden. Den QR-Code für die App finden Sie unten.
|
Scannen Sie den QR-Code
Wichtig: Stellen Sie sicher, dass das WLAN-Netzwerk am gewählten Installationsort stabil ist und eine ausreichende Signalstärke aufweist. Die Signalstärke kann die Funktion des Thermostats direkt beeinflussen. Vergewissern Sie sich daher, dass der Installationsort des Thermostats WLAN-Abdeckung und ein gutes Signal bietet.
5. INSTALLATION
PLAN A
Wenn das WLAN-Signal vom Kesselsignal abgedeckt wird, muss der Empfänger im Kesselsignalbereich installiert werden, der Sender kann
an einem beliebigen Ort platziert werden.
|
|
|
|
2. Verdrahtung: Führen Sie den Draht in die Klemme ein und |
PLAN B
Wenn die WLAN-Abdeckung nicht durch die Kesselsignalleitung gewährleistet ist,
muss der Sender im Kesselsignalbereich und der Empfänger im WLAN-Abdeckungsbereich installiert werden.
|
|
|
1. Entfernen Sie die Schutzabdeckung. |
| 2. Verdrahtungsanschluss | |
| 3. Sicherheitsabdeckung anbringen, Schutzmaßnahmen durchführen |
SCHALTPLAN (A/B - PLAN)
|
Thermostatinstallation
An der Wand
|
1. Setzen Sie die Rückwand auf die Installationsbox. |
|
2. Die Schraube in das Loch einsetzen und festschrauben. |
|
|
3. Decken Sie die Platte ab. |
|
|
4. Installation abschließen |
Auf dem Schreibtisch
|
MANUEL D'UTILISATION
1. DESCRIPTION
|
| Non. | Nom | Description |
| 1 | Menu | Permet de basculer entre le mode de fonctionnement programmé et le mode manuel/maintien temporaire. Maintenez la touche enfoncée pendant plus de 3 secondes pour accéder aux réglages du programme de chauffage. |
| 2 | Temps | Affiche et ajuste la date et l'heure. Appuyez et maintenez enfoncé pendant environ 3 secondes pour accéder au mode de réglage de l'heure. |
| 3 | Alimentation / Confirmer | Permet d'allumer/d'éteindre le thermostat et de confirmer les réglages. Permet également de quitter les menus de réglage. |
| 4 | Haut ▲ | Augmente la température de consigne ou la valeur du paramètre sélectionné. |
| 5 | Bas ▼ | Diminue la température de consigne ou la valeur du paramètre sélectionné. |
| 6 | Réveillez-vous | Active l'affichage/le rétroéclairage lorsque le thermostat est en mode économie d'énergie ou en mode veille. |
| Nom | Description |
1. Menu |
Appui court : permet de basculer le thermostat entre le fonctionnement programmé et le contrôle manuel/temporaire de la température. Maintenez la pression pendant plus de 3 secondes : vous accédez aux réglages du programme de chauffage. Les valeurs dans les réglages sont ajustées à l’aide des touches 4 ▲ et 5 ▼ . |
2. Réglage de l'heure |
Appui court : permet de basculer l’affichage entre l’heure et la température. Press and hold for about 3 seconds: enters the date and time settings. Use 4 ▲ and 5 ▼ to change values and 3 to confirm. |
3. Power / Confirm |
Used as the main power and confirmation button. In setting modes, a short press means Confirm / Exit. In normal operation, the button is used to turn the thermostat on and off. It can also be used to wake the thermostat from power-saving mode. |
4. Up ▲ |
Increases the set temperature or the selected parameter value. It is also used when setting the time, heating schedule, and system parameters. |
5. Down ▼ |
Decreases the set temperature or the selected parameter value. |
6. Wake-up |
The side button is used to activate the display after the thermostat enters power-saving mode. In the manual, it is specifically identified as the Wake-up button. |
|
1. Week shows |
| 2. Time Bucket flag-Wake up | |
| 3. Time Bucket flag-Back home | |
| 4. OFF\ Temperature shows | |
| 5. Time Bucket flag-Out home | |
| 6. Time Bucket flag-Sleep | |
| 7. Communication show (blinking indicates communication error alarm) | |
| 8. Alternate button | |
| 9. Time shows, Running mode shows | |
| 10. Forever keeping mode shows | |
| 11. Alternate button | |
| 12. Alternate button | |
| 13. Output shows | |
| 14. Anti-freezing mode shows | |
| 15. Setting Time\ Temperature shows | |
| 16. Setting shows (Parameters, programming, time) | |
| 17. Low battery indicator shows | |
| 18. Meterage shows |
Brief Operating Instructions
Power On
If the thermostat is switched off, press 3 – Power.
After switching on, the display shows the current room temperature, set temperature, time, operating mode, and additional indicators. The manual provides indicators for programming, heating output, communication, anti-freeze protection, and low battery status.
Temperature Setting
Use:
4 ▲ – increase the temperature;
5 ▼ – decrease the temperature.
The thermostat temperature setting range is 5–35°C, with a setting accuracy of 0.5°C.
Manual and Programmed Mode
Short press 1 – Menu to switch between manual control and programmed operation. In programmed mode, the thermostat automatically changes the set temperature during the day. The factory program includes six periods:
|
Period |
Time |
Temperature |
|
Wake up |
06:00 |
20°C |
|
Out |
08:00 |
16°C |
|
Back home |
11:00 |
20°C |
|
Out |
14:00 |
16°C |
|
Back home |
18:00 |
20°C |
|
Sleep |
22:00 |
16°C |
Editing the Heating Schedule
Press and hold 1 – Menu for more than 3 seconds.
Then use:
4 ▲ / 5 ▼ – select and change time/temperature;
1 Menu – move to the next parameter/period;
3 Power/Confirm – save settings and exit.
The thermostat allows common or separate programming for different days of the week. The settings allow you to select 4 or 6 temperature periods per day.
Date and Time Setting
Press and hold 2 – Time for approximately 3 seconds.
Use 4 ▲ / 5 ▼ to change the date and time. Button 2 is used to move between parameters, and 3 – Power/Confirm is used to confirm and exit.
Advanced Settings
In standby mode, press and hold 1 – Menu for more than 3 seconds to open the configuration menu. Values are changed using ▲/▼. Press Menu again to move to the next item, and press Power to confirm the settings. If no button is pressed for approximately 10 seconds, the thermostat automatically exits the menu.
|
Parameter |
Function |
Range / Options |
|
CL |
Temperature display calibration |
-4…+4°C |
|
AH |
Maximum allowed temperature |
20-35°C |
|
AL |
Minimum allowed temperature |
5-20°C |
|
bL |
Display-on time |
5 / 10 / 15 sec / --- |
|
db |
Heating differential |
0.5-3°C |
|
Pro |
Weekly program |
ON / OFF |
|
Seg |
Number of periods |
4 / 6 |
|
ES |
Intelligent function |
ON / OFF |
|
PP |
Anti-freeze function |
ON / OFF |
Open Window Detection
The thermostat monitors rapid temperature drops. If the room temperature drops by approximately 1.5°C within 3 minutes, the thermostat detects this as an open window and temporarily stops heating. Normal operation is restored when any button is pressed, when the temperature rises by approximately 1.5°C, or automatically after 30 minutes.
Anti-freeze Protection
Even when the thermostat is switched off, it can still protect the room against freezing: if the temperature falls below 5°C, heating starts, and when the temperature rises above 8°C, heating stops.
Low Battery Indication
When the battery voltage drops below approximately 2.3 V, the low-battery indicator starts flashing on the display.
2. TECHNICAL CHARACTERISTICS
WiFi Frequency: 2.4 GHz
Network Protocol: IEEE802.11 b/g/n
Frequency range: 2.412- 2.484 GHz
Output: 1 channel passive linkage output (10A)
Frequency: 868 MHz (Bidirectional FSK)
Working Range: 100 m
Communicaon protocol: TCP/IP, MQTT
Temperature setting range: 5℃~35℃
Temperature setting accuracy: 0.5℃
Working Temperature: 0°C~50°C
Water resistance: IP21
Power Input: 100-240 V (AC), 50/60 Hz
Power Input (thermostat): 4 AAA batteries / USB-A (5V, 1A)
GATEWAY & RECEIVER:
WiFi Frequency: 2.4 GHz
Network Protocol: IEEE802.11 b/g/n
Frequency range: 2.412GHz- 2.484GHz
Output: 1 channel passive linkage output (10A)
Frequency: 868MHz(Bidirectional FSK)
Working Range: 100m
Communicaon protocol: TCP/IP, MQTT
Working Temperature: 0°C~50°C
Water resistance: IP21
Power Input: 100-240VAC 50/60Hz
Thermostat:
Output: 1 channel passive linkage output (8A)
Frequency: 868MHz (Bidirectional FSK)
Working Range: 100m
Working Temperature: 0°C~50°C
Water resistance: IP21
Power Input: 4 AAA batteries / USB power supply (5V, 1A)
|
3. SAFETY AND PRECAUTIONARY MEASURES
- Please read this manual carefully.
- Use the product within the temperature and humidity limits specified in the technical data sheet.
- Ne pas installer le produit à proximité de sources de chaleur telles que des radiateurs, etc.
- Ne laissez pas l'appareil tomber ou être soumis à des contraintes mécaniques.
- N’utilisez pas de détergents chimiques ou abrasifs pour nettoyer le produit. Utilisez plutôt un chiffon de flanelle humide.
- Ne dépassez pas la puissance nominale spécifiée. Cela pourrait provoquer un court-circuit et une électrocution.
- Ne démontez pas vous-même le produit ; les diagnostics et les réparations de l’appareil doivent être effectués uniquement dans un centre de service agréé.
4. CONNEXION
Pour connecter l'appareil Nous, vous avez besoin d'un smartphone Android ou iOS sur lequel l'application Nous Smart Home est installée. Cette application mobile est gratuite et disponible au téléchargement sur le Play Store et l'App Store. Le code QR de l'application est indiqué ci-dessous :
|
Scannez le code QR
Important : assurez-vous que le réseau Wi-Fi est stable et offre un signal suffisant à l’emplacement d’installation choisi. La puissance du signal influence directement le fonctionnement du thermostat ; vérifiez donc que l’emplacement d’installation du thermostat est bien couvert par le Wi-Fi et bénéficie d’un bon signal.
5. INSTALLATION
PLAN A
Lorsque le Wi-Fi est couvert par le signal de la chaudière, le récepteur doit être installé dans la zone de signal de la chaudière, tandis que l'émetteur peut être placé
où vous le souhaitez.
|
|
|
|
2. Câblage : Insérez le fil dans la borne puis |
PLAN B
Lorsque le Wi-Fi n'est pas couvert par le câble de signal de la chaudière,
l'émetteur doit être installé dans la zone de couverture du signal de la chaudière et le récepteur dans la zone de couverture Wi-Fi.
|
|
|
1. Retirez le couvercle de sécurité |
| 2. Connexion du câblage | |
| 3. Installez le couvercle de sécurité, effectuez la protection |
SCHÉMA DE CÂBLAGE (PLAN A/B )
|
Installation du thermostat
Sur le mur
|
1. Placez le panneau arrière sur le boîtier d'installation. |
|
2. Insérez la vis dans le trou et vissez-la. |
|
|
3. Recouvrez le panneau |
|
|
4. Achèvement de l'installation |
Sur le bureau
|
INSTRUKCJA OBSŁUGI
1. OPIS
|
| NIE. | Nazwa | Opis |
| 1 | Menu | Przełącza między trybem zaprogramowanym a trybem ręcznym/tymczasowym. Naciśnij i przytrzymaj dłużej niż 3 sekundy, aby przejść do ustawień programu grzania. |
| 2 | Czas | Wyświetla i dostosowuje ustawienia daty i godziny. Naciśnij i przytrzymaj przez około 3 sekundy, aby przejść do trybu ustawiania czasu. |
| 3 | Zasilanie / Potwierdź | Włącza/wyłącza termostat i potwierdza ustawienia. Służy również do wychodzenia z menu ustawień. |
| 4 | W górę ▲ | Zwiększa ustawioną temperaturę lub wartość wybranego parametru. |
| 5 | W dół ▼ | Zmniejsza ustawioną temperaturę lub wartość wybranego parametru. |
| 6 | Budzić się | Aktywuje wyświetlacz/podświetlenie, gdy termostat znajduje się w trybie oszczędzania energii lub czuwania. |
| Nazwa | Opis |
1. Menu |
Krótkie naciśnięcie: przełącza termostat pomiędzy pracą zaprogramowaną a ręczną/tymczasową kontrolą temperatury. Naciśnięcie i przytrzymanie przez ponad 3 sekundy: wejście do ustawień programu grzania. Wartości w ustawieniach reguluje się za pomocą przycisków 4 ▲ i 5 ▼ . |
2. Ustawianie czasu |
Krótkie naciśnięcie: przełącza wyświetlanie informacji o czasie i temperaturze. Press and hold for about 3 seconds: enters the date and time settings. Use 4 ▲ and 5 ▼ to change values and 3 to confirm. |
3. Power / Confirm |
Used as the main power and confirmation button. In setting modes, a short press means Confirm / Exit. In normal operation, the button is used to turn the thermostat on and off. It can also be used to wake the thermostat from power-saving mode. |
4. Up ▲ |
Increases the set temperature or the selected parameter value. It is also used when setting the time, heating schedule, and system parameters. |
5. Down ▼ |
Decreases the set temperature or the selected parameter value. |
6. Wake-up |
The side button is used to activate the display after the thermostat enters power-saving mode. In the manual, it is specifically identified as the Wake-up button. |
|
1. Week shows |
| 2. Time Bucket flag-Wake up | |
| 3. Time Bucket flag-Back home | |
| 4. OFF\ Temperature shows | |
| 5. Time Bucket flag-Out home | |
| 6. Time Bucket flag-Sleep | |
| 7. Communication show (blinking indicates communication error alarm) | |
| 8. Alternate button | |
| 9. Time shows, Running mode shows | |
| 10. Forever keeping mode shows | |
| 11. Alternate button | |
| 12. Alternate button | |
| 13. Output shows | |
| 14. Anti-freezing mode shows | |
| 15. Setting Time\ Temperature shows | |
| 16. Setting shows (Parameters, programming, time) | |
| 17. Low battery indicator shows | |
| 18. Meterage shows |
Brief Operating Instructions
Power On
If the thermostat is switched off, press 3 – Power.
After switching on, the display shows the current room temperature, set temperature, time, operating mode, and additional indicators. The manual provides indicators for programming, heating output, communication, anti-freeze protection, and low battery status.
Temperature Setting
Use:
4 ▲ – increase the temperature;
5 ▼ – decrease the temperature.
The thermostat temperature setting range is 5–35°C, with a setting accuracy of 0.5°C.
Manual and Programmed Mode
Short press 1 – Menu to switch between manual control and programmed operation. In programmed mode, the thermostat automatically changes the set temperature during the day. The factory program includes six periods:
|
Period |
Time |
Temperature |
|
Wake up |
06:00 |
20°C |
|
Out |
08:00 |
16°C |
|
Back home |
11:00 |
20°C |
|
Out |
14:00 |
16°C |
|
Back home |
18:00 |
20°C |
|
Sleep |
22:00 |
16°C |
Editing the Heating Schedule
Press and hold 1 – Menu for more than 3 seconds.
Then use:
4 ▲ / 5 ▼ – select and change time/temperature;
1 Menu – move to the next parameter/period;
3 Power/Confirm – save settings and exit.
The thermostat allows common or separate programming for different days of the week. The settings allow you to select 4 or 6 temperature periods per day.
Date and Time Setting
Press and hold 2 – Time for approximately 3 seconds.
Use 4 ▲ / 5 ▼ to change the date and time. Button 2 is used to move between parameters, and 3 – Power/Confirm is used to confirm and exit.
Advanced Settings
In standby mode, press and hold 1 – Menu for more than 3 seconds to open the configuration menu. Values are changed using ▲/▼. Press Menu again to move to the next item, and press Power to confirm the settings. If no button is pressed for approximately 10 seconds, the thermostat automatically exits the menu.
|
Parameter |
Function |
Range / Options |
|
CL |
Temperature display calibration |
-4…+4°C |
|
AH |
Maximum allowed temperature |
20-35°C |
|
AL |
Minimum allowed temperature |
5-20°C |
|
bL |
Display-on time |
5 / 10 / 15 sec / --- |
|
db |
Heating differential |
0.5-3°C |
|
Pro |
Weekly program |
ON / OFF |
|
Seg |
Number of periods |
4 / 6 |
|
ES |
Intelligent function |
ON / OFF |
|
PP |
Anti-freeze function |
ON / OFF |
Open Window Detection
The thermostat monitors rapid temperature drops. If the room temperature drops by approximately 1.5°C within 3 minutes, the thermostat detects this as an open window and temporarily stops heating. Normal operation is restored when any button is pressed, when the temperature rises by approximately 1.5°C, or automatically after 30 minutes.
Anti-freeze Protection
Even when the thermostat is switched off, it can still protect the room against freezing: if the temperature falls below 5°C, heating starts, and when the temperature rises above 8°C, heating stops.
Low Battery Indication
When the battery voltage drops below approximately 2.3 V, the low-battery indicator starts flashing on the display.
2. TECHNICAL CHARACTERISTICS
WiFi Frequency: 2.4 GHz
Network Protocol: IEEE802.11 b/g/n
Frequency range: 2.412- 2.484 GHz
Output: 1 channel passive linkage output (10A)
Frequency: 868 MHz (Bidirectional FSK)
Working Range: 100 m
Communicaon protocol: TCP/IP, MQTT
Temperature setting range: 5℃~35℃
Temperature setting accuracy: 0.5℃
Working Temperature: 0°C~50°C
Water resistance: IP21
Power Input: 100-240 V (AC), 50/60 Hz
Power Input (thermostat): 4 AAA batteries / USB-A (5V, 1A)
GATEWAY & RECEIVER:
WiFi Frequency: 2.4 GHz
Network Protocol: IEEE802.11 b/g/n
Frequency range: 2.412GHz- 2.484GHz
Output: 1 channel passive linkage output (10A)
Frequency: 868MHz(Bidirectional FSK)
Working Range: 100m
Communicaon protocol: TCP/IP, MQTT
Working Temperature: 0°C~50°C
Water resistance: IP21
Power Input: 100-240VAC 50/60Hz
Thermostat:
Output: 1 channel passive linkage output (8A)
Frequency: 868MHz (Bidirectional FSK)
Working Range: 100m
Working Temperature: 0°C~50°C
Water resistance: IP21
Power Input: 4 AAA batteries / USB power supply (5V, 1A)
|
3. SAFETY AND PRECAUTIONARY MEASURES
- Please read this manual carefully.
- Use the product within the temperature and humidity limits specified in the technical data sheet.
- Nie należy instalować produktu w pobliżu źródeł ciepła, takich jak grzejniki itp.
- Nie dopuść do upadku urządzenia lub narażenia go na obciążenia mechaniczne.
- Do czyszczenia produktu nie należy używać detergentów o działaniu chemicznym ani ściernym. Zamiast tego należy używać wilgotnej flanelowej ściereczki.
- Nie przekraczać zalecanej mocy znamionowej. Może to spowodować zwarcie i porażenie prądem.
- Nie rozbieraj produktu na części samodzielnie – diagnostykę i naprawy urządzenia należy wykonywać wyłącznie w autoryzowanym serwisie.
4. POŁĄCZENIE
Aby podłączyć urządzenie Nous, potrzebujesz smartfona z systemem Android lub iOS z zainstalowaną aplikacją Nous Smart Home. Ta aplikacja mobilna jest darmowa i dostępna do pobrania w sklepach Play Market i App Store. Kod QR aplikacji znajduje się poniżej:
|
Zeskanuj kod QR
Ważne: Upewnij się, że sieć Wi-Fi jest stabilna i ma wystarczającą siłę sygnału w wybranym miejscu instalacji. Będzie to bezpośrednio zakłócać działanie termostatu poprzez siłę sygnału, dlatego upewnij się, że miejsce instalacji termostatu jest w zasięgu sieci Wi-Fi i ma dobry sygnał.
5. INSTALACJA
PLAN A
Gdy zasięg sygnału Wi-Fi jest w zasięgu kotła, odbiornik należy zainstalować w obszarze sygnału kotła, nadajnik zaś można umieścić
w dowolnym miejscu.
|
|
|
|
2. Podłączenie: Włóż przewód do zacisku, a następnie |
PLAN B
Jeśli sygnał Wi-Fi nie jest objęty zasięgiem przewodu sygnałowego kotła,
nadajnik należy zainstalować w obszarze sygnału kotła, a odbiornik w obszarze zasięgu Wi-Fi.
|
|
|
1. Zdejmij osłonę zabezpieczającą |
| 2. Podłączenie przewodów | |
| 3. Zamontuj osłonę zabezpieczającą i wykonaj zabezpieczenie |
SCHEMAT OKABLOWANIA (PLAN A/B )
|
Montaż termostatu
Na ścianie l
|
1. Załóż tylną płytę na skrzynkę instalacyjną |
|
2. Włóż śrubę do otworu i przykręć |
|
|
3. Zakryj panel |
|
|
4. Zakończenie instalacji |
Na biurku
|
MANUALE OPERATIVO
1. DESCRIZIONE
|
| NO. | Nome | Descrizione |
| 1 | Menu | Consente di passare dalla modalità di funzionamento programmata alla modalità manuale/di mantenimento temporaneo. Tenere premuto per più di 3 secondi per accedere alle impostazioni del programma di riscaldamento. |
| 2 | Tempo | Visualizza e regola le impostazioni di data e ora. Tieni premuto per circa 3 secondi per accedere alla modalità di impostazione dell'ora. |
| 3 | Accensione/Conferma | Accende/spegne il termostato e conferma le impostazioni. Viene utilizzato anche per uscire dai menu di impostazione. |
| 4 | Su ▲ | Aumenta la temperatura impostata o il valore del parametro selezionato. |
| 5 | Giù ▼ | Diminuisce la temperatura impostata o il valore del parametro selezionato. |
| 6 | Svegliati | Attiva il display/la retroilluminazione quando il termostato è in modalità di risparmio energetico o standby. |
| Nome | Descrizione |
1. Menù |
Pressione breve: commuta il termostato tra funzionamento programmato e controllo manuale/temporaneo della temperatura. Tenere premuto per più di 3 secondi: si accede alle impostazioni del programma di riscaldamento. I valori all'interno delle impostazioni si regolano utilizzando i pulsanti 4 ▲ e 5 ▼ . |
2. Impostazione dell'ora |
Pressione breve: commuta la visualizzazione tra ora e temperatura. Press and hold for about 3 seconds: enters the date and time settings. Use 4 ▲ and 5 ▼ to change values and 3 to confirm. |
3. Power / Confirm |
Used as the main power and confirmation button. In setting modes, a short press means Confirm / Exit. In normal operation, the button is used to turn the thermostat on and off. It can also be used to wake the thermostat from power-saving mode. |
4. Up ▲ |
Increases the set temperature or the selected parameter value. It is also used when setting the time, heating schedule, and system parameters. |
5. Down ▼ |
Decreases the set temperature or the selected parameter value. |
6. Wake-up |
The side button is used to activate the display after the thermostat enters power-saving mode. In the manual, it is specifically identified as the Wake-up button. |
|
1. Week shows |
| 2. Time Bucket flag-Wake up | |
| 3. Time Bucket flag-Back home | |
| 4. OFF\ Temperature shows | |
| 5. Time Bucket flag-Out home | |
| 6. Time Bucket flag-Sleep | |
| 7. Communication show (blinking indicates communication error alarm) | |
| 8. Alternate button | |
| 9. Time shows, Running mode shows | |
| 10. Forever keeping mode shows | |
| 11. Alternate button | |
| 12. Alternate button | |
| 13. Output shows | |
| 14. Anti-freezing mode shows | |
| 15. Setting Time\ Temperature shows | |
| 16. Setting shows (Parameters, programming, time) | |
| 17. Low battery indicator shows | |
| 18. Meterage shows |
Brief Operating Instructions
Power On
If the thermostat is switched off, press 3 – Power.
After switching on, the display shows the current room temperature, set temperature, time, operating mode, and additional indicators. The manual provides indicators for programming, heating output, communication, anti-freeze protection, and low battery status.
Temperature Setting
Use:
4 ▲ – increase the temperature;
5 ▼ – decrease the temperature.
The thermostat temperature setting range is 5–35°C, with a setting accuracy of 0.5°C.
Manual and Programmed Mode
Short press 1 – Menu to switch between manual control and programmed operation. In programmed mode, the thermostat automatically changes the set temperature during the day. The factory program includes six periods:
|
Period |
Time |
Temperature |
|
Wake up |
06:00 |
20°C |
|
Out |
08:00 |
16°C |
|
Back home |
11:00 |
20°C |
|
Out |
14:00 |
16°C |
|
Back home |
18:00 |
20°C |
|
Sleep |
22:00 |
16°C |
Editing the Heating Schedule
Press and hold 1 – Menu for more than 3 seconds.
Then use:
4 ▲ / 5 ▼ – select and change time/temperature;
1 Menu – move to the next parameter/period;
3 Power/Confirm – save settings and exit.
The thermostat allows common or separate programming for different days of the week. The settings allow you to select 4 or 6 temperature periods per day.
Date and Time Setting
Press and hold 2 – Time for approximately 3 seconds.
Use 4 ▲ / 5 ▼ to change the date and time. Button 2 is used to move between parameters, and 3 – Power/Confirm is used to confirm and exit.
Advanced Settings
In standby mode, press and hold 1 – Menu for more than 3 seconds to open the configuration menu. Values are changed using ▲/▼. Press Menu again to move to the next item, and press Power to confirm the settings. If no button is pressed for approximately 10 seconds, the thermostat automatically exits the menu.
|
Parameter |
Function |
Range / Options |
|
CL |
Temperature display calibration |
-4…+4°C |
|
AH |
Maximum allowed temperature |
20-35°C |
|
AL |
Minimum allowed temperature |
5-20°C |
|
bL |
Display-on time |
5 / 10 / 15 sec / --- |
|
db |
Heating differential |
0.5-3°C |
|
Pro |
Weekly program |
ON / OFF |
|
Seg |
Number of periods |
4 / 6 |
|
ES |
Intelligent function |
ON / OFF |
|
PP |
Anti-freeze function |
ON / OFF |
Open Window Detection
The thermostat monitors rapid temperature drops. If the room temperature drops by approximately 1.5°C within 3 minutes, the thermostat detects this as an open window and temporarily stops heating. Normal operation is restored when any button is pressed, when the temperature rises by approximately 1.5°C, or automatically after 30 minutes.
Anti-freeze Protection
Even when the thermostat is switched off, it can still protect the room against freezing: if the temperature falls below 5°C, heating starts, and when the temperature rises above 8°C, heating stops.
Low Battery Indication
When the battery voltage drops below approximately 2.3 V, the low-battery indicator starts flashing on the display.
2. TECHNICAL CHARACTERISTICS
WiFi Frequency: 2.4 GHz
Network Protocol: IEEE802.11 b/g/n
Frequency range: 2.412- 2.484 GHz
Output: 1 channel passive linkage output (10A)
Frequency: 868 MHz (Bidirectional FSK)
Working Range: 100 m
Communicaon protocol: TCP/IP, MQTT
Temperature setting range: 5℃~35℃
Temperature setting accuracy: 0.5℃
Working Temperature: 0°C~50°C
Water resistance: IP21
Power Input: 100-240 V (AC), 50/60 Hz
Power Input (thermostat): 4 AAA batteries / USB-A (5V, 1A)
GATEWAY & RECEIVER:
WiFi Frequency: 2.4 GHz
Network Protocol: IEEE802.11 b/g/n
Frequency range: 2.412GHz- 2.484GHz
Output: 1 channel passive linkage output (10A)
Frequency: 868MHz(Bidirectional FSK)
Working Range: 100m
Communicaon protocol: TCP/IP, MQTT
Working Temperature: 0°C~50°C
Water resistance: IP21
Power Input: 100-240VAC 50/60Hz
Thermostat:
Output: 1 channel passive linkage output (8A)
Frequency: 868MHz (Bidirectional FSK)
Working Range: 100m
Working Temperature: 0°C~50°C
Water resistance: IP21
Power Input: 4 AAA batteries / USB power supply (5V, 1A)
|
3. SAFETY AND PRECAUTIONARY MEASURES
- Please read this manual carefully.
- Use the product within the temperature and humidity limits specified in the technical data sheet.
- Non installare il prodotto in prossimità di fonti di calore come termosifoni, ecc.
- Non permettere che il dispositivo cada o sia sottoposto a sollecitazioni meccaniche.
- Non utilizzare detergenti chimicamente aggressivi o abrasivi per pulire il prodotto. Utilizzare invece un panno di flanella umido.
- Non superare la potenza nominale specificata. Ciò potrebbe causare un cortocircuito e una scossa elettrica.
- Non smontare il prodotto autonomamente: la diagnosi e la riparazione del dispositivo devono essere eseguite esclusivamente presso un centro di assistenza autorizzato.
4. CONNESSIONE
Per connettere il dispositivo Nous, è necessario uno smartphone con sistema operativo Android o iOS e l'applicazione Nous Smart Home installata. Questa applicazione è gratuita e disponibile per il download su Play Store e App Store. Il codice QR per l'applicazione è riportato di seguito:
|
Scansiona il codice QR
Importante: assicurarsi che la rete Wi-Fi sia stabile e abbia un segnale sufficientemente forte nel luogo di installazione scelto. Un segnale debole può interferire direttamente con il corretto funzionamento del termostato, quindi è fondamentale verificare che il luogo di installazione sia coperto dalla rete Wi-Fi e abbia un buon segnale.
5. INSTALLAZIONE
PIANO A
Quando il segnale Wi-Fi è coperto dal segnale della caldaia, il ricevitore deve essere installato nell'area coperta dal segnale della caldaia, mentre il trasmettitore può essere posizionato
dove si preferisce.
|
|
|
|
2. Cablaggio: Inserire il filo nel terminale e |
PIANO B
Quando il segnale Wi-Fi non è coperto dal cavo del segnale della caldaia,
il trasmettitore deve essere installato nell'area coperta dal segnale della caldaia, mentre il ricevitore deve essere installato nell'area coperta dal Wi-Fi.
|
|
|
1. Rimuovere il coperchio di sicurezza |
| 2. Collegamento dei cavi | |
| 3. Installare il coperchio di sicurezza, eseguire la protezione |
SCHEMA ELETTRICO (A/B - PIANTA)
|
Installazione del termostato
Sul muro
|
1. Posizionare il pannello posteriore sulla scatola di installazione |
|
2. Inserisci la vite nel foro e avvitala. |
|
|
3. Coprire il pannello |
|
|
4. Completamento dell'installazione |
Sulla scrivania
|
MANUAL DE INSTRUCCIONES
1. DESCRIPCIÓN
|
| No. | Nombre | Descripción |
| 1 | Menú | Permite alternar entre el funcionamiento programado y el modo manual/de espera temporal. Mantén pulsado durante más de 3 segundos para acceder a la configuración del programa de calefacción. |
| 2 | Tiempo | Muestra y ajusta la fecha y la hora. Mantén pulsado durante unos 3 segundos para acceder al modo de configuración de la hora. |
| 3 | Encendido / Confirmar | Enciende/apaga el termostato y confirma la configuración. También se utiliza para salir de los menús de configuración. |
| 4 | Arriba ▲ | Aumenta la temperatura establecida o el valor del parámetro seleccionado. |
| 5 | Abajo ▼ | Disminuye la temperatura establecida o el valor del parámetro seleccionado. |
| 6 | Despertar | Activa la pantalla/retroiluminación cuando el termostato está en modo de ahorro de energía o en modo de espera. |
| Nombre | Descripción |
1. Menú |
Pulsación corta: conmuta el termostato entre el funcionamiento programado y el control manual/temporal de la temperatura. Mantenga pulsado durante más de 3 segundos: accede a la configuración del programa de calefacción. Los valores dentro de la configuración se ajustan mediante 4 ▲ y 5 ▼ . |
2. Configuración de la hora |
Pulsación corta: alterna la visualización entre información de hora y temperatura. Press and hold for about 3 seconds: enters the date and time settings. Use 4 ▲ and 5 ▼ to change values and 3 to confirm. |
3. Power / Confirm |
Used as the main power and confirmation button. In setting modes, a short press means Confirm / Exit. In normal operation, the button is used to turn the thermostat on and off. It can also be used to wake the thermostat from power-saving mode. |
4. Up ▲ |
Increases the set temperature or the selected parameter value. It is also used when setting the time, heating schedule, and system parameters. |
5. Down ▼ |
Decreases the set temperature or the selected parameter value. |
6. Wake-up |
The side button is used to activate the display after the thermostat enters power-saving mode. In the manual, it is specifically identified as the Wake-up button. |
|
1. Week shows |
| 2. Time Bucket flag-Wake up | |
| 3. Time Bucket flag-Back home | |
| 4. OFF\ Temperature shows | |
| 5. Time Bucket flag-Out home | |
| 6. Time Bucket flag-Sleep | |
| 7. Communication show (blinking indicates communication error alarm) | |
| 8. Alternate button | |
| 9. Time shows, Running mode shows | |
| 10. Forever keeping mode shows | |
| 11. Alternate button | |
| 12. Alternate button | |
| 13. Output shows | |
| 14. Anti-freezing mode shows | |
| 15. Setting Time\ Temperature shows | |
| 16. Setting shows (Parameters, programming, time) | |
| 17. Low battery indicator shows | |
| 18. Meterage shows |
Brief Operating Instructions
Power On
If the thermostat is switched off, press 3 – Power.
After switching on, the display shows the current room temperature, set temperature, time, operating mode, and additional indicators. The manual provides indicators for programming, heating output, communication, anti-freeze protection, and low battery status.
Temperature Setting
Use:
4 ▲ – increase the temperature;
5 ▼ – decrease the temperature.
The thermostat temperature setting range is 5–35°C, with a setting accuracy of 0.5°C.
Manual and Programmed Mode
Short press 1 – Menu to switch between manual control and programmed operation. In programmed mode, the thermostat automatically changes the set temperature during the day. The factory program includes six periods:
|
Period |
Time |
Temperature |
|
Wake up |
06:00 |
20°C |
|
Out |
08:00 |
16°C |
|
Back home |
11:00 |
20°C |
|
Out |
14:00 |
16°C |
|
Back home |
18:00 |
20°C |
|
Sleep |
22:00 |
16°C |
Editing the Heating Schedule
Press and hold 1 – Menu for more than 3 seconds.
Then use:
4 ▲ / 5 ▼ – select and change time/temperature;
1 Menu – move to the next parameter/period;
3 Power/Confirm – save settings and exit.
The thermostat allows common or separate programming for different days of the week. The settings allow you to select 4 or 6 temperature periods per day.
Date and Time Setting
Press and hold 2 – Time for approximately 3 seconds.
Use 4 ▲ / 5 ▼ to change the date and time. Button 2 is used to move between parameters, and 3 – Power/Confirm is used to confirm and exit.
Advanced Settings
In standby mode, press and hold 1 – Menu for more than 3 seconds to open the configuration menu. Values are changed using ▲/▼. Press Menu again to move to the next item, and press Power to confirm the settings. If no button is pressed for approximately 10 seconds, the thermostat automatically exits the menu.
|
Parameter |
Function |
Range / Options |
|
CL |
Temperature display calibration |
-4…+4°C |
|
AH |
Maximum allowed temperature |
20-35°C |
|
AL |
Minimum allowed temperature |
5-20°C |
|
bL |
Display-on time |
5 / 10 / 15 sec / --- |
|
db |
Heating differential |
0.5-3°C |
|
Pro |
Weekly program |
ON / OFF |
|
Seg |
Number of periods |
4 / 6 |
|
ES |
Intelligent function |
ON / OFF |
|
PP |
Anti-freeze function |
ON / OFF |
Open Window Detection
The thermostat monitors rapid temperature drops. If the room temperature drops by approximately 1.5°C within 3 minutes, the thermostat detects this as an open window and temporarily stops heating. Normal operation is restored when any button is pressed, when the temperature rises by approximately 1.5°C, or automatically after 30 minutes.
Anti-freeze Protection
Even when the thermostat is switched off, it can still protect the room against freezing: if the temperature falls below 5°C, heating starts, and when the temperature rises above 8°C, heating stops.
Low Battery Indication
When the battery voltage drops below approximately 2.3 V, the low-battery indicator starts flashing on the display.
2. TECHNICAL CHARACTERISTICS
WiFi Frequency: 2.4 GHz
Network Protocol: IEEE802.11 b/g/n
Frequency range: 2.412- 2.484 GHz
Output: 1 channel passive linkage output (10A)
Frequency: 868 MHz (Bidirectional FSK)
Working Range: 100 m
Communicaon protocol: TCP/IP, MQTT
Temperature setting range: 5℃~35℃
Temperature setting accuracy: 0.5℃
Working Temperature: 0°C~50°C
Water resistance: IP21
Power Input: 100-240 V (AC), 50/60 Hz
Power Input (thermostat): 4 AAA batteries / USB-A (5V, 1A)
GATEWAY & RECEIVER:
WiFi Frequency: 2.4 GHz
Network Protocol: IEEE802.11 b/g/n
Frequency range: 2.412GHz- 2.484GHz
Output: 1 channel passive linkage output (10A)
Frequency: 868MHz(Bidirectional FSK)
Working Range: 100m
Communicaon protocol: TCP/IP, MQTT
Working Temperature: 0°C~50°C
Water resistance: IP21
Power Input: 100-240VAC 50/60Hz
Thermostat:
Output: 1 channel passive linkage output (8A)
Frequency: 868MHz (Bidirectional FSK)
Working Range: 100m
Working Temperature: 0°C~50°C
Water resistance: IP21
Power Input: 4 AAA batteries / USB power supply (5V, 1A)
|
3. SAFETY AND PRECAUTIONARY MEASURES
- Please read this manual carefully.
- Use the product within the temperature and humidity limits specified in the technical data sheet.
- No instale el producto cerca de fuentes de calor como radiadores, etc.
- No permita que el dispositivo se caiga ni que sea sometido a esfuerzos mecánicos.
- No utilice detergentes químicamente activos ni abrasivos para limpiar el producto. En su lugar, utilice un paño de franela húmedo.
- No exceda la potencia nominal especificada. Esto podría provocar un cortocircuito y una descarga eléctrica.
- No desmonte usted mismo el producto; el diagnóstico y las reparaciones del dispositivo solo deben realizarse en un centro de servicio certificado.
4. CONEXIÓN
Para conectar el dispositivo Nous, necesita un smartphone con sistema operativo Android o iOS y la aplicación Nous Smart Home instalada. Esta aplicación es gratuita y se puede descargar desde Google Play y la App Store. El código QR de la aplicación se muestra a continuación:
|
Escanee el código QR
Importante: Asegúrese de que la red Wi-Fi sea estable y tenga una señal suficiente en la ubicación de instalación elegida. Una señal débil interferirá directamente con el funcionamiento del termostato, por lo que le rogamos que confirme que la ubicación de instalación del termostato esté cubierta por Wi-Fi y tenga buena señal.
5. INSTALACIÓN
PLAN A
Cuando la señal de la caldera interfiere con la señal Wi-Fi, el receptor debe instalarse en el área de cobertura de la señal de la caldera; el transmisor puede colocarse
donde se desee.
|
|
|
|
2. Cableado: Coloque el cable en el terminal y luego |
PLAN B
Cuando la señal WIFI no está cubierta por el cable de señal de la caldera,
el transmisor debe instalarse en el área de señal de la caldera y el receptor en el área de cobertura WIFI.
|
|
|
1. Retire la tapa de seguridad. |
| 2. Conexión de cableado | |
| 3. Instale la cubierta de seguridad, realice la protección |
DIAGRAMA DE CABLEADO (A/B - PLANO)
|
Instalación del termostato
En la pared
|
1. Coloque el panel trasero sobre la caja de instalación. |
|
2. Introduce el tornillo en el agujero y apriétalo. |
|
|
3. Cubra el panel. |
|
|
4. Finalización de la instalación |
Sobre el escritorio
|
NÁVOD NA POUŽITIE
1. POPIS
|
| Nie. | Meno | Popis |
| 1 | Menu | Prepína medzi programovanou prevádzkou a manuálnym/dočasným režimom pozastavenia. Stlačte a podržte dlhšie ako 3 sekundy pre vstup do nastavení vykurovacieho programu. |
| 2 | Čas | Zobrazuje a upravuje nastavenia dátumu a času. Stlačením a podržaním približne 3 sekundy vstúpite do režimu nastavenia času. |
| 3 | Napájanie / Potvrdiť | Zapína/vypína termostat a potvrdzuje nastavenia. Používa sa aj na ukončenie menu nastavení. |
| 4 | Hore ▲ | Zvyšuje nastavenú teplotu alebo hodnotu zvoleného parametra. |
| 5 | Dole ▼ | Znižuje nastavenú teplotu alebo hodnotu zvoleného parametra. |
| 6 | Budenie | Aktivuje displej/podsvietenie, keď je termostat v režime úspory energie alebo v pohotovostnom režime. |
| Meno | Popis |
1. Menu |
Krátke stlačenie: prepína termostat medzi programovanou prevádzkou a manuálnou/dočasnou reguláciou teploty. Stlačenie a podržanie dlhšie ako 3 sekundy: vstup do nastavení vykurovacieho programu. Hodnoty v rámci nastavení sa upravujú pomocou tlačidiel 4 ▲ a 5 ▼ . |
2. Nastavenie času |
Krátke stlačenie: prepínanie medzi zobrazením času/teploty. Press and hold for about 3 seconds: enters the date and time settings. Use 4 ▲ and 5 ▼ to change values and 3 to confirm. |
3. Power / Confirm |
Used as the main power and confirmation button. In setting modes, a short press means Confirm / Exit. In normal operation, the button is used to turn the thermostat on and off. It can also be used to wake the thermostat from power-saving mode. |
4. Up ▲ |
Increases the set temperature or the selected parameter value. It is also used when setting the time, heating schedule, and system parameters. |
5. Down ▼ |
Decreases the set temperature or the selected parameter value. |
6. Wake-up |
The side button is used to activate the display after the thermostat enters power-saving mode. In the manual, it is specifically identified as the Wake-up button. |
|
1. Week shows |
| 2. Time Bucket flag-Wake up | |
| 3. Time Bucket flag-Back home | |
| 4. OFF\ Temperature shows | |
| 5. Time Bucket flag-Out home | |
| 6. Time Bucket flag-Sleep | |
| 7. Communication show (blinking indicates communication error alarm) | |
| 8. Alternate button | |
| 9. Time shows, Running mode shows | |
| 10. Forever keeping mode shows | |
| 11. Alternate button | |
| 12. Alternate button | |
| 13. Output shows | |
| 14. Anti-freezing mode shows | |
| 15. Setting Time\ Temperature shows | |
| 16. Setting shows (Parameters, programming, time) | |
| 17. Low battery indicator shows | |
| 18. Meterage shows |
Brief Operating Instructions
Power On
If the thermostat is switched off, press 3 – Power.
After switching on, the display shows the current room temperature, set temperature, time, operating mode, and additional indicators. The manual provides indicators for programming, heating output, communication, anti-freeze protection, and low battery status.
Temperature Setting
Use:
4 ▲ – increase the temperature;
5 ▼ – decrease the temperature.
The thermostat temperature setting range is 5–35°C, with a setting accuracy of 0.5°C.
Manual and Programmed Mode
Short press 1 – Menu to switch between manual control and programmed operation. In programmed mode, the thermostat automatically changes the set temperature during the day. The factory program includes six periods:
|
Period |
Time |
Temperature |
|
Wake up |
06:00 |
20°C |
|
Out |
08:00 |
16°C |
|
Back home |
11:00 |
20°C |
|
Out |
14:00 |
16°C |
|
Back home |
18:00 |
20°C |
|
Sleep |
22:00 |
16°C |
Editing the Heating Schedule
Press and hold 1 – Menu for more than 3 seconds.
Then use:
4 ▲ / 5 ▼ – select and change time/temperature;
1 Menu – move to the next parameter/period;
3 Power/Confirm – save settings and exit.
The thermostat allows common or separate programming for different days of the week. The settings allow you to select 4 or 6 temperature periods per day.
Date and Time Setting
Press and hold 2 – Time for approximately 3 seconds.
Use 4 ▲ / 5 ▼ to change the date and time. Button 2 is used to move between parameters, and 3 – Power/Confirm is used to confirm and exit.
Advanced Settings
In standby mode, press and hold 1 – Menu for more than 3 seconds to open the configuration menu. Values are changed using ▲/▼. Press Menu again to move to the next item, and press Power to confirm the settings. If no button is pressed for approximately 10 seconds, the thermostat automatically exits the menu.
|
Parameter |
Function |
Range / Options |
|
CL |
Temperature display calibration |
-4…+4°C |
|
AH |
Maximum allowed temperature |
20-35°C |
|
AL |
Minimum allowed temperature |
5-20°C |
|
bL |
Display-on time |
5 / 10 / 15 sec / --- |
|
db |
Heating differential |
0.5-3°C |
|
Pro |
Weekly program |
ON / OFF |
|
Seg |
Number of periods |
4 / 6 |
|
ES |
Intelligent function |
ON / OFF |
|
PP |
Anti-freeze function |
ON / OFF |
Open Window Detection
The thermostat monitors rapid temperature drops. If the room temperature drops by approximately 1.5°C within 3 minutes, the thermostat detects this as an open window and temporarily stops heating. Normal operation is restored when any button is pressed, when the temperature rises by approximately 1.5°C, or automatically after 30 minutes.
Anti-freeze Protection
Even when the thermostat is switched off, it can still protect the room against freezing: if the temperature falls below 5°C, heating starts, and when the temperature rises above 8°C, heating stops.
Low Battery Indication
When the battery voltage drops below approximately 2.3 V, the low-battery indicator starts flashing on the display.
2. TECHNICAL CHARACTERISTICS
WiFi Frequency: 2.4 GHz
Network Protocol: IEEE802.11 b/g/n
Frequency range: 2.412- 2.484 GHz
Output: 1 channel passive linkage output (10A)
Frequency: 868 MHz (Bidirectional FSK)
Working Range: 100 m
Communicaon protocol: TCP/IP, MQTT
Temperature setting range: 5℃~35℃
Temperature setting accuracy: 0.5℃
Working Temperature: 0°C~50°C
Water resistance: IP21
Power Input: 100-240 V (AC), 50/60 Hz
Power Input (thermostat): 4 AAA batteries / USB-A (5V, 1A)
GATEWAY & RECEIVER:
WiFi Frequency: 2.4 GHz
Network Protocol: IEEE802.11 b/g/n
Frequency range: 2.412GHz- 2.484GHz
Output: 1 channel passive linkage output (10A)
Frequency: 868MHz(Bidirectional FSK)
Working Range: 100m
Communicaon protocol: TCP/IP, MQTT
Working Temperature: 0°C~50°C
Water resistance: IP21
Power Input: 100-240VAC 50/60Hz
Thermostat:
Output: 1 channel passive linkage output (8A)
Frequency: 868MHz (Bidirectional FSK)
Working Range: 100m
Working Temperature: 0°C~50°C
Water resistance: IP21
Power Input: 4 AAA batteries / USB power supply (5V, 1A)
|
3. SAFETY AND PRECAUTIONARY MEASURES
- Please read this manual carefully.
- Use the product within the temperature and humidity limits specified in the technical data sheet.
- Neinštalujte výrobok v blízkosti zdrojov tepla, ako sú radiátory atď.
- Nedovoľte, aby zariadenie spadlo alebo bolo vystavené mechanickému namáhaniu.
- Na čistenie výrobku nepoužívajte chemicky aktívne ani abrazívne čistiace prostriedky. Namiesto toho použite vlhkú flanelovú handričku.
- Neprekračujte uvedený menovitý výkon. Môže to spôsobiť skrat a úraz elektrickým prúdom.
- Nerozoberajte výrobok sami - diagnostiku a opravy zariadenia by malo vykonávať iba certifikované servisné stredisko.
4. PRIPOJENIE
Na pripojenie zariadenia Nous potrebujete smartfón s mobilným operačným systémom Android alebo iOS s nainštalovanou aplikáciou Nous Smart Home. Táto mobilná aplikácia je bezplatná a dostupná na stiahnutie z Play Marketu a App Store. QR kód aplikácie je uvedený nižšie:
|
Naskenujte QR kód
Dôležité: Uistite sa, že sieť Wi-Fi je stabilná a má dostatočnú úroveň signálu na zvolenom mieste inštalácie. Sila signálu bude priamo ovplyvňovať prevádzku termostatu, preto sa uistite, že miesto inštalácie termostatu je pokryté sieťou Wi-Fi a má dobrý signál.
5. INŠTALÁCIA
PLÁN A
Ak je Wi-Fi sieť pokrytá signálom kotla, prijímač je potrebné nainštalovať v oblasti signálu kotla a vysielač je možné umiestniť
kamkoľvek chcete.
|
|
|
|
2. Zapojenie: Vložte kábel do svorky a potom |
PLÁN B
Ak Wi-Fi nie je pokrytý signálom kotla,
vysielač musí byť nainštalovaný v oblasti signálu kotla a prijímač musí byť nainštalovaný v oblasti pokrytia Wi-Fi.
|
|
|
1. Odstráňte bezpečnostný kryt |
| 2. Pripojenie káblov | |
| 3. Nainštalujte bezpečnostný kryt a vykonajte ochranu |
SCHÉMA ZAPOJENIA (A/B - PLÁN)
|
Inštalácia termostatu
Na stene
|
1. Nasaďte zadnú dosku na inštalačnú krabicu |
|
2. Vložte skrutku do otvoru a zaskrutkujte ju |
|
|
3. Zakryte panel |
|
|
4. Dokončenie inštalácie |
Na stole
|
PROVOZNÍ NÁVOD
1. POPIS
|
| Žádný. | Jméno | Popis |
| 1 | Menu | Přepíná mezi programovaným provozem a manuálním/dočasným režimem pozastavení. Stiskněte a podržte déle než 3 sekundy pro vstup do nastavení topného programu. |
| 2 | Čas | Zobrazuje a upravuje nastavení data a času. Stisknutím a podržením po dobu přibližně 3 sekund přejdete do režimu nastavení času. |
| 3 | Napájení / Potvrzení | Zapíná/vypíná termostat a potvrzuje nastavení. Používá se také k ukončení nabídek nastavení. |
| 4 | Nahoru ▲ | Zvyšuje nastavenou teplotu nebo hodnotu vybraného parametru. |
| 5 | Dolů ▼ | Snižuje nastavenou teplotu nebo hodnotu vybraného parametru. |
| 6 | Probuzení | Aktivuje displej/podsvícení, když je termostat v úsporném režimu nebo v pohotovostním režimu. |
| Jméno | Popis |
1. Nabídka |
Krátké stisknutí: přepíná termostat mezi programovaným provozem a manuální/dočasnou regulací teploty. Stisknutí a podržení po dobu delší než 3 sekundy: vstup do nastavení topného programu. Hodnoty v rámci nastavení se upravují pomocí tlačítek 4 ▲ a 5 ▼ . |
2. Nastavení času |
Krátké stisknutí: přepíná zobrazení mezi údaji o čase/teplotě. Press and hold for about 3 seconds: enters the date and time settings. Use 4 ▲ and 5 ▼ to change values and 3 to confirm. |
3. Power / Confirm |
Used as the main power and confirmation button. In setting modes, a short press means Confirm / Exit. In normal operation, the button is used to turn the thermostat on and off. It can also be used to wake the thermostat from power-saving mode. |
4. Up ▲ |
Increases the set temperature or the selected parameter value. It is also used when setting the time, heating schedule, and system parameters. |
5. Down ▼ |
Decreases the set temperature or the selected parameter value. |
6. Wake-up |
The side button is used to activate the display after the thermostat enters power-saving mode. In the manual, it is specifically identified as the Wake-up button. |
|
1. Week shows |
| 2. Time Bucket flag-Wake up | |
| 3. Time Bucket flag-Back home | |
| 4. OFF\ Temperature shows | |
| 5. Time Bucket flag-Out home | |
| 6. Time Bucket flag-Sleep | |
| 7. Communication show (blinking indicates communication error alarm) | |
| 8. Alternate button | |
| 9. Time shows, Running mode shows | |
| 10. Forever keeping mode shows | |
| 11. Alternate button | |
| 12. Alternate button | |
| 13. Output shows | |
| 14. Anti-freezing mode shows | |
| 15. Setting Time\ Temperature shows | |
| 16. Setting shows (Parameters, programming, time) | |
| 17. Low battery indicator shows | |
| 18. Meterage shows |
Brief Operating Instructions
Power On
If the thermostat is switched off, press 3 – Power.
After switching on, the display shows the current room temperature, set temperature, time, operating mode, and additional indicators. The manual provides indicators for programming, heating output, communication, anti-freeze protection, and low battery status.
Temperature Setting
Use:
4 ▲ – increase the temperature;
5 ▼ – decrease the temperature.
The thermostat temperature setting range is 5–35°C, with a setting accuracy of 0.5°C.
Manual and Programmed Mode
Short press 1 – Menu to switch between manual control and programmed operation. In programmed mode, the thermostat automatically changes the set temperature during the day. The factory program includes six periods:
|
Period |
Time |
Temperature |
|
Wake up |
06:00 |
20°C |
|
Out |
08:00 |
16°C |
|
Back home |
11:00 |
20°C |
|
Out |
14:00 |
16°C |
|
Back home |
18:00 |
20°C |
|
Sleep |
22:00 |
16°C |
Editing the Heating Schedule
Press and hold 1 – Menu for more than 3 seconds.
Then use:
4 ▲ / 5 ▼ – select and change time/temperature;
1 Menu – move to the next parameter/period;
3 Power/Confirm – save settings and exit.
The thermostat allows common or separate programming for different days of the week. The settings allow you to select 4 or 6 temperature periods per day.
Date and Time Setting
Press and hold 2 – Time for approximately 3 seconds.
Use 4 ▲ / 5 ▼ to change the date and time. Button 2 is used to move between parameters, and 3 – Power/Confirm is used to confirm and exit.
Advanced Settings
In standby mode, press and hold 1 – Menu for more than 3 seconds to open the configuration menu. Values are changed using ▲/▼. Press Menu again to move to the next item, and press Power to confirm the settings. If no button is pressed for approximately 10 seconds, the thermostat automatically exits the menu.
|
Parameter |
Function |
Range / Options |
|
CL |
Temperature display calibration |
-4…+4°C |
|
AH |
Maximum allowed temperature |
20-35°C |
|
AL |
Minimum allowed temperature |
5-20°C |
|
bL |
Display-on time |
5 / 10 / 15 sec / --- |
|
db |
Heating differential |
0.5-3°C |
|
Pro |
Weekly program |
ON / OFF |
|
Seg |
Number of periods |
4 / 6 |
|
ES |
Intelligent function |
ON / OFF |
|
PP |
Anti-freeze function |
ON / OFF |
Open Window Detection
The thermostat monitors rapid temperature drops. If the room temperature drops by approximately 1.5°C within 3 minutes, the thermostat detects this as an open window and temporarily stops heating. Normal operation is restored when any button is pressed, when the temperature rises by approximately 1.5°C, or automatically after 30 minutes.
Anti-freeze Protection
Even when the thermostat is switched off, it can still protect the room against freezing: if the temperature falls below 5°C, heating starts, and when the temperature rises above 8°C, heating stops.
Low Battery Indication
When the battery voltage drops below approximately 2.3 V, the low-battery indicator starts flashing on the display.
2. TECHNICAL CHARACTERISTICS
WiFi Frequency: 2.4 GHz
Network Protocol: IEEE802.11 b/g/n
Frequency range: 2.412- 2.484 GHz
Output: 1 channel passive linkage output (10A)
Frequency: 868 MHz (Bidirectional FSK)
Working Range: 100 m
Communicaon protocol: TCP/IP, MQTT
Temperature setting range: 5℃~35℃
Temperature setting accuracy: 0.5℃
Working Temperature: 0°C~50°C
Water resistance: IP21
Power Input: 100-240 V (AC), 50/60 Hz
Power Input (thermostat): 4 AAA batteries / USB-A (5V, 1A)
GATEWAY & RECEIVER:
WiFi Frequency: 2.4 GHz
Network Protocol: IEEE802.11 b/g/n
Frequency range: 2.412GHz- 2.484GHz
Output: 1 channel passive linkage output (10A)
Frequency: 868MHz(Bidirectional FSK)
Working Range: 100m
Communicaon protocol: TCP/IP, MQTT
Working Temperature: 0°C~50°C
Water resistance: IP21
Power Input: 100-240VAC 50/60Hz
Thermostat:
Output: 1 channel passive linkage output (8A)
Frequency: 868MHz (Bidirectional FSK)
Working Range: 100m
Working Temperature: 0°C~50°C
Water resistance: IP21
Power Input: 4 AAA batteries / USB power supply (5V, 1A)
|
3. SAFETY AND PRECAUTIONARY MEASURES
- Please read this manual carefully.
- Use the product within the temperature and humidity limits specified in the technical data sheet.
- Neinstalujte výrobek v blízkosti zdrojů tepla, jako jsou radiátory atd.
- Nedovolte, aby zařízení spadlo nebo bylo vystaveno mechanickému namáhání.
- K čištění výrobku nepoužívejte chemicky aktivní ani abrazivní čisticí prostředky. Použijte místo toho vlhký flanelový hadřík.
- Nepřekračujte specifikovaný jmenovitý výkon. Může dojít ke zkratu a úrazu elektrickým proudem.
- Nerozebírejte výrobek sami - diagnostiku a opravy zařízení by měly provádět pouze certifikované servisní středisko.
4. PŘIPOJENÍ
Pro připojení zařízení Nous potřebujete chytrý telefon s operačním systémem Android nebo iOS s nainstalovanou aplikací Nous Smart Home. Tato mobilní aplikace je zdarma a je k dispozici ke stažení z Play Marketu a App Storu. QR kód aplikace je uveden níže:
|
Naskenujte QR kód
Důležité: Ujistěte se, že je síť Wi-Fi stabilní a má dostatečný signál ve zvoleném místě instalace. Síla signálu bude přímo ovlivňovat provoz termostatu, proto se prosím ujistěte, že je místo instalace termostatu pokryto sítí Wi-Fi a má dobrý signál.
5. INSTALACE
PLÁN A
Pokud je Wi-Fi pokryta signálem kotle, je nutné přijímač nainstalovat v oblasti signálu kotle, vysílač lze umístit
kamkoli chcete.
|
|
|
|
2. Zapojení: Vložte vodič do svorky a poté |
PLÁN B
Pokud Wi-Fi není pokryta signálem kotle,
musí být vysílač instalován v oblasti signálu kotle a přijímač v oblasti pokrytí Wi-Fi.
|
|
|
1. Sejměte bezpečnostní kryt |
| 2. Zapojení kabeláže | |
| 3. Nainstalujte bezpečnostní kryt a proveďte ochranu |
SCHÉMA ZAPOJENÍ (A/B - PLÁN)
|
Instalace termostatu
Na zdi
|
1. Nasaďte zadní desku na instalační krabici |
|
2. Vložte šroub do otvoru a zašroubujte jej |
|
|
3. Zakryjte panel |
|
|
4. Dokončení instalace |
Na stole
|